Business Owner Registration
Start your journey by registering as a Business Owner on PayBitoPro. The registration process is simple and requires no documents for the initial sign-up.

Registration Steps
Visit PayBitoPro Website
Go to Paybito.com and click on the Business Owner Login tab at the top-right corner of the page.
Start Free Trial
Click on "Start Your Free Trial Now" to open the sign-up page.
Enter Personal Details
Enter your first name and last name, then click the arrow button to proceed.
Select Business Type
Choose Company or Individual, then enter your company or exchange name.
Add Contact Information
Choose your country code, enter your phone number, and then your email ID.

Frequently Asked Questions
No documents are required during the initial registration. However, KYC verification and business details will be needed later to activate your account.
Once you complete the sign-up process, your admin access credentials will be sent automatically to your registered email address.
Yes, during the sign-up process, you can choose either Company or Individual based on your business setup.
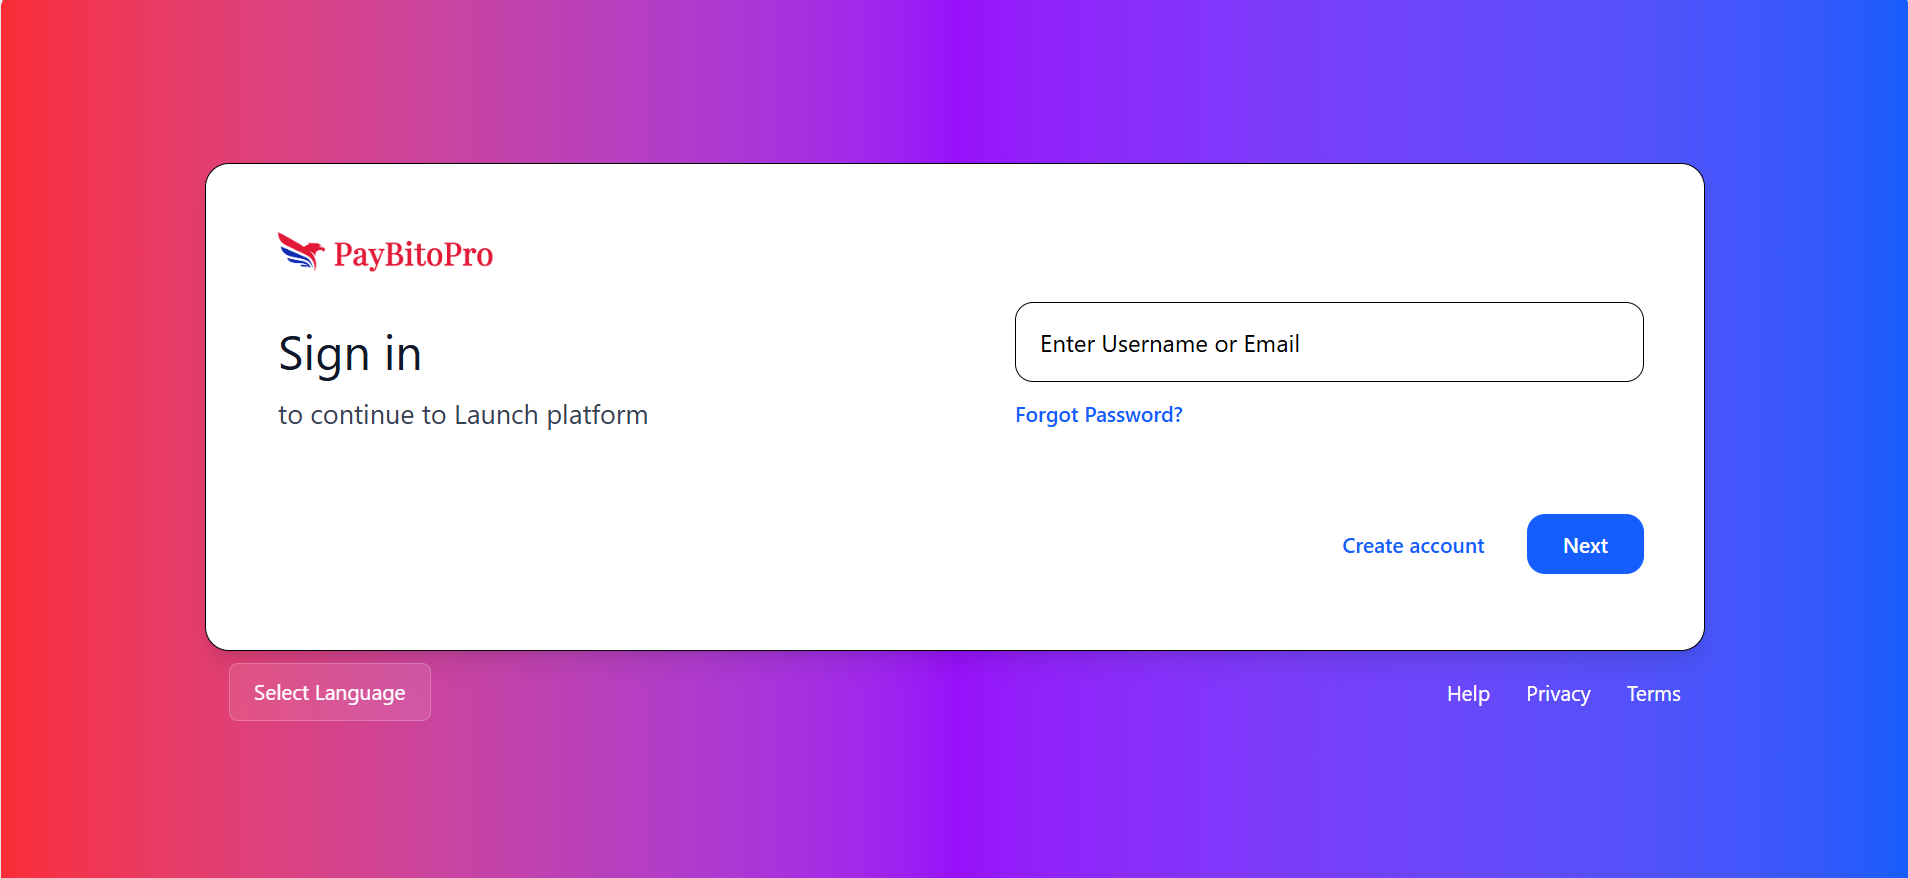
Business Owner Login
Business Owners will receive an Admin link and login credentials via their registered email address. Use these credentials to access your admin panel.
Login Process
Receive Credentials
Your admin login link and credentials will be sent to your registered email address after completing registration.
Enter Username & Password
Click on the link and enter your username and password on the login page.
OTP Verification
You will receive an OTP in your email. Enter the OTP to complete login and access the admin panel.
Frequently Asked Questions
Your admin login link and credentials will be sent to your registered email address after completing the registration process.
Check your email inbox and spam folder for the OTP. If you still don’t receive it, click on “Resend OTP” or contact support for assistance.
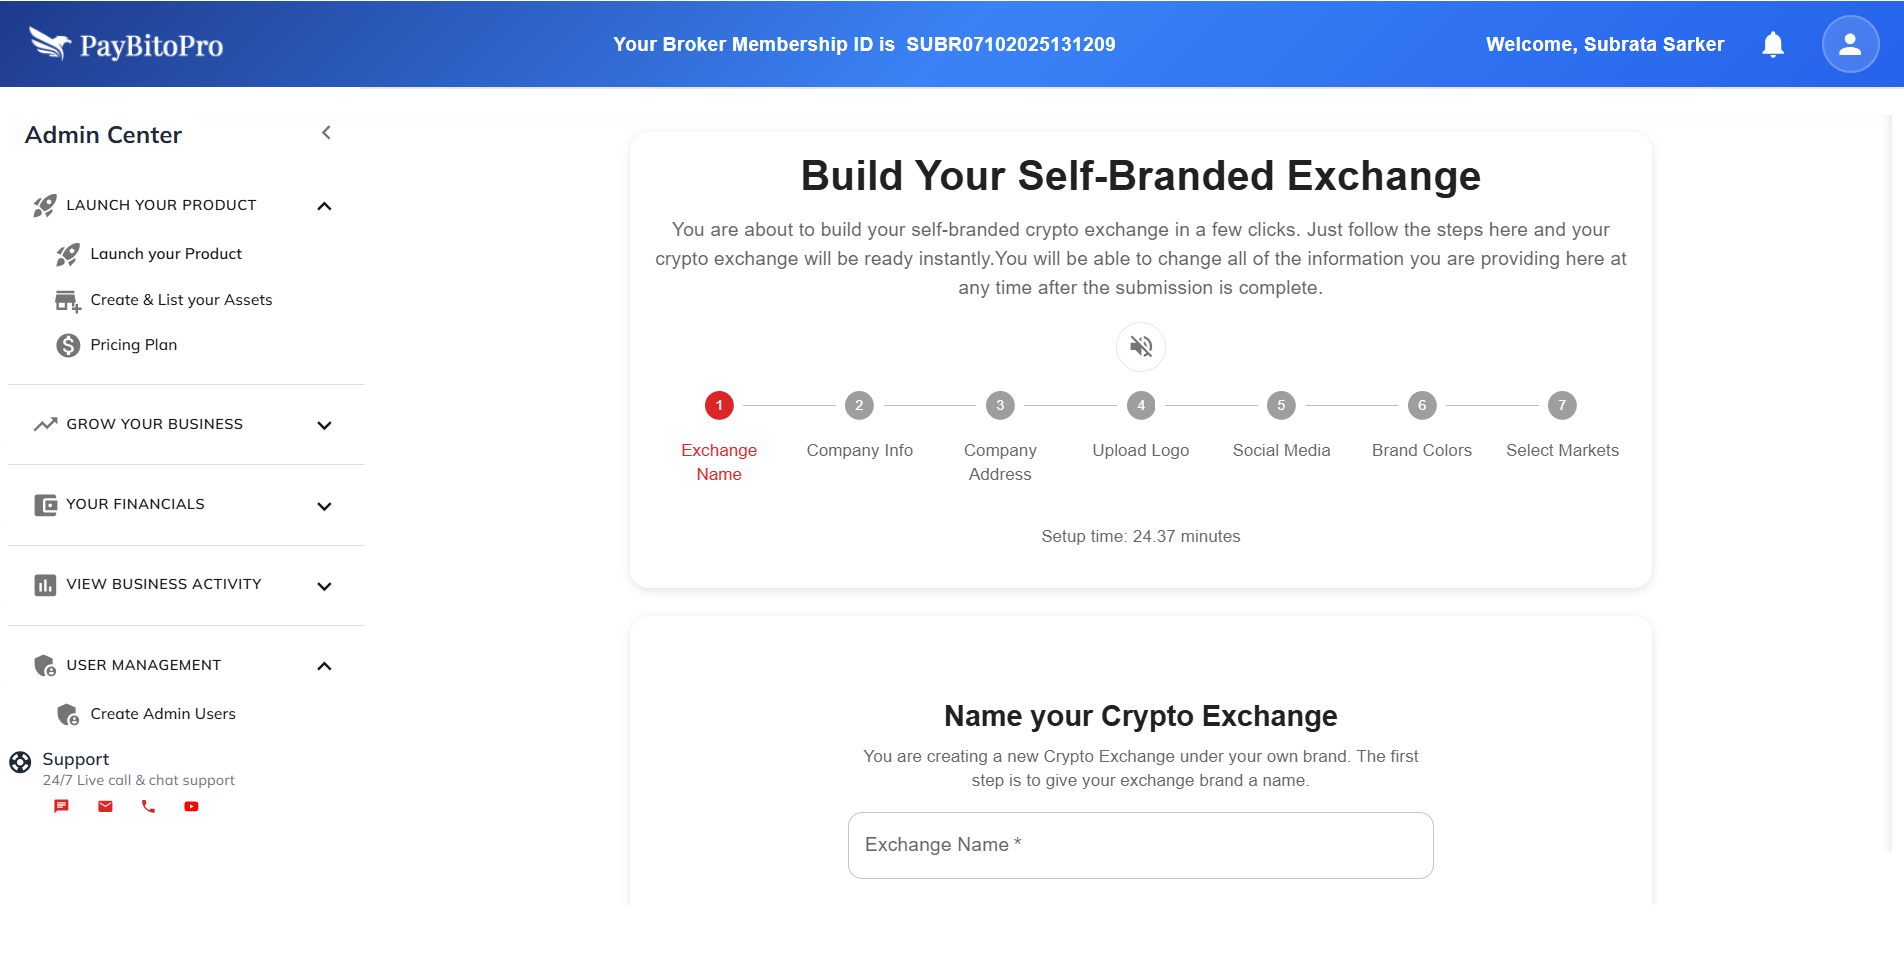
Launch Your Product
Build your self-branded crypto exchange in just a few steps. Follow this guide to name your exchange, add branding, and select your markets.
Setup Steps
Name Your Crypto Exchange
Provide a unique and recognizable name for your exchange that reflects your brand identity.
Enter Your Company Name
Provide your company's legal name. If you haven't formed a company yet, you can skip this step.
Enter Your Company Address
Provide the registered address of your company for compliance and transparency.
Upload Your Exchange Logo
Upload logo in .jpg or .png format (max 3MB). Use the online logo creator if you don't have one.
Add Social Media Links
Connect your Facebook, Instagram, X (Twitter), Telegram, and LinkedIn pages.
Choose Brand Colors
Customize the look and feel by selecting background colors for your login and registration pages.
Choose Your Markets
Select at least two markets from the available options to shape your platform's services.
Available Market Options
Selection Requirement:
Selected Markets: 0 (Please select at least two markets to continue.)
Choose your preferred markets to shape the services and opportunities your traders will experience on your platform. Complete the setup.
You’ve successfully created your self-branded crypto exchange platform. Your setup was completed in 5 minutes — faster than 98% of users!
You can update or modify any of the information you entered at any time, and your traders will instantly see the changes reflected on your platform.
You can use the web application, download your self-branded mobile apps, or install the desktop application.
Next Steps After Setup
Build Your Website
Use the integrated website builder with pre-designed templates to create a stunning website — no coding required.
Host on Your Domain
Take your brand live by hosting your exchange on your own domain with flexible subscription plans.
Frequently Asked Questions
No, you can start building your exchange even if you don't have a registered company yet. Skip the company steps and update them later.
Your logo should be in .jpg or .png format and must not exceed 3 MB in size. If you don’t have a logo, you can create one using the integrated logo creator tool.
Yes, you can fully customize your platform by selecting your brand colors, ensuring the exchange interface matches your visual identity.
You can choose from multiple market options, including Spot, Convert, Futures, Options, P2P, NFT Marketplace, ICO Launchpad, and more. At least two markets must be selected to proceed.
Yes, all information—such as company details, logo, colors, and market selections—can be updated anytime, and changes will reflect instantly.
Create & List Your Assets
This page allows you to create new assets and list them on your exchange, as well as make them available for listing by other brokers within the ecosystem.
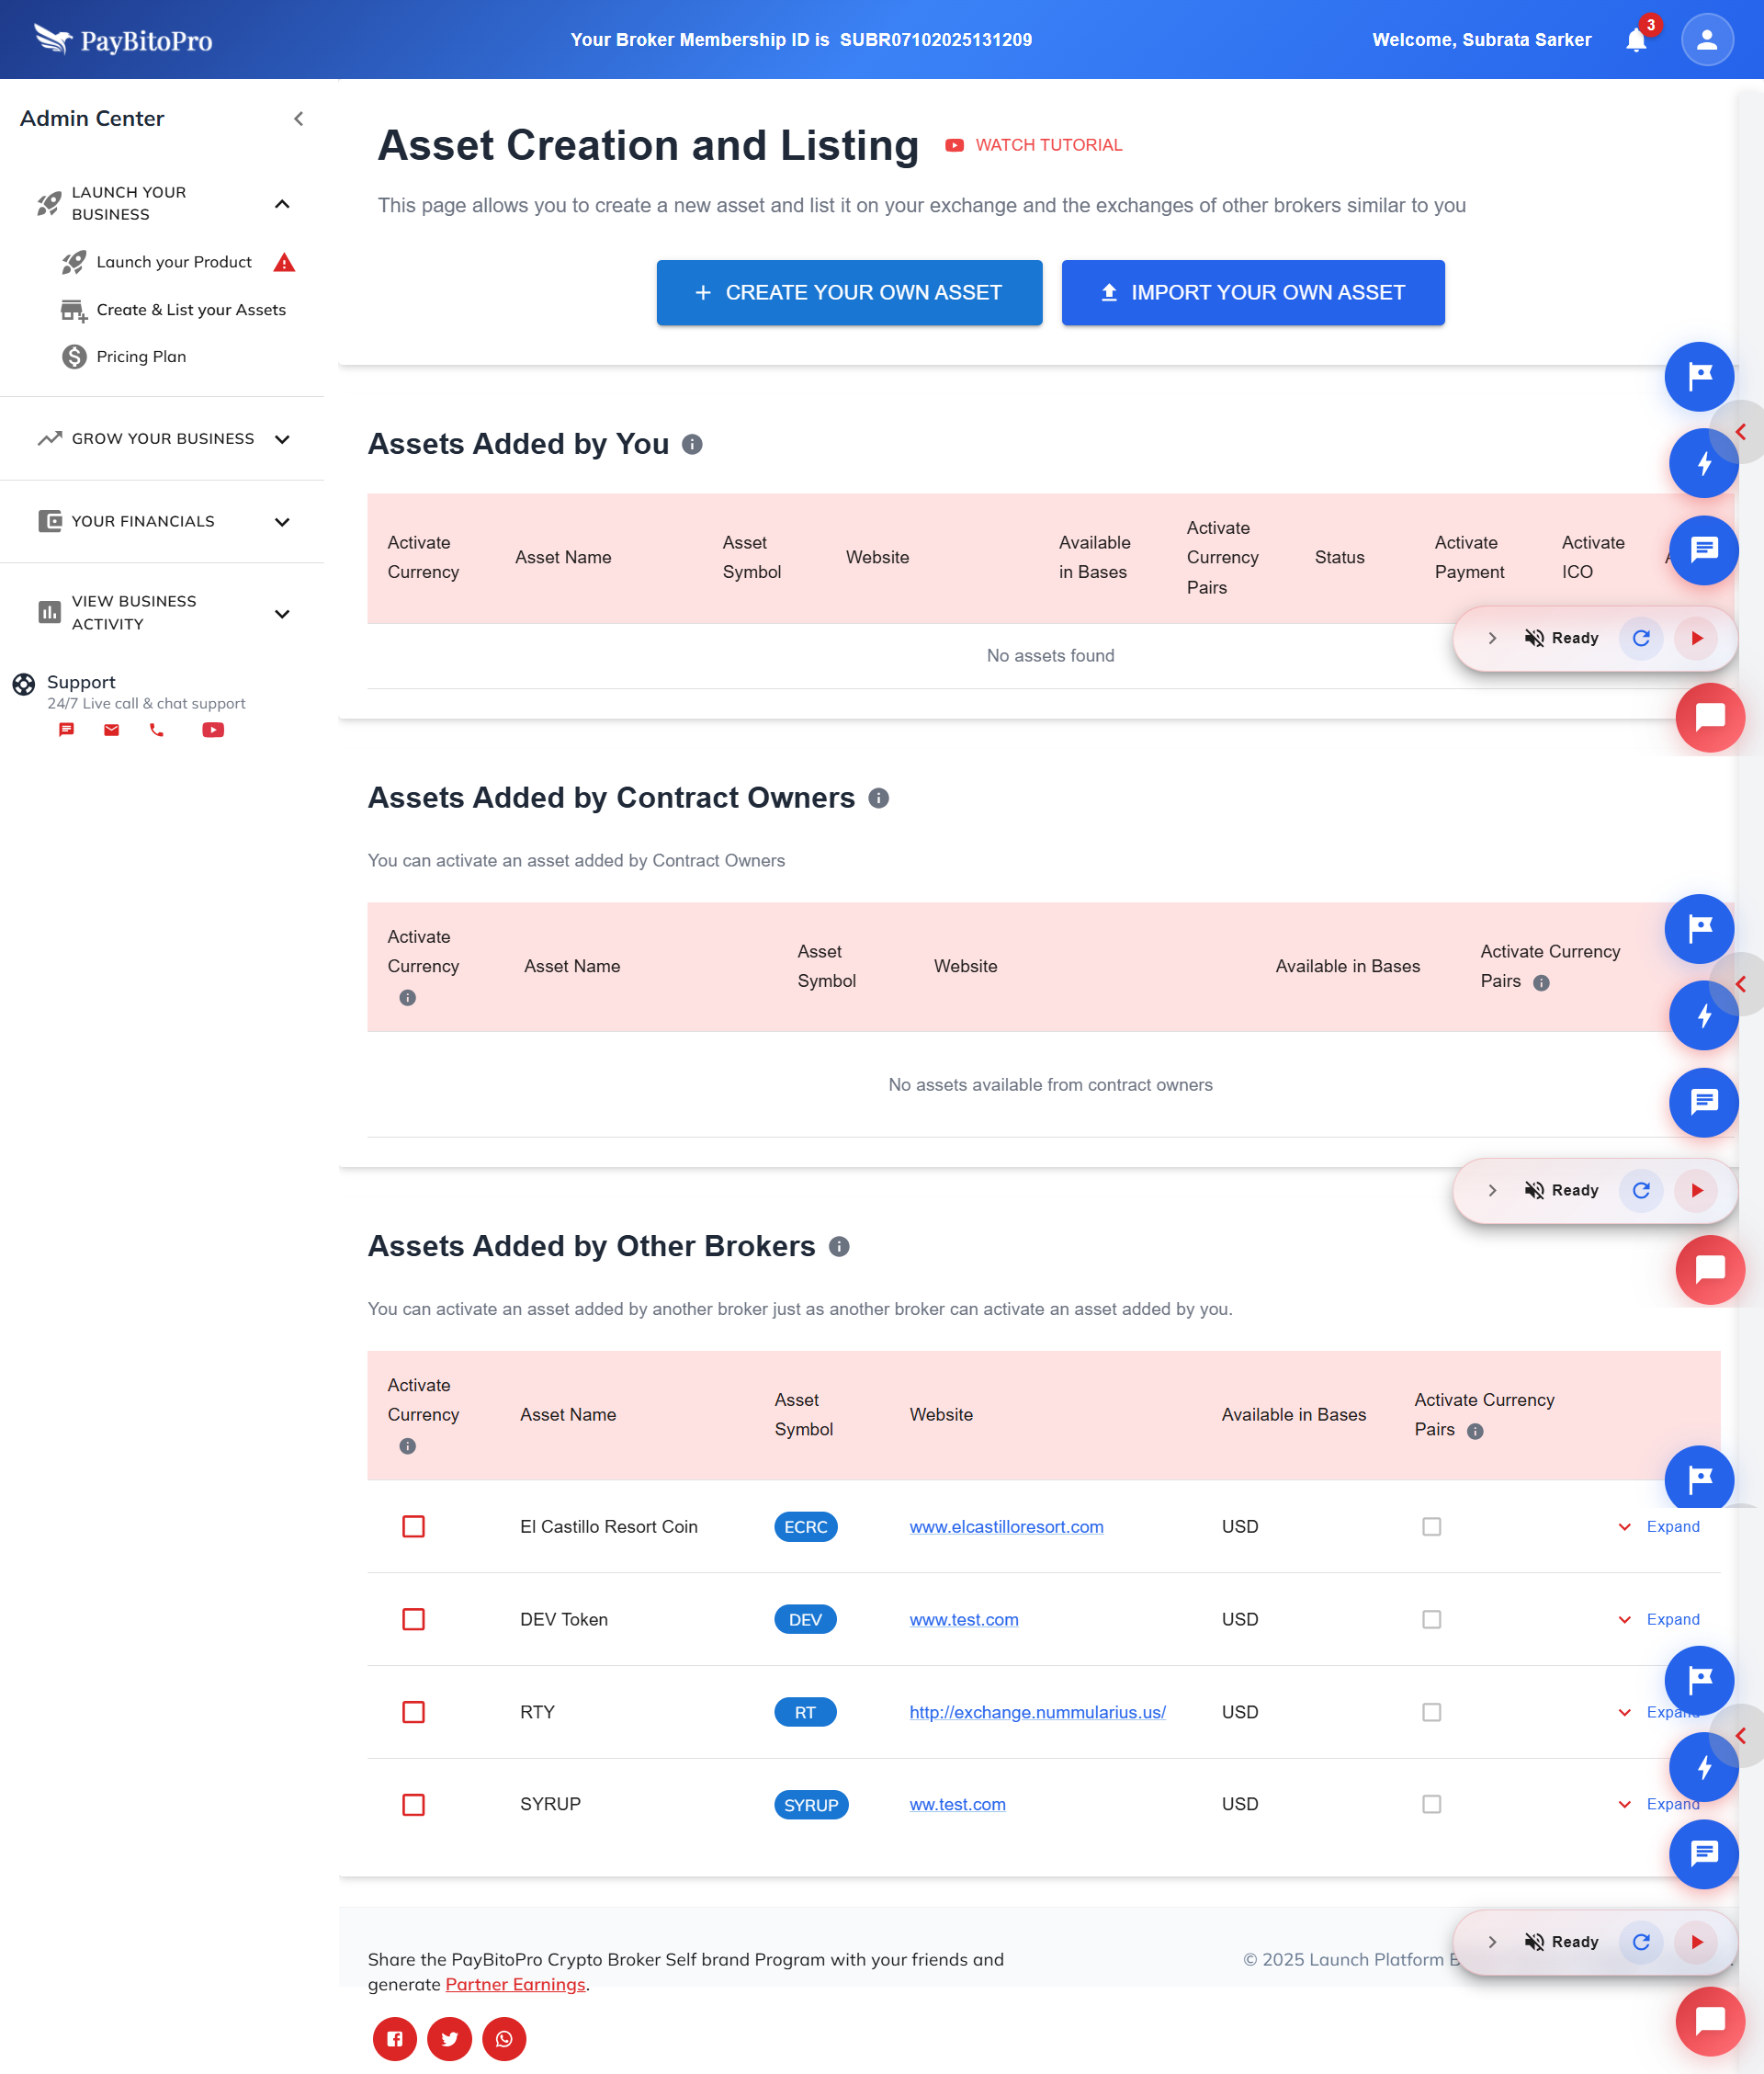
Assets Added by Other Brokers
You can view and activate assets added by other brokers in this section. Review the asset details — including name, symbol, website, and available base currencies — before enabling them for trading.
Frequently Asked Questions
You can modify certain details such as description or website link. However, key parameters like the token symbol and contract address cannot be changed.
Go to the "Assets Added by Other Brokers" section, review the asset details, then click "Activate" to enable trading for that asset.
No external approval is required. Once you create a new asset, it becomes available on your exchange instantly. However, if you choose to make it available for other brokers, they must review and manually activate it on their own exchanges.
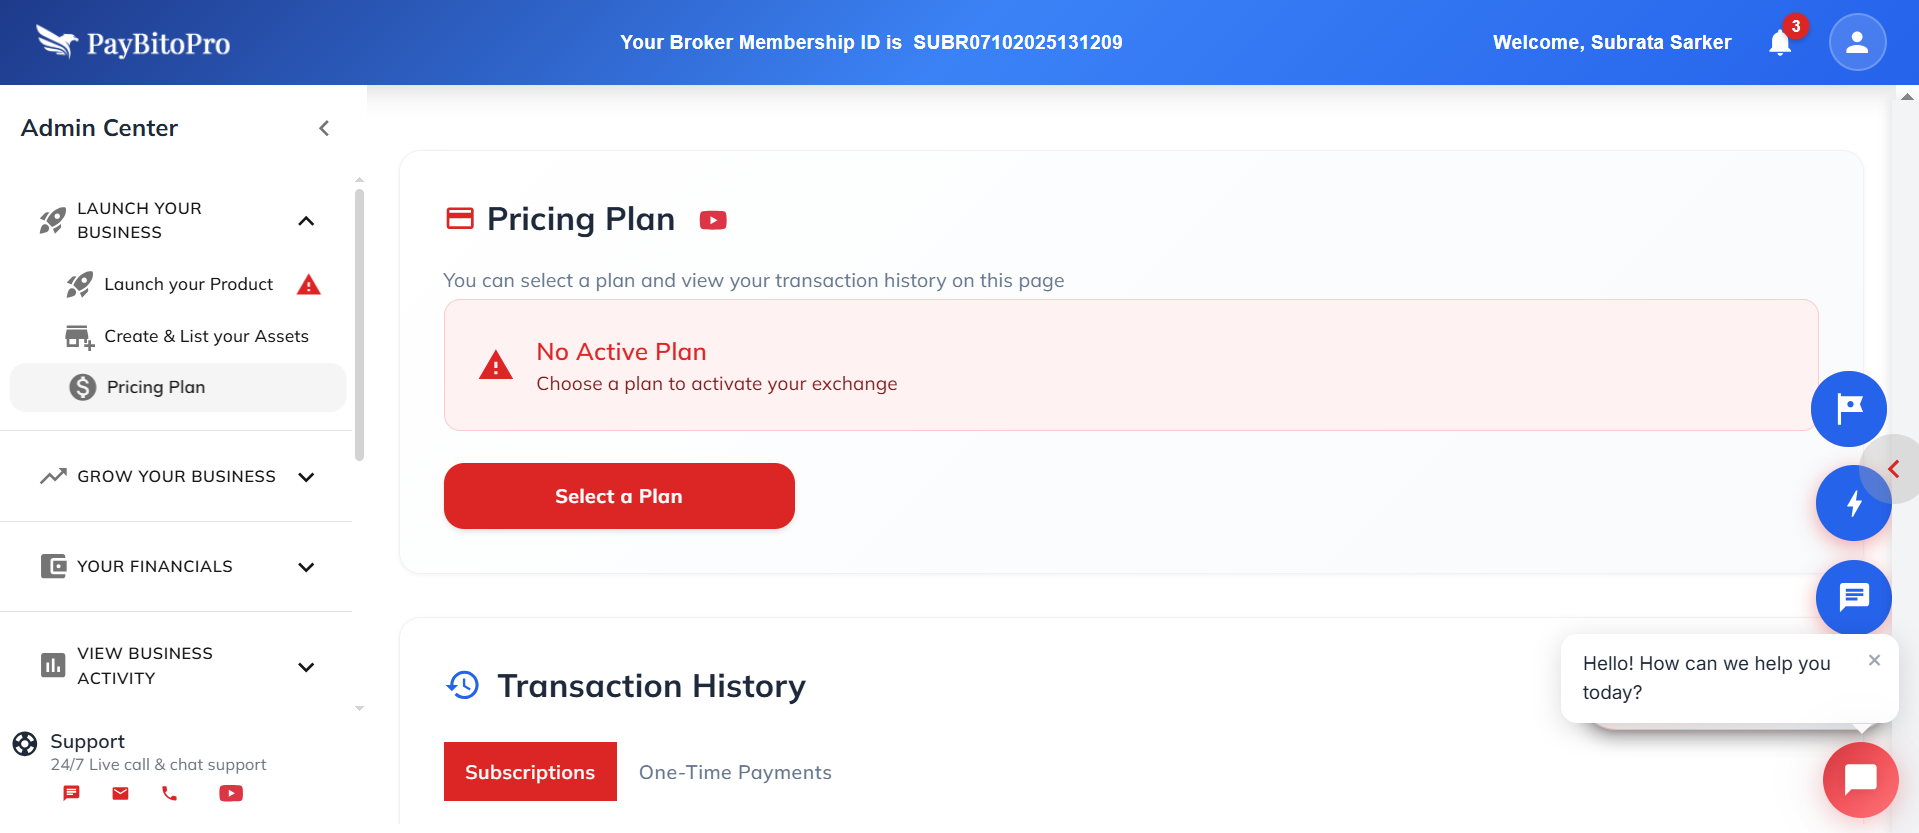
Pricing Plan
Choose a subscription plan that best fits your business needs. Pay monthly or yearly — and save 30% with annual billing. Enjoy a 5-day free trial.
Basic
Solo Starter
PayBitoPro
Professional
Advanced
Growing Business
Plus
Enterprise
Frequently Asked Questions
Yes, every plan includes a 5-day free trial, allowing you to explore all features before making a payment decision.
You can choose between monthly or yearly billing. Annual subscriptions offer a 30% discount compared to monthly payments
If you’re starting out, the Basic plan is ideal. For professionals or growing businesses, PayBitoPro and Advanced plans provide more scalability, while the Plus plan suits established entrepreneurs managing larger operations.
Market Your Business
Once you click on this tab, you’ll be redirected to PayBito Marketing Portal — a complete platform to manage and grow all your sales and marketing channels from one place.
Marketing Solutions Available
SEO
Search engine optimization
Email Marketing
Campaign management
Social Media
Social campaigns
Exchange Listing
Get listed on directories
Press Releases
Media outlets coverage
Video Marketing
Video content creation
AI Content
AI-powered marketing
Link Building
Backlink strategies
Affiliate Marketing
Partner programs
Frequently Asked Questions
The PayBito Marketing Portal is a centralized platform that helps you manage and grow all your sales and marketing activities, from SEO and social media to content and affiliate marketing.
You can access a wide range of marketing solutions, including SEO, email campaigns, press releases, exchange listings, video marketing, and AI-powered content marketing — all tailored to boost visibility and engagement.
It enables you to run campaigns, monitor performance analytics, and engage investors — giving you complete control to expand your exchange’s reach and stay competitive in the crypto market.
Bulk Email Offers
This section allows you to send bulk emails to your traders — perfect for festive greetings, promotional offers, product updates, or new feature launches. You can choose from pre-designed email templates and send them directly to selected trader groups.
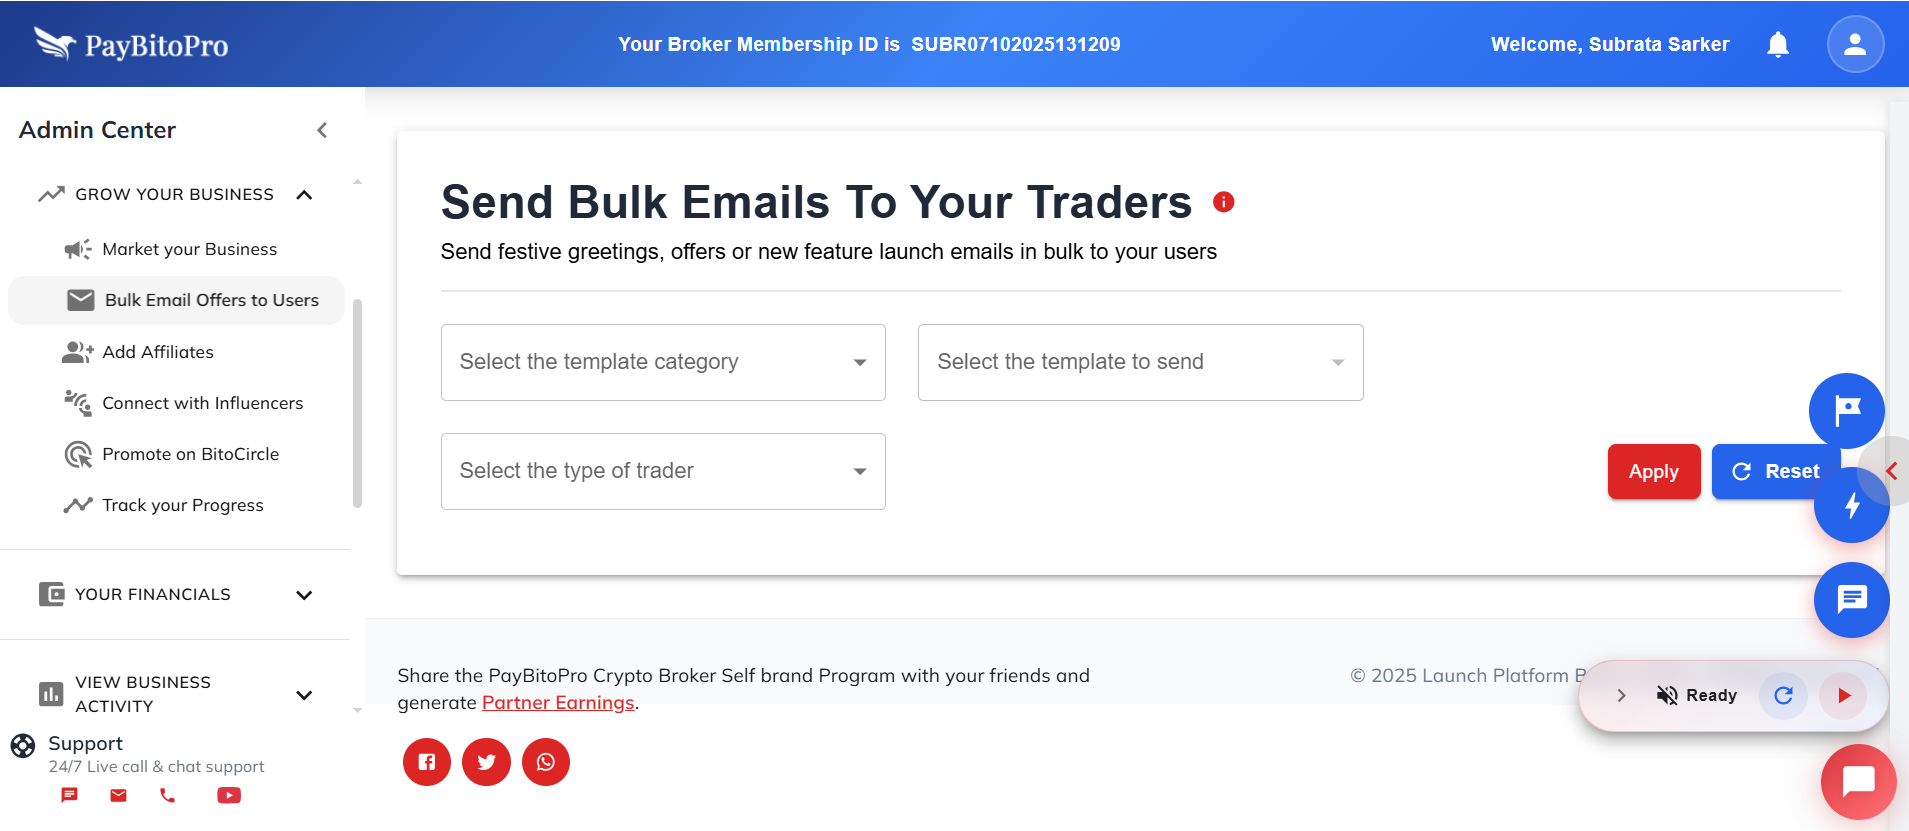
Steps to Send Bulk Emails
Select the Template Category
Choose relevant category (announcements, promotions, festive greetings).
Select the Template
Pick a ready-made template that fits your message.
Preview the Template
Click the Download button to preview the template. Open the downloaded HTML file in your browser to review how the email will appear to recipients.
Choose Trader Type
Select the type of traders you wish to send the email to — for example, active traders, new users, or verified traders.
Apply the Selection
Click the Apply button to view the list of traders who will receive the email.
Manage Recipient List
If needed, you can exclude specific traders by unchecking the box next to their name.
Send the Email
Once the list is finalized, click the Send Email button to send the selected template to all listed traders.
Frequently Asked Questions
The Bulk Email feature allows brokers to send promotional, festive, or informational emails to multiple traders at once. It helps in maintaining engagement and communicating updates efficiently.
Yes. You can preview any email template by clicking the Download button and opening the HTML file in your browser to see how it will appear to traders before sending it.
You can select the type of trader (such as verified, active, or all traders) before sending. After applying the selection, you can manually uncheck any trader you don’t wish to include.
Currently, you can choose from predefined templates available in different categories. For custom templates or personalized messages, please contact the admin or support team.
After sending, you can verify the status of bulk emails in your activity logs or contact support for delivery confirmation if needed.
Add Affiliates
The Affiliate feature allows you to share a part of your commission earnings with your marketing partners.
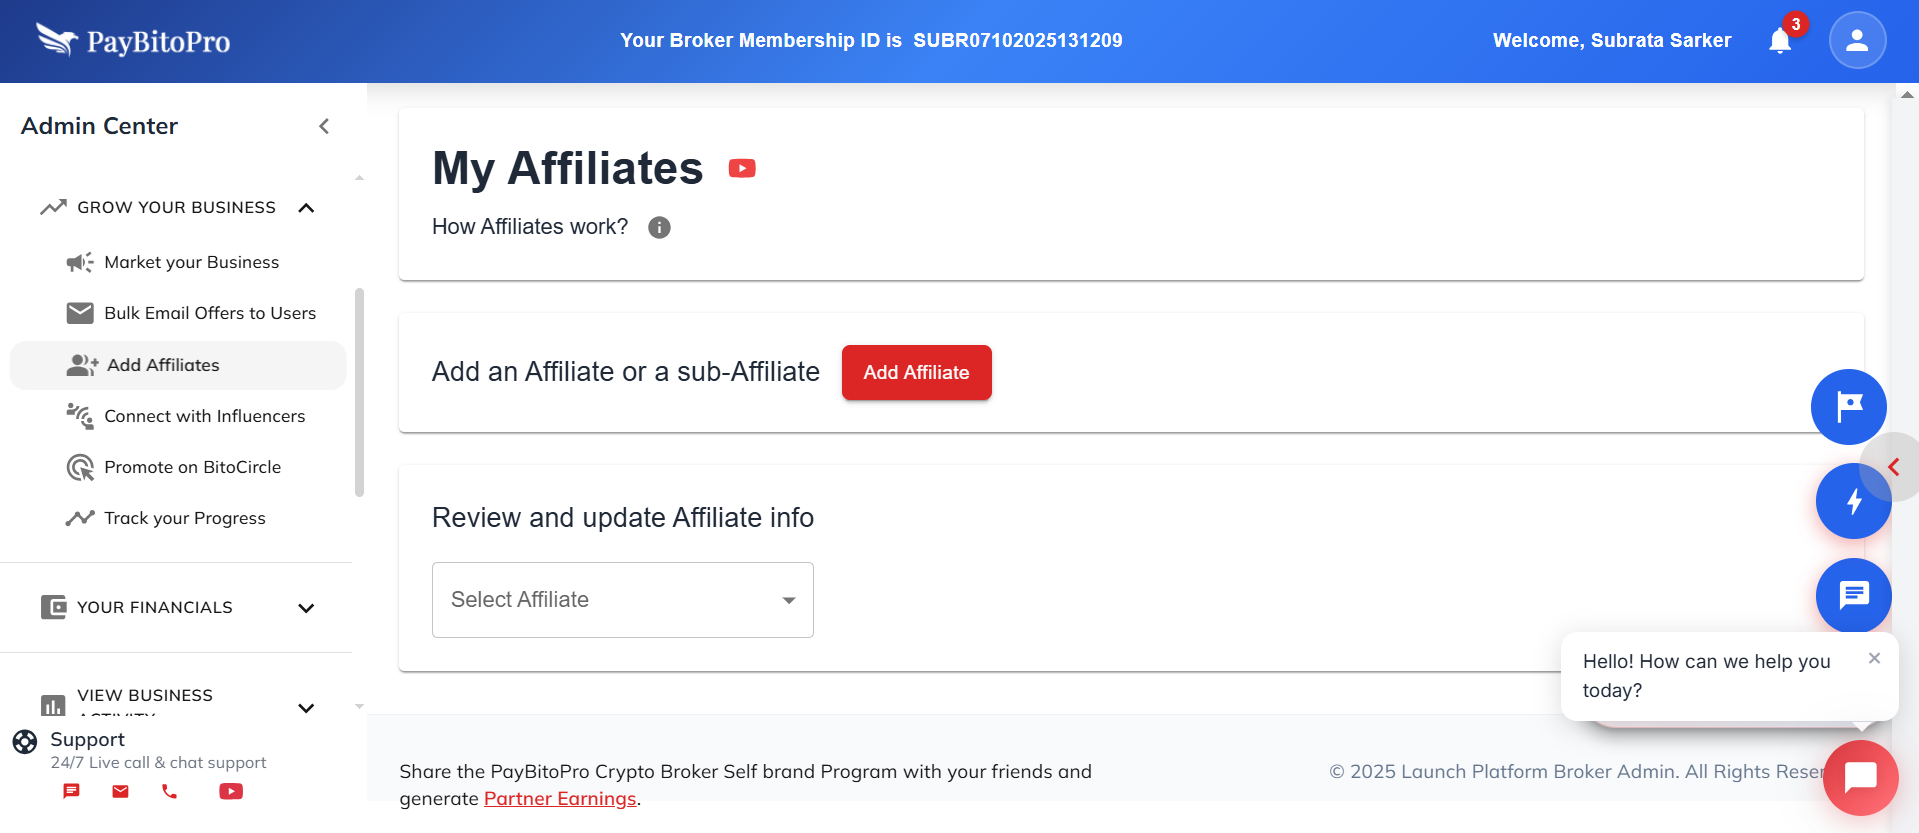
You can add an Affiliate or a sub-Affiliate using this feature.
Commission Sharing
A percentage of the commissions you earn from your users' trading activity will be shared with your Affiliate. For example, if you made $100 and want the Affiliate to receive $20, set 20%.
Sub-Affiliate Structure
The Affiliate can share a part of their commissions with a sub-Affiliate. You control both commission percentages.
Add an Affiliate or a sub-Affiliate:
- Click on the Add Affiliate button to add a new Affiliate. Fill in the Affiliate info in the form that appears upon clicking the button. Note the Commission Percentage box in the form. Fill in the percentage of your commissions that you would like to share with the Affiliate here. Say, you made $100 in commission earnings, and you would like the Affiliate to receive $20 from that. Then you will put 20 (meaning 20%) in the Commission Percentage box.
- If you have Affiliates that were already added before, note that you can designate this new Affiliate as a sub-affiliate to the ones already added.
Frequently Asked Questions
An Affiliate is your direct marketing partner who receives a share of your commission earnings. A Sub-Affiliate is linked to your Affiliate and receives a share of the Affiliate's commission.
Yes. You can modify the commission percentage for any existing Affiliate or Sub-Affiliate at any time. The new percentage will apply to future earnings, while previous transactions remain unaffected.
The commission distribution follows the hierarchy you set. You earn commissions from user trading activity, a portion of which goes to your Affiliate based on the percentage you set. The Affiliate can then share part of their commission with their Sub-Affiliate according to their defined rate.
Connect with Influencers
Overview
Teamups helps your business partner with creators (influencers, affiliates) to drive new user sign-ups and trading volume. As a Business Owner, you can configure your program, invite creators, and track performance all from one platform.
What You Can Do with Teamups
- 1. Configure who you want to work with
- 2. Set up how Teamups communicates with you and your creators
- 3. Create a profile that creators can see
- 4. Invite creators and manage connections
- 5. Track performance and handle payouts
Main Navigation
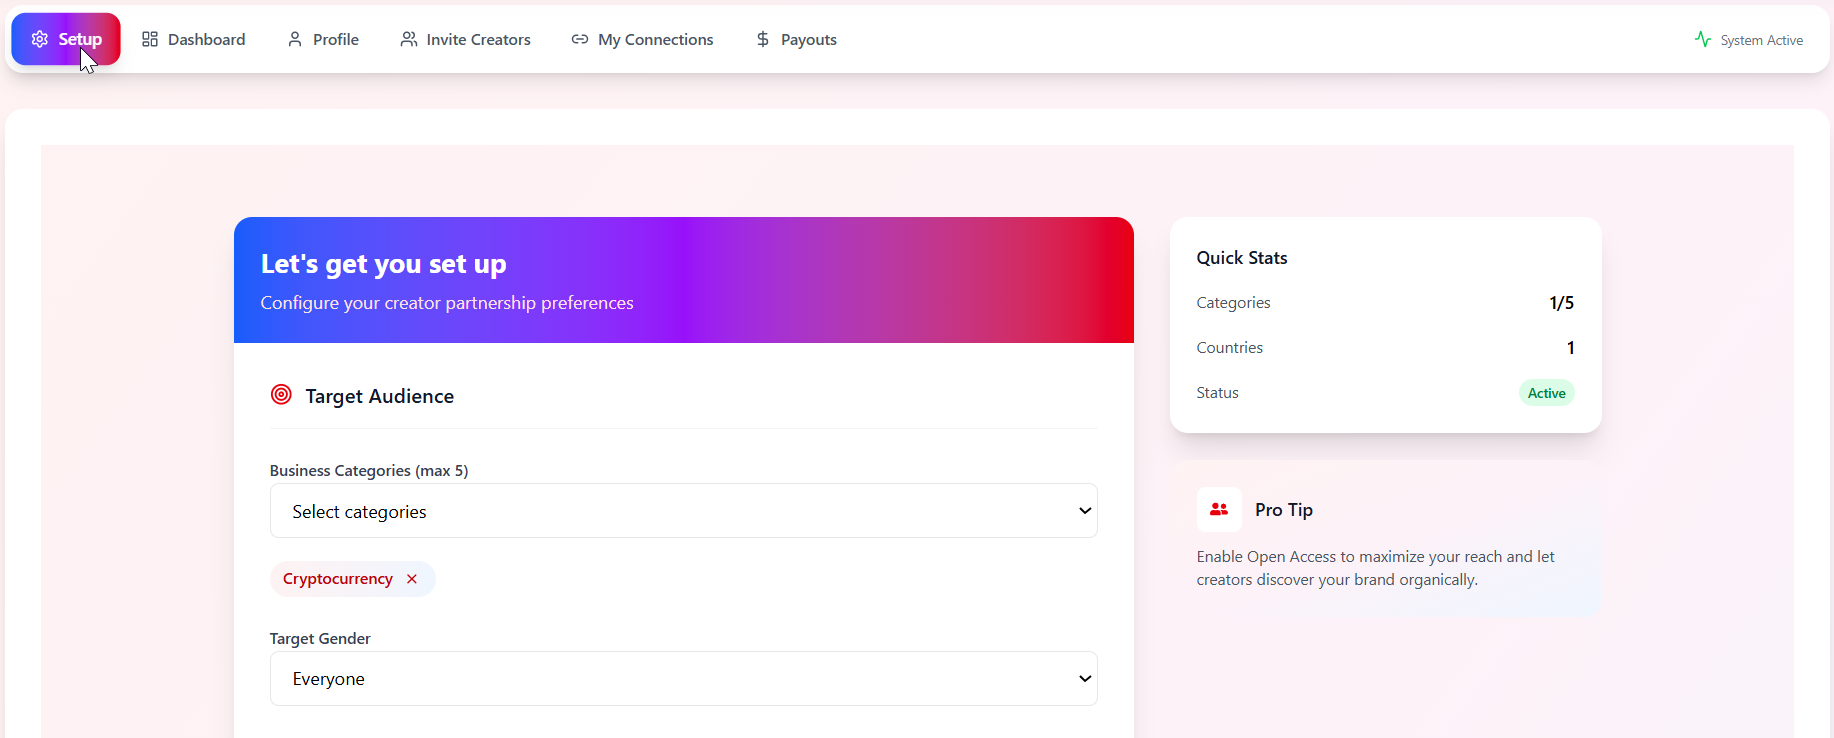
Setup - Configure Your Creator Program
Use this page the very first time you log in to configure your creator program. Follow these steps to get started.
Use this page the very first time you log in.
Step 1 - Define Your Target Audience
Go to the top menu and click Setup. In Target Audience section:
Business Categories (Max 5)
Click "Select categories" and choose the industry/verticals relevant to your business (e.g., Cryptocurrency, Finance, Web3).
Target Gender
Choose "Everyone" or a specific gender, depending on your campaign preference.
Target Countries
Click "Edit Selection" and select the countries you want your creators to focus on. Confirm the selected items appear as tags.
Step 2 - Set Communication Settings
Scroll to Communication Settings section:
Notification Email
Enter the email where you want to receive system alerts, new connection requests, etc.
Creator Communication Email
Enter the email creators can reply to (support, partnership, or marketing email).
Step 3 - Configure Email Templates
The Email Templates section controls automated emails sent to creators:
| Template | When It's Sent |
|---|---|
| Invite | Sent when you invite a creator to join Teamups |
| Welcome | Sent when creators accept your application |
| Decline | Sent when you decline an invitation/application |
| Congratulate | Sent when a creator's first user signs up or qualifies |
Step 4 - Set Interaction Preferences
This section decides how creators can start working with you. Choose ONE as your main operating mode:
Default Invitation Mode
Only creators you invite can work with you. Good for closed or high-control programs.
Open Access
Any creator can send a request to work with you without a prior invitation. Best if you want to grow your network quickly.
Open Invitation
Creators can see and join your program via a public or shareable invitation link. Perfect for open community-based expansion.
Set Commission & Rewards
Commission Rate
% of Revenue
Reward per User
Fixed $ Amount
Step 5 - Accept Agreements
At the bottom of the page, you'll find Agreements:
- Tick "I consent and follow our Community Guidelines"
- Tick "I agree to Privacy Policy and Terms of Service"
Step 6 - Save Your Setup
Review all entries once more and click the Save Setup button. Ensure you see a success/confirmation message and the status shows Active in the Quick Stats widget.
Dashboard - Track Your Performance
Once your program is active and creators start promoting, this is where you track everything.
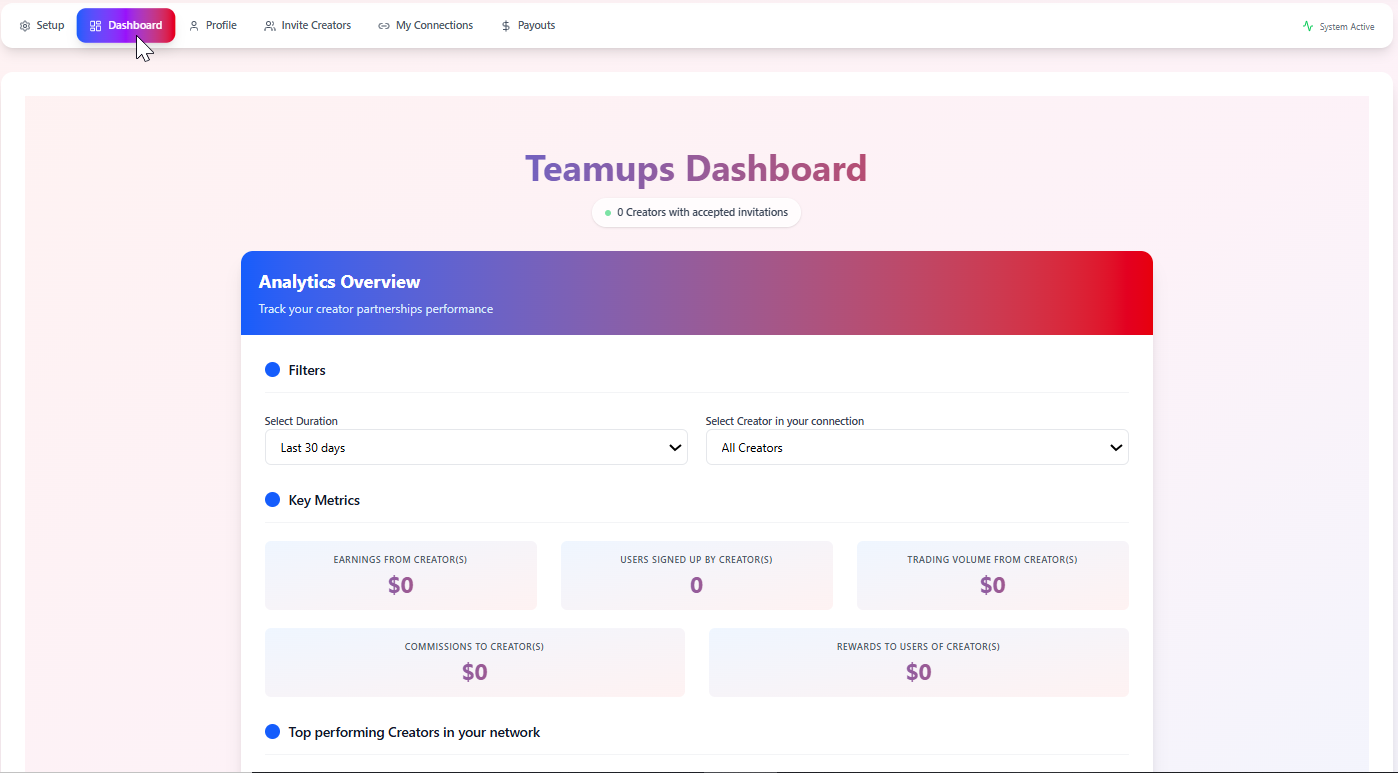
Step 1 - Open the Dashboard
Click Dashboard in the top navigation. At the top you'll see an Analytics Overview.
Step 2 - Use Filters
Filter Options
Select Duration: Choose the time range (Last 7 days, Last 30 days, Custom dates, etc.)
Select Creator: View data for All Creators or a specific creator.
Step 3 - Read Key Metrics
The Key Metrics cards show your program's performance:
Earnings from Creators
Total Revenue
Users Signed Up
By Creators
Trading Volume
From Creators
Commissions
To Creators
Rewards
To Users
Step 4 - Identify Top Creators
Below metrics, you'll see Top performing Creators in your network:
Top Creators by Earnings
Who drives the most revenue for your business.
Highest ROI Creators
Who delivers the best return on your spend.
Top by Users Signed Up
Who brings in the most new users.
Top by Trading Volume
Who generates the most trading activity.
Profile - Present Your Brand to Creators
This profile is what creators see when deciding to work with you. A strong profile increases the acceptance rate and builds trust.
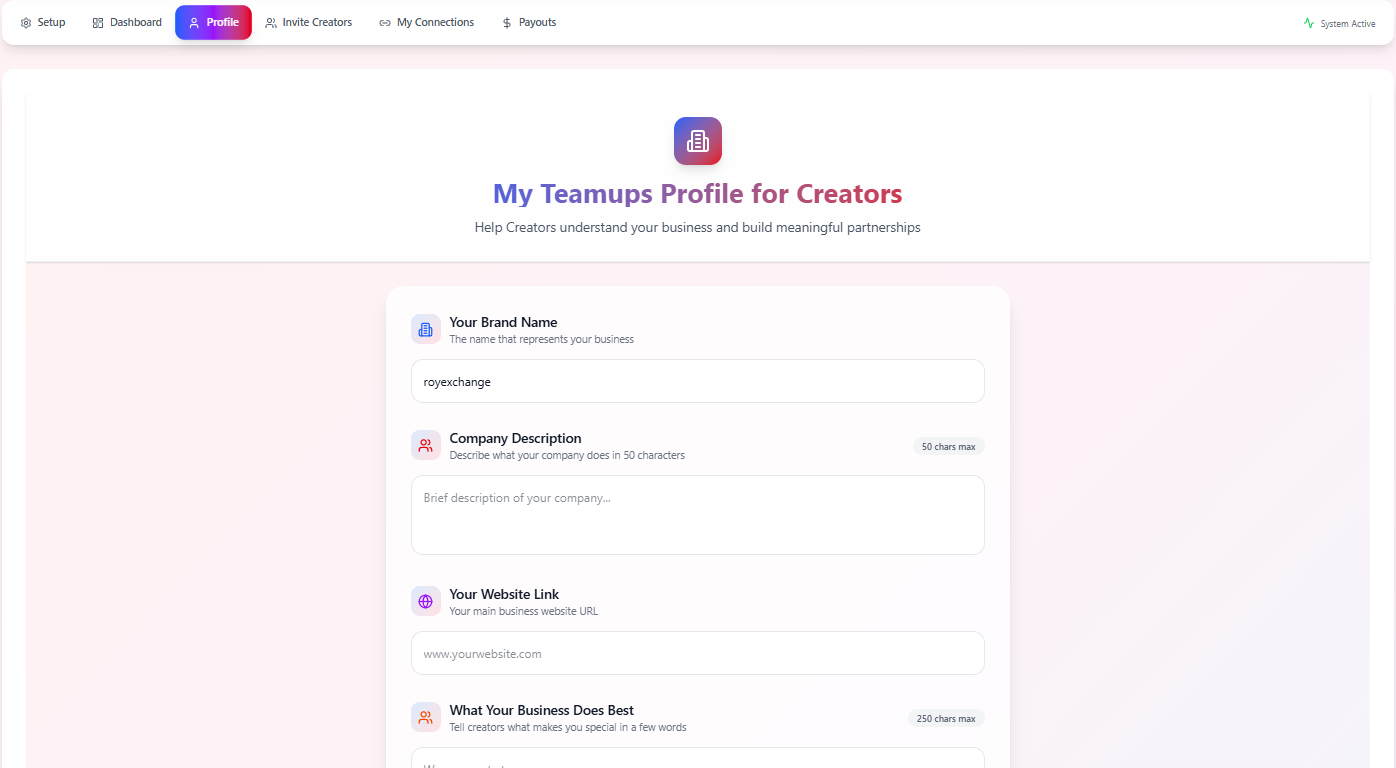
Step 1 - Open Profile
Click Profile in the top navigation. You'll see "My Teamups Profile for Creators".
Step 2 - Fill in Business Details
Your Brand Name
Enter the brand name that creators will promote.
Company Description (50 chars max)
A short, clear description of what your company does.
Your Website Link
Paste your main business website URL.
What Your Business Does Best (250 chars max)
A short pitch focused on why creators should care. Mention key benefits for users (low fees, easy signup, high-yield products, etc.).
Step 3 - Add Social Media Links (Optional but Recommended)
Under Social Media Links, add your presence on:
Step 4 - Review Your Affiliate Link Example
In Affiliate Link Example, you will see a preview of how your affiliate/creator link will appear. Make sure the branding and domain look correct and trustworthy.
Step 5 - Save Profile
Click Save Profile at the bottom. Confirm no validation errors appear (missing URL, characters limit exceeded, etc.).
Invite Creators - Grow Your Network
This section is where you search for and invite creators to join your program.
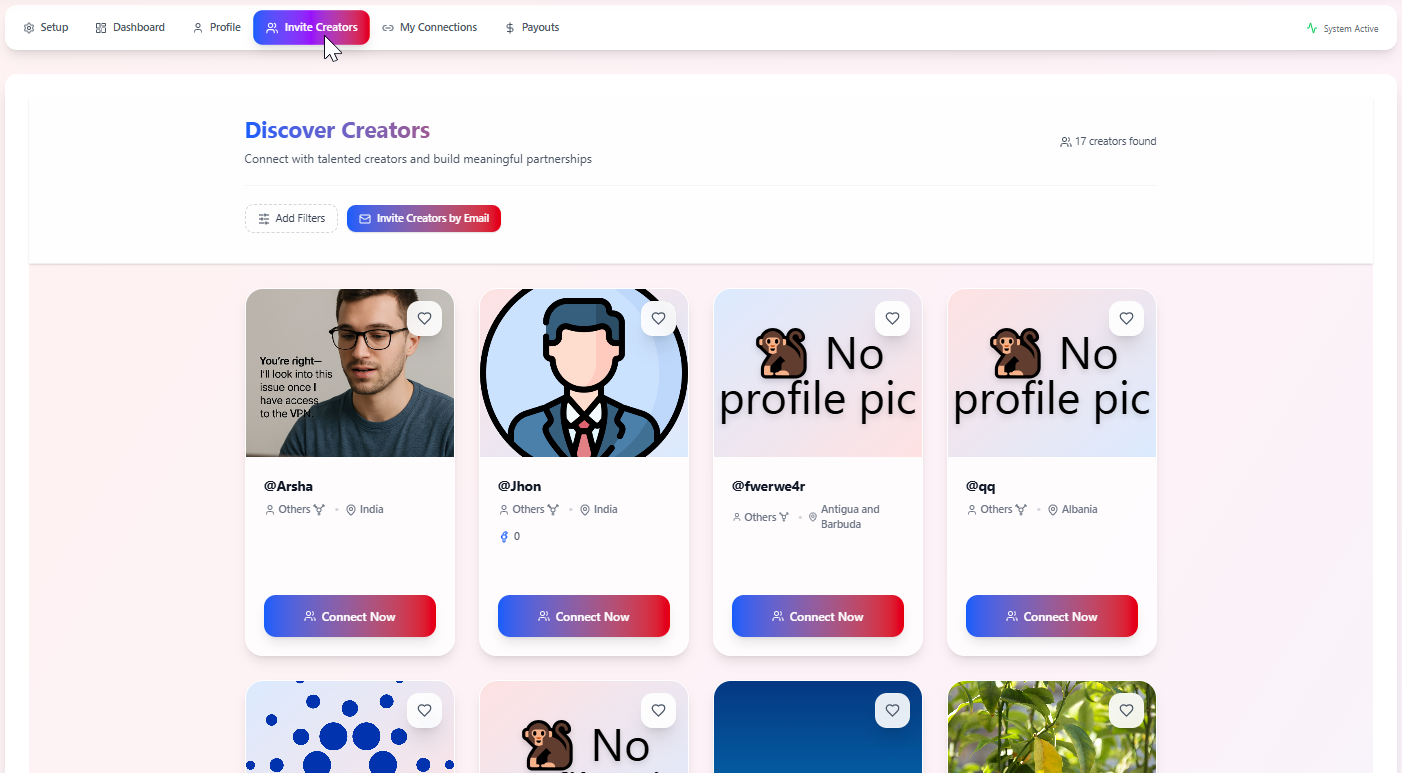
Step 1 - Open Invite Creators
Click Invite Creators in the top navigation. You'll see "Discover Creators" at the top of the page.
Step 2 - Use Filters or Search
Add Filters
Click "Add Filters" to narrow down potential creators by category, location, audience type, etc.
Search Bar
If a search bar exists, enter keywords related to your niche (e.g., "crypto", "forex", "web3").
Step 3 - Invite Creators by Email
Click Invite Creators by Email
Open the email invitation form.
Enter Email Addresses
Enter one or more email addresses of creators or partners you want to onboard.
Customize the Message
Explain the benefits of joining your program, commission & rewards structure, and what kind of content or audience you're looking for.
Send the Invitations
The invited creators will receive an email with steps to join Teamups and connect with your business.
My Connections - Manage Creator Relationships
This page shows the status of your relationship with each creator.
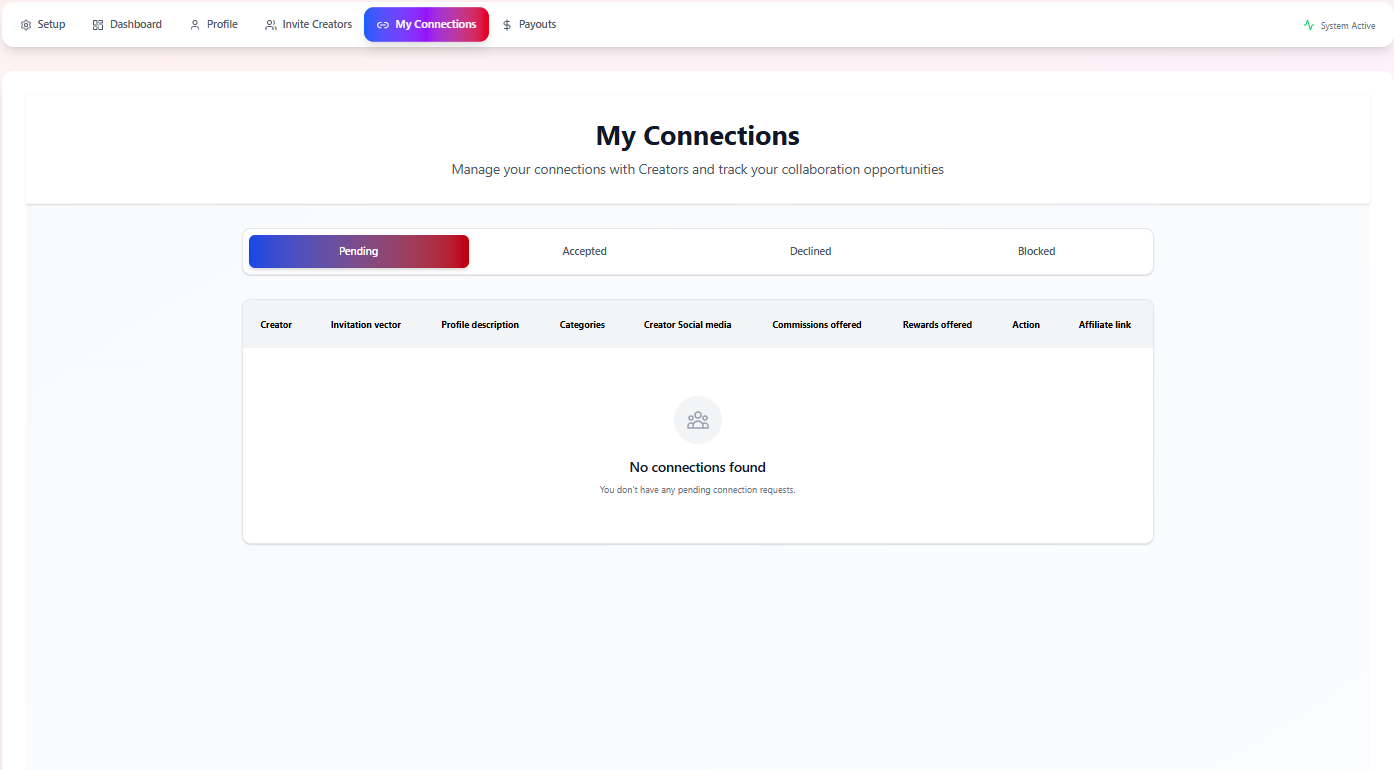
Step 1 - Open My Connections
Click My Connections on the top navigation. You'll see tabs for different connection statuses:
Step 2 - Understand Each Tab
| Tab | Description |
|---|---|
| Pending | Creators you've invited or who have requested to join but haven't been approved yet |
| Accepted | Creators that are actively connected to your business |
| Declined | Creators whose requests/invitations were declined |
| Blocked | Creators you've blocked from working with you |
Step 3 - Review Connection Details
For each creator (once you have activity), you can see:
- Creator name
- Invitation vector (how they joined)
- Profile description
- Categories
- Creator social media
- Commissions offered
- Rewards offered
- Affiliate link
Payouts - Monitor and Manage Payments
Once creators start generating results, you'll track and review payouts here.
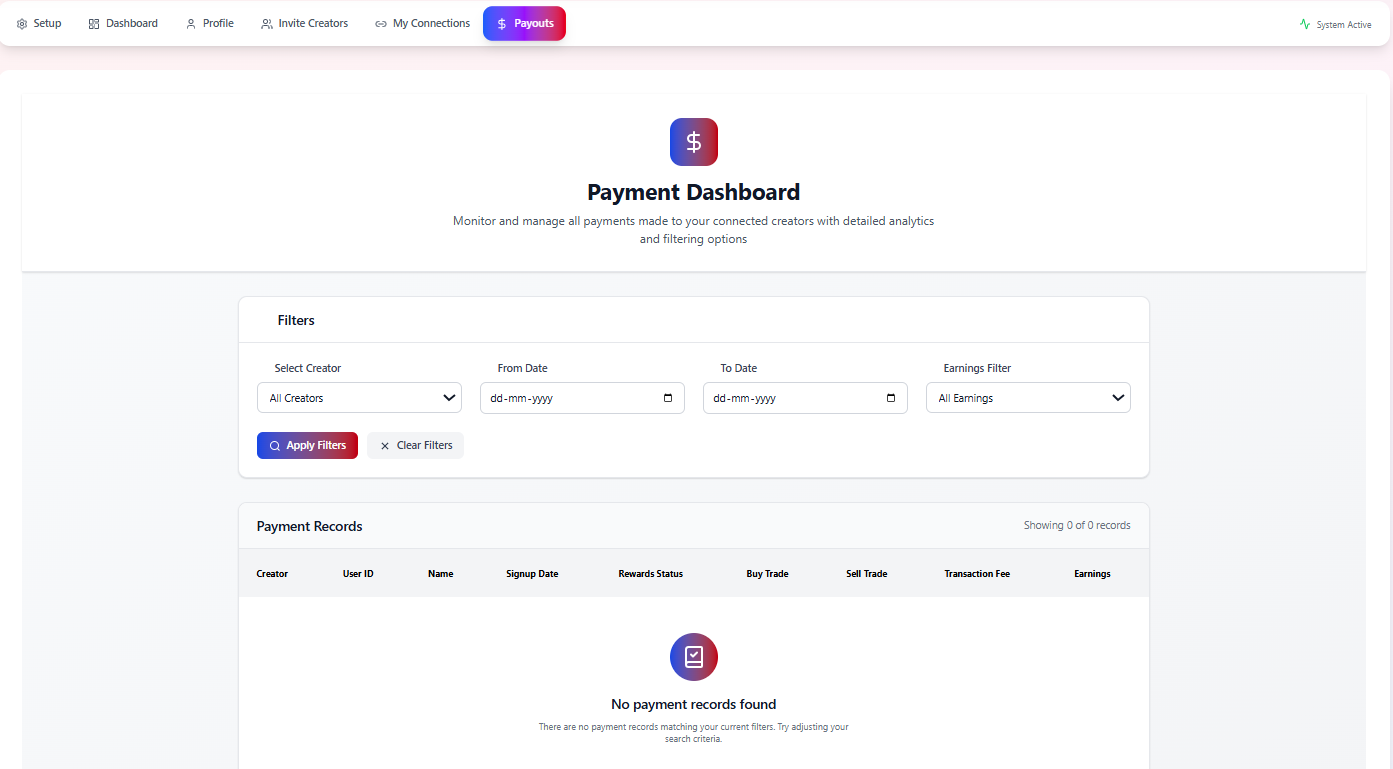
Step 1 - Open Payouts
Click Payouts on the top navigation bar. You'll see the Payment Dashboard.
Step 2 - Use Filters
At the top section Filters:
Select Creator
Choose All Creators or filter by a specific creator.
Date Range
Set the From Date / To Date for the timeframe you want to review.
Earnings Filter
Filter by all earnings, unpaid/paid, or other available categories.
Click Apply Filters to update the results. Click Clear Filters to reset and start over.
Step 3 - Review Payment Records
The Payment Records table below shows, for each qualified user or payout line:
| Field | Description |
|---|---|
| Creator | Who brought the user |
| User ID | Internal user identifier |
| Name | User's display name (if available) |
| Signup Date | When the user joined |
| Rewards Status | Whether the reward is pending, paid, or in review |
| Buy Trade / Sell Trade | Trading activity generated |
| Transaction Fee | Fees charged to the user |
| Earnings | Your revenue and/or creator's share |
Quick "First Day" Checklist
To summarize, here's what a new business owner should do on Day 1:
Setup
- Choose categories, target gender, and countries
- Set notification & creator communication emails
- Review email templates
- Decide on Default / Open Access / Open Invitation
- Set Commission Rate and Reward per User
- Accept agreements and Save Setup
Profile
- Fill in brand name
- Add short description
- Enter website URL
- Describe "What your business does best"
- Add social links
- Save profile
Invite Creators
- Invite existing partners by email
- Start exploring filters/search for new creators
My Connections
- Approve incoming creator requests
- Review terms and creator details
Frequently Asked Questions
Find answers to common questions about using Teamups to grow your business.
Teamups connects your business with influencers and affiliate creators who promote your brand to their audiences. This drives new user sign-ups, higher trading volume, and overall growth—without needing to run ads or manage complex partnership systems manually. The platform automates invitations, tracking, reporting, and payouts.
Default Invitation: Only creators you invite can join. Best for selective or premium programs.
Open Access: Any creator can send a join request. Ideal for faster network growth.
Open Invitation: A public invite link lets creators instantly join. Perfect for open community-based expansion. Choose based on how controlled or open you want your program to be.
Yes. Completing Setup ensures creators clearly understand your brand, commission rate, rewards per user, target countries, and contact emails. Any missing element reduces trust and can cause creators to decline your partnership.
You can set two types of compensation:
Commission Rate (%): A percentage of trading fees or revenue generated by the users a creator brings.
Reward per User: A fixed payout each time a creator's user meets a qualification (example: becomes a verified trader). Creators can see these amounts before joining your program, so choose values aligned with your marketing budget.
The Dashboard shows real-time analytics only after creators begin generating results such as new user sign-ups, first trades, trading volume, and revenue or fees. Until then, all metrics will show 0, which is normal for new programs.
You may see "No creators found" if no filters are applied, filters are too restrictive, or there are currently no creators matching your selected categories, countries, etc. Start with wider filters or directly invite creators by email to begin.
Their request appears under My Connections → Pending. You can:
• Accept → They become an active partner
• Decline → They cannot join
• Block → They will be permanently restricted
Before accepting, review their profile, categories, and audience fit.
Payouts appear when a referred user signs up, completes required trades or activity, and generates fees or qualifies for rewards. Each payout line shows the user, date, reward status, and creator associated. You can filter payouts by date range, creator, or payment status.
Your profile is the first place creators evaluate your brand. Include a clear brand name, short high-impact description, what your business does best (value proposition), legitimate website link, and social media pages. A strong profile increases the acceptance rate of creators and builds trust.
After saving your Setup, check the Quick Stats widget. It must show Status: Active and Completed Setup fields. If agreements were not accepted or required fields are missing, the program will remain inactive and creators will not be able to join.
Promote on BitoConnect
Complete guide to creating, managing, and optimizing your crypto advertising campaigns on BitoConnect.
Overview – What You Can Do in Ad Center
As a Business Owner, Ad Center lets you create and manage advertising campaigns to promote your crypto business on BitoConnect.
Ad Center Capabilities
Accessing the Ad Center
Follow these steps to access the Ad Center and start promoting your brand.
Log in to BitoConnect
Log in to your BitoConnect account with your Business Owner credentials.
Click Advertise (Ad Center)
From the top navigation, click on "Advertise" or "Ad Center".
Left Sidebar Navigation
The left sidebar will show:
- Campaigns
- Audiences
- Spend Caps
- Publish Campaign
- Campaign Insights
- Billing
- Creator Collab Panel
FAQs - Accessing Ad Center
Yes. Only Business Owner / brand accounts have access to campaign creation and billing.
Yes. You can create separate pages or brand profiles and run campaigns for each, as long as billing is configured.
Under Campaigns, you'll see all Active, Inactive, and In-review campaigns.
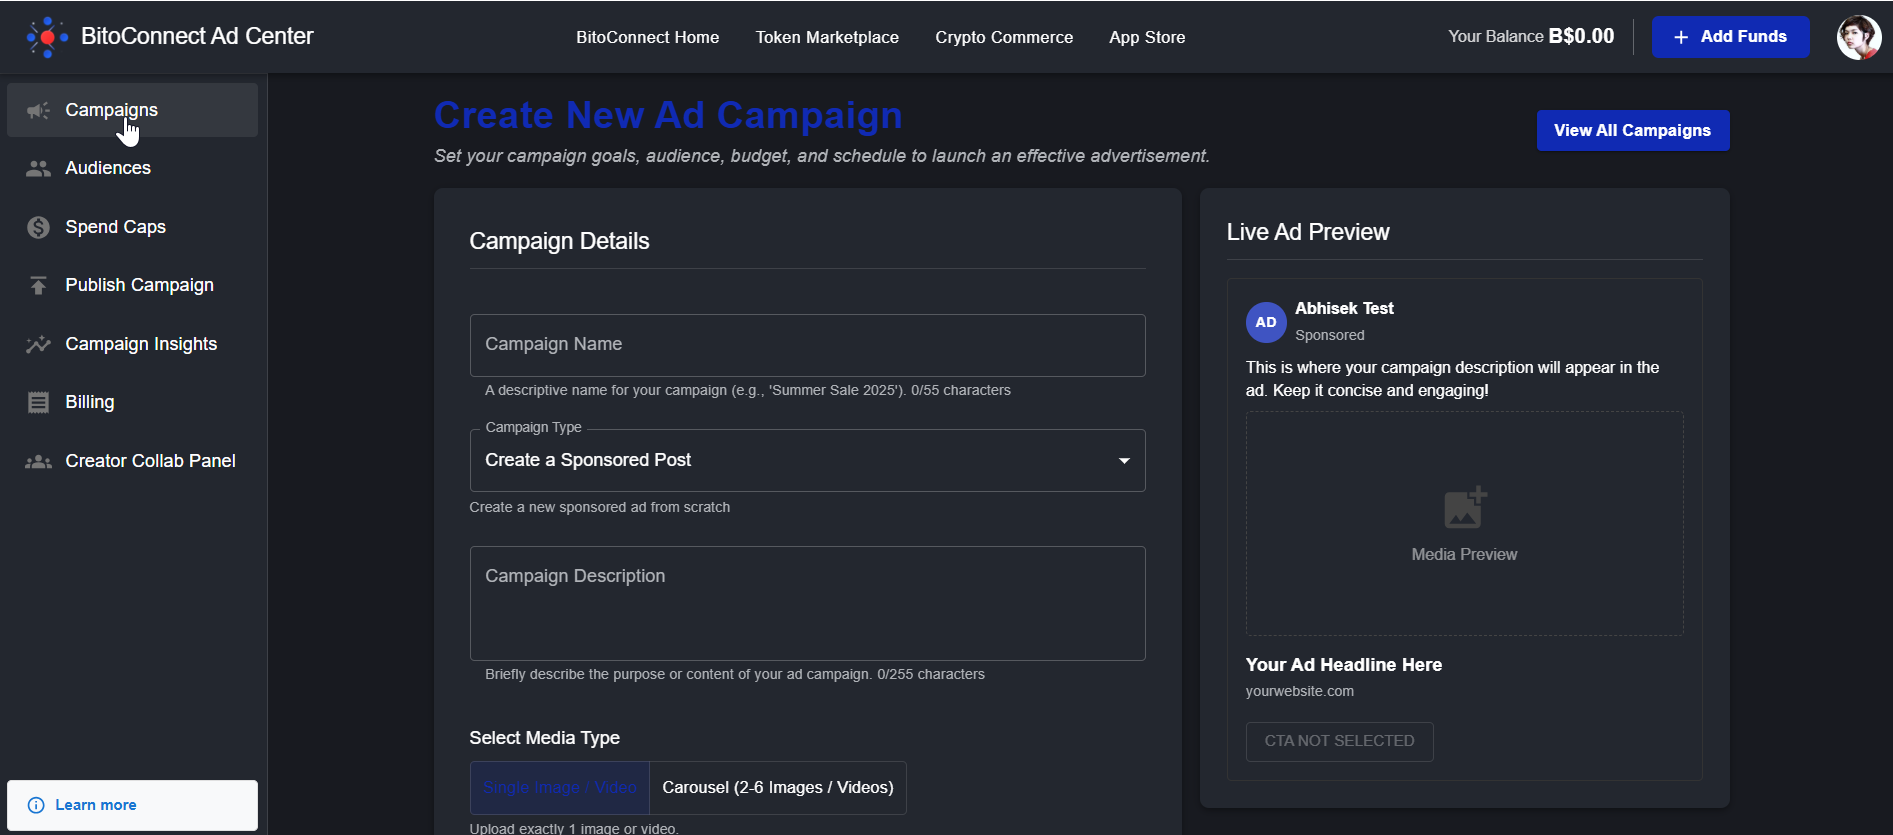
Campaigns - Create a New Ad Campaign
The Campaigns tab is where you create and manage all your ads on BitoConnect.

2.1 Open the Campaign Creation Screen
Click Campaigns
In Ad Center, click Campaigns in the left menu.
Create Campaign
Click "Create Campaign" or "Create New Ad Campaign" to open the form.
2.2 Fill Campaign Details
Campaign Name
Enter a short, descriptive name (e.g., "DeFi Wallet Launch – US").
Campaign Type
Select "Create a Sponsored Post" (new ad from scratch).
Campaign Description
Briefly explain the purpose of the campaign (up to 255 characters). Focus on benefits and what the user can do, not on guaranteed returns.
2.3 Add Media (Creative)
Select Media Type
Single Image / Video
One visual asset for your campaign.
Carousel (2–6 Items)
Multiple images or videos as cards.
Media Specifications
2.4 Set CTA, URLs & Headline
| Field | Description |
|---|---|
| Call to Action | Choose a CTA button (Sign Up, Trade Now, Learn More) |
| CTA URL | The landing page where users should go |
| Website URL | Optional separate display URL |
| Ad Headline | Up to ~100 characters (e.g., "Trade 250+ crypto pairs with low fees") |
2.5 Submit Campaign for Review
Review all inputs one last time and click Create Campaign. The campaign moves into Review status:
FAQs - Campaigns
Check if all required fields are filled: Campaign Name, Campaign Type, Description, media, CTA, and URL.
Most campaigns are reviewed within a short time, but delays may occur during peak hours or if additional compliance checks are needed.
Open the campaign details, review the rejection reason (often related to policy violations or missing disclosures), fix the issue, and resubmit.
Audiences - Define Who Sees Your Ads
The Audiences tab lets you build reusable targeting profiles. An AI helper (PayBito Whizzo) can auto-suggest options.

3.1 Create a New Audience
Click Audiences
Click Audiences in the left menu.
Create Audience
Click "Create Audience" or "Create new campaign audience".
3.2 Fill Targeting Details
Campaign Type
Link the audience to the appropriate campaign type (e.g., brand awareness, user acquisition).
Name of the Audience
Use a clear naming convention: Country + Interest + Objective. Example: "US – DeFi Traders – Signups".
Interested In (Optional)
Add interest keywords like NFT, Startups, Trading, DeFi, etc.
3.3 Demographics & Device
Gender
Select Any, Women, or Men.
Age Range
Choose All Ages or specify a range (e.g., 21–45).
Select Country
Choose one or more countries where your business is allowed to operate.
Operating System
Target All / iOS / Android / Desktop.
3.4 Save Your Audience
Review your selections and click Save Audience. This audience can now be attached later under Publish Campaign.
FAQs - Audiences
Your filters are too narrow. Loosen age, interests, or countries until you see a positive reach.
Yes. That's the main benefit—build once, reuse many times.
Start broad (2–3 interests + 1–2 regions), then narrow once you see clear winners in Campaign Insights.
Spend Caps - Control Your Daily Budget
Spend Caps limit how much you spend per day across selected campaigns.
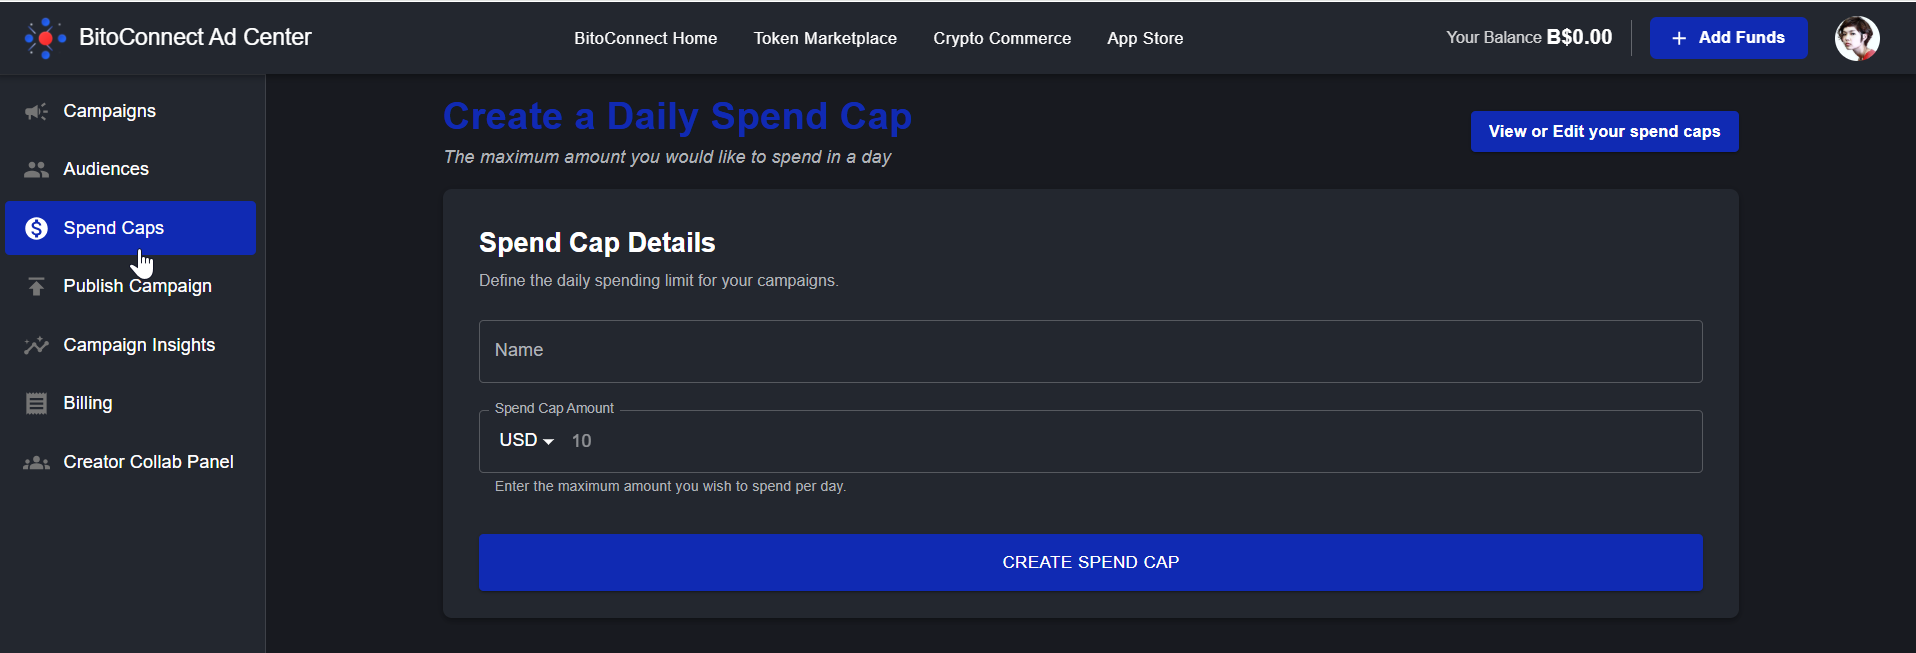
4.1 Create a Daily Spend Cap
Click Spend Caps
Click Spend Caps in the left menu.
Create Spend Cap
Click "Create Spend Cap" to open the form.
Fill Out Details
Name: Example "Daily Cap – Q2 Brand Push"
Spend Cap Amount: Enter the maximum daily amount (e.g., 10 B$ per day)
Save
Click "CREATE SPEND CAP" to save.
4.2 Apply Spend Caps to Campaigns
When publishing a campaign, choose a Spend Cap from the dropdown. You can also edit a live campaign to change or remove the assigned cap.
FAQs - Spend Caps
Spend Caps can be set and then assigned to one or more campaigns, effectively limiting combined daily spend.
Delivery slows or stops for campaigns tied to that cap until the next day.
Yes, you can edit or delete caps at any time. Be mindful that raising caps may speed up budget consumption.
Billing & BitoDollars Wallet - Add Funds
Ad Center uses BitoDollars (B$) as the internal currency for ad spend. 1 B$ = 1 USD for billing purposes.
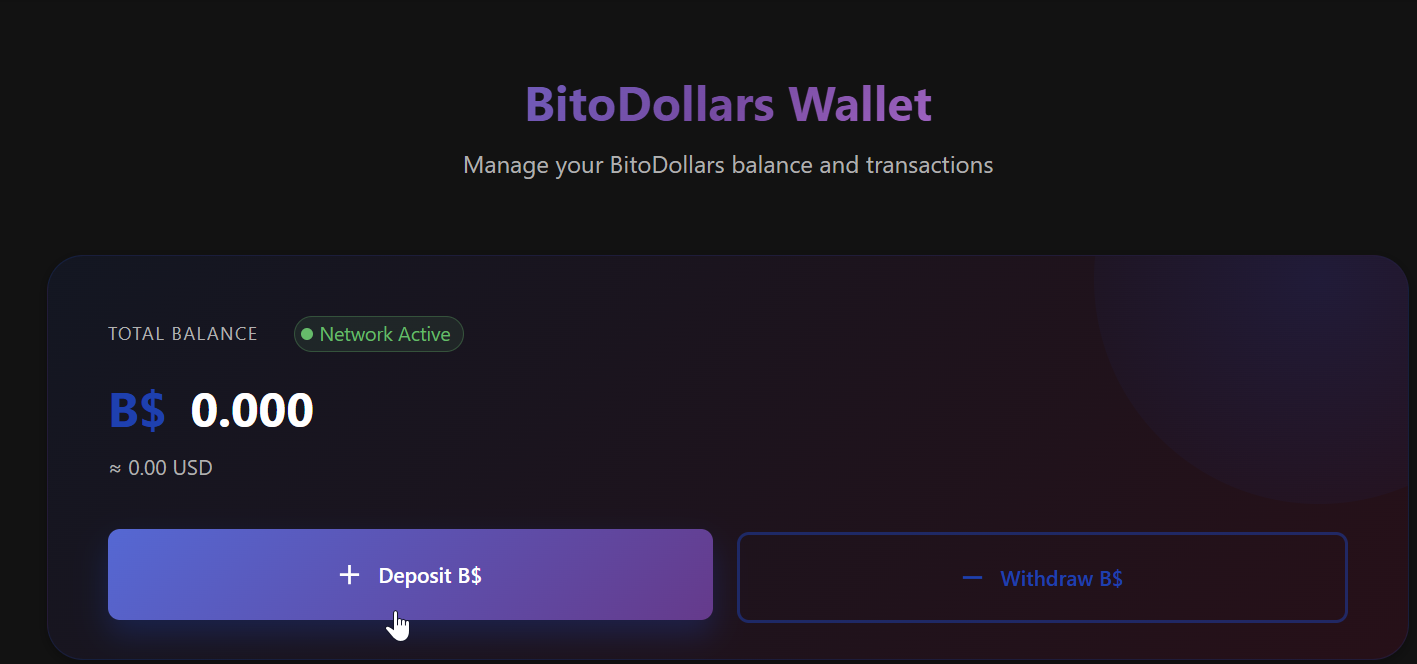
5.1 Open Billing
In the Ad Center sidebar, click Billing. You'll see the BitoDollars Wallet showing:
- Total balance in B$ and USD
- Network status
- Deposit and Withdraw options
5.2 Deposit B$
Click Deposit B$
Open the deposit form.
Choose Payment Method
Select crypto, card, or bank transfer (depending on availability).
Enter Amount & Confirm
Enter the amount to deposit and confirm. Wait for the deposit to appear in your wallet.
5.3 Withdraw B$
Click Withdraw B$, select the destination method, enter the withdrawal amount and confirm.
5.4 Review Transactions
Scroll down to see deposit, withdrawal, and ad spend history. Use Export (CSV) if available to download for accounting.
FAQs - Billing
No. Campaigns need sufficient B$ balance to deliver impressions.
Yes, depending on payment method; check the Billing screen during deposit.
You can keep them for future campaigns or withdraw back to your funding method.
Publish Campaign - Go Live
The Publish Campaign tab is where you connect Campaign + Audience + Spend Cap and set an optional end date before launching.
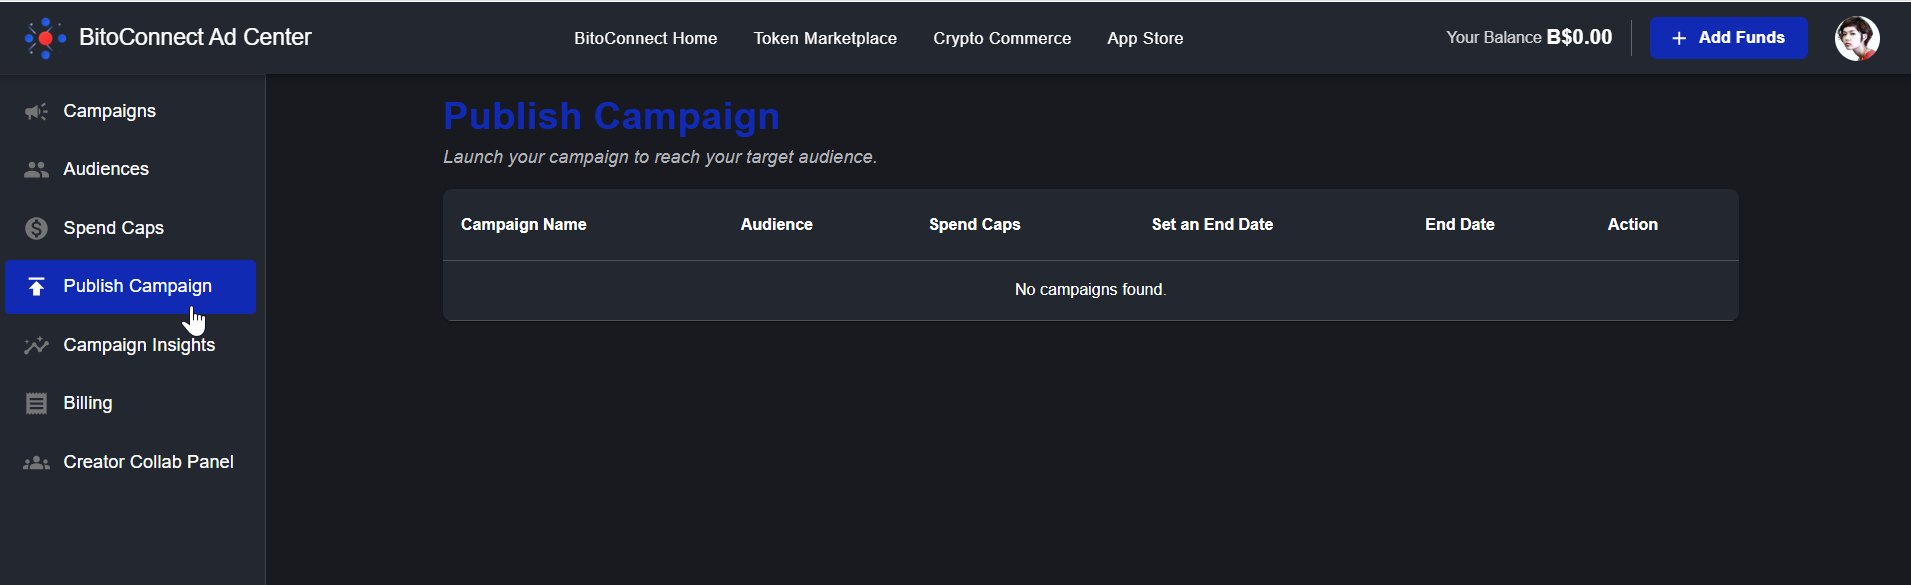
6.1 Open the Publish Campaign Tab
Click Publish Campaign in the sidebar. You'll see a list of campaigns eligible to be published (created and approved).
6.2 Complete the Publishing Checklist
For each campaign row, confirm:
| Field | Action |
|---|---|
| Campaign Name | Your created campaign |
| Audience | Choose one of your saved audiences |
| Spend Caps | Select a daily cap (recommended) |
| End Date | Optional - choose when the campaign should stop |
Under Action, click Publish. Once published, the campaign status changes to Active and begins spending from your B$ wallet.
FAQs - Publish Campaign
Ensure it has passed review and is not rejected or still In Review.
Yes, go back to Campaigns, open the campaign, and select Pause.
No. If not set, the campaign continues until you pause it or the budget runs out.
Campaign Insights - Measure & Optimize
The Campaign Insights tab displays analytics for all your campaigns with filters for status and time period.
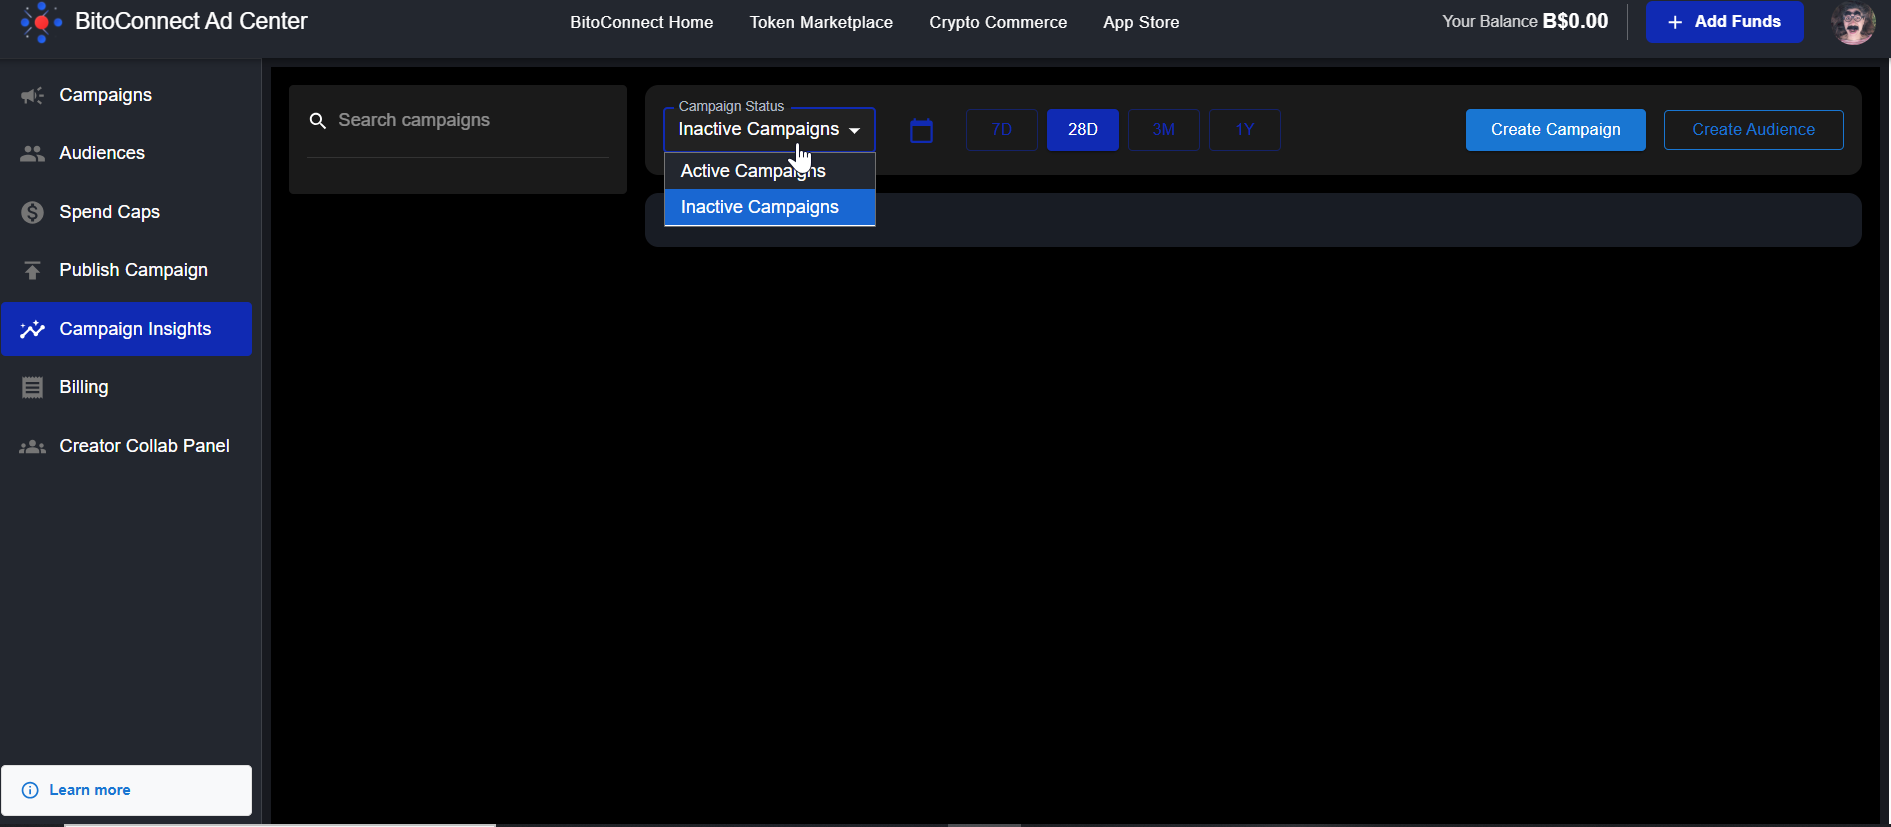
7.1 Filter Your View
Click Campaign Insights in the sidebar. Use filters:
- Search campaigns by name
- Campaign Status: Active / Inactive
- Date range: 7D, 28D, 3M, 1Y, or custom
7.2 Key Metrics to Watch
Impressions
Ad Views
Clicks
Ad Clicks
CTR
Click Rate
CPC / CPM
Cost Metrics
Conversions
Goal Achieved
7.3 Optimization Ideas for Crypto Brands
CTR Low (<1%)
Test new creatives, headlines, and hooks to improve engagement.
CPC High
Broaden audience or refine targeting to cheaper regions.
Conversions Low
Improve landing page speed, clarity, and onboarding flow.
FAQs - Campaign Insights
Metrics refresh periodically, but may not be real-time. Allow some time after changes.
Your creative is being shown but not compelling enough. A/B test different visuals and ad copy.
Check whether the pixel/SDK is installed and firing correctly on your "success" page.
Creator Collab Panel & Marketplace
Beyond running platform ads, Business Owners can scale promotion by working with creators through the Creator Collab Panel and Collabs Marketplace.
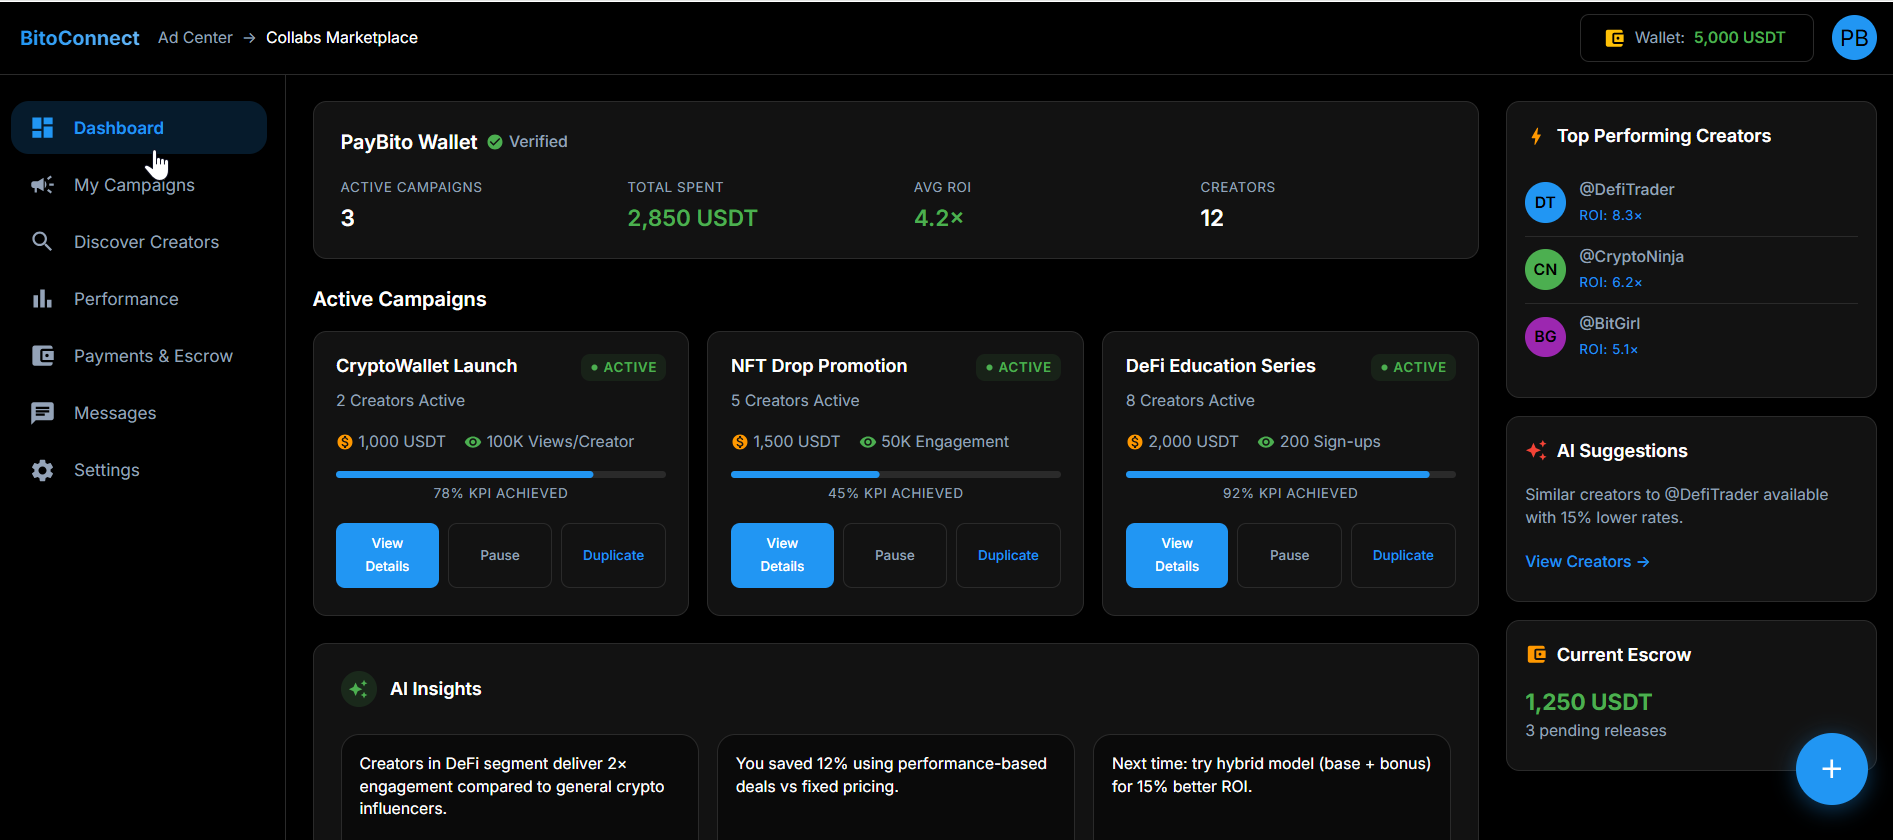
8.1 Open Creator Collab Panel
In Ad Center, click Creator Collab Panel from the sidebar. Here you can view your collaborations, performance, and escrow stats.
8.2 Explore Collabs Marketplace
From the top navigation, click Collabs Marketplace. Review:
- Active campaigns
- Total spent and ROI
- Number of creators working with you
- Top Performing Creators (with ROI)
- AI Suggestions for similar creators
FAQs - Creator Collabs
Yes, creators can be assigned to promote the same campaign or custom creator-specific briefs.
Payments often use escrow or milestones linked to KPIs (views, clicks, signups). Details appear in Payments & Escrow.
No. You can run Ad Center campaigns without creators, but creator partnerships usually improve reach and authenticity.
Final Checklist for Business Owners
Before launching your first campaign:
Launch Checklist
- Fund your BitoDollars Wallet (Billing)
- Create at least one Campaign with strong creative and clear CTA
- Set up at least one Audience
- Create a Spend Cap to protect daily budget
- Publish the campaign and monitor via Campaign Insights
- Optionally, onboard creators through Collabs Marketplace for additional reach
Track Your Progress
Track your progress step-by-step as you build, launch, and grow your crypto exchange business through 8 phases.
Getting Started
Choose a plan, register as a trader, publish your website, add branding elements, and customize settings.
Growth Essentials
Add company details, complete MSB registration (if applicable), and submit details to activate mobile apps.
Create Your Ecosystem Asset
Create your asset, activate trading bots, enable for payments, ICO, earn, loans, and referrals. Explore copy trading.
Growth & Scaling
Onboard influencers and affiliates, run ads, attend masterclasses, use AI tools for content, video, and link building.
Business Operations
Send bulk emails and notifications. Use BitoDesk for support, SalesBito for sales, BitoBooks for finances, BitoHRIS for staff.
Multiply Your Earnings
Refer new business owners or software companies and earn 10% of every subscription payment (lifetime recurring revenue).
Continuous Learning
Learn crypto, blockchain, and product features with PayBito Academy videos and certification courses.
Hypergrowth Strategies
Scale beyond an exchange—build an ecosystem with NFT marketplace, ICO launchpad, DEX wallet, mining, and more.
Track Progress - FAQs
Find answers to common questions about tracking your business progress.
The progress tracker shows how far you've progressed in setting up, launching, and scaling your crypto exchange. Each completed task increases your percentage toward 100% completion.
No. You can move ahead at your own pace. However, completing all tasks in a phase ensures that your exchange is fully optimized before scaling.
Registering lets you experience the product as a user. This helps you understand the trader journey, test features, and troubleshoot issues.
You can launch your own cryptocurrency (token/coin), enable trading, use it for payments, ICO fundraising, loans, and investment modules.
No. The platform automates asset creation, ICO setup, and integrations. No coding or blockchain development is required.
You get free access to AI tools for content generation, video creation, link building, and social media campaigns. Plus weekly masterclasses and free marketing courses.
Phase 5 includes tools like BitoDesk for customer support tickets, SalesBito for managing sales teams, BitoBooks for finances, and BitoHRIS for managing staff.
In Phase 6, you earn 10% recurring commission for referring new Business Owners or referring software companies to use APIs.
Yes. You get free access to PayBito Academy, certification courses, and product videos to help you grow your platform and skills.
The timeline depends on how actively you work through the checklist. Some businesses reach 100% in weeks, some in months — it's self-paced.
Track Your Progress
Track your progress step-by-step as you build, launch, and grow your crypto exchange business through 8 phases.
Getting Started
Choose plan, register, publish website, add branding, customize settings.
Growth Essentials
Add company details, complete MSB registration, submit app details.
Create Ecosystem Asset
Create your asset, activate trading bots, enable payments, ICO, earn, loans.
Growth & Scaling
Onboard influencers, run ads, attend masterclasses, use AI tools.
Business Operations
Send bulk emails, use BitoDesk, SalesBito, BitoBooks, BitoHRIS.
Multiply Earnings
Refer new business owners and earn 10% of every subscription payment.
Continuous Learning
Learn with PayBito Academy videos and certification courses.
Hypergrowth Strategies
Build ecosystem with NFT marketplace, ICO launchpad, DEX wallet, mining.
My Dashboard
The Dashboard provides a quick overview of your business insights and performance metrics. Monitor commissions, trading activities, and user engagement in real time.

Overview Cards
Commission Earned
Total Revenue
Pending Settlement
Awaiting
Trading Volume
Total Value
Users Registered
Total Users
Performance Charts
The dashboard includes visual representations showing Commission Earned by Month, Users Registered by Month, Trading Volume by Month, and Users Active by Month.
User and Activity Insights
- Active Users (Last 24 hrs): Shows how many users were active within the last 24 hours.
- Fiat Activity: Displays your fiat deposit and withdrawal statistics, including:
- Fiat Deposited
- Fiat Withdrawn
Users by KYC Status
KYC Pending
Users awaiting review.
KYC Confirmed
Successfully verified users.
KYC Tier 3
Advanced privileges users.
Frequently Asked Questions
The dashboard provides a real-time overview of your business performance, including commissions earned, trading activity, and user engagement metrics — all in one place.
You can view your total Commission Earned and Pending Settlement amounts in the overview cards at the top of the dashboard. These figures update automatically as new transactions occur.
Yes. The Performance Charts section shows month-by-month data for user registrations, active users, and trading volumes, helping you analyze growth trends and performance patterns.
This section displays the KYC verification status of your users, categorized into Pending, Confirmed, and Tier 3 Confirmed, allowing you to track compliance progress.
Under User and Activity Insights, you can view how many users were active in the last 24 hours, along with details of Fiat Deposited and Fiat Withdrawn transactions.
My Earnings
This page displays your total earnings from various marketplaces within the ecosystem, along with your final settlement amount.
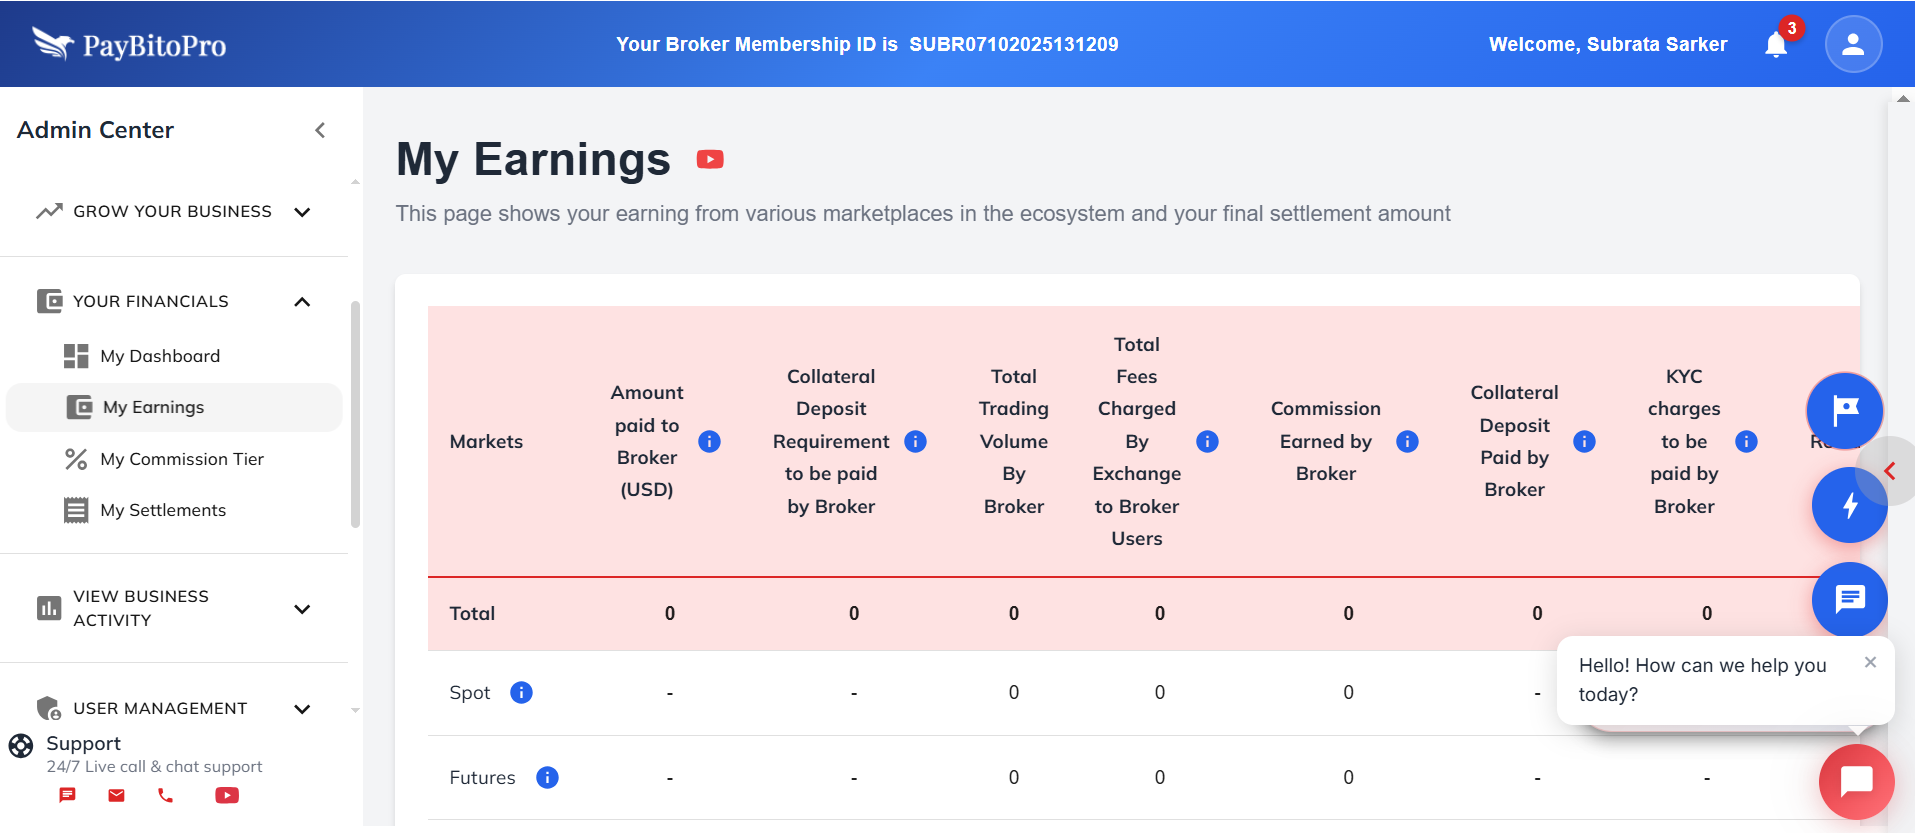
Markets Covered
| Field | Description |
|---|---|
| Amount Paid to Broker | Total amount paid to you |
| Collateral Deposit | Required collateral amount |
| Trading Volume | Total value of trades |
| Total Fees Charged | Cumulative exchange fees |
| Commission Earned | Total commission income |
| Final Settlement | Net amount after adjustments |
KYC Charges
The KYC Charges section provides a detailed summary of all verification costs for your exchange users. It tracks charges for Tier 2 and Tier 3 KYC levels, showing how much you’ve spent and how much is still payable.
You can view the charge per KYC, the number of verifications, the total charge, and the total for all completed KYCs. The section also highlights the amount already paid and the net amount due, ensuring you have a clear overview of your KYC-related expenses.
This overview helps brokers maintain transparency and manage compliance costs efficiently across all verified users.
Frequently Asked Questions
You can view a complete breakdown of your earnings, expenses, and settlements across all active markets, helping you track your exchange’s financial performance in real time.
Earnings are displayed for Spot, Futures, Options, P2P, Portfolio, NFT Marketplace, Payment, and ICO markets — along with any Copy Trade-related income.
Final Settlement represents your net earnings after deducting all applicable charges, collateral deposits, and KYC-related expenses.
KYC Charges show the total cost of user verification at Tier 2 and Tier 3 levels, including the amount already paid and the balance payable.
The detailed view of commissions, deposits, rewards, and expenses helps you analyze profit margins, ensure compliance, and plan settlements more efficiently.
My Commission Tier
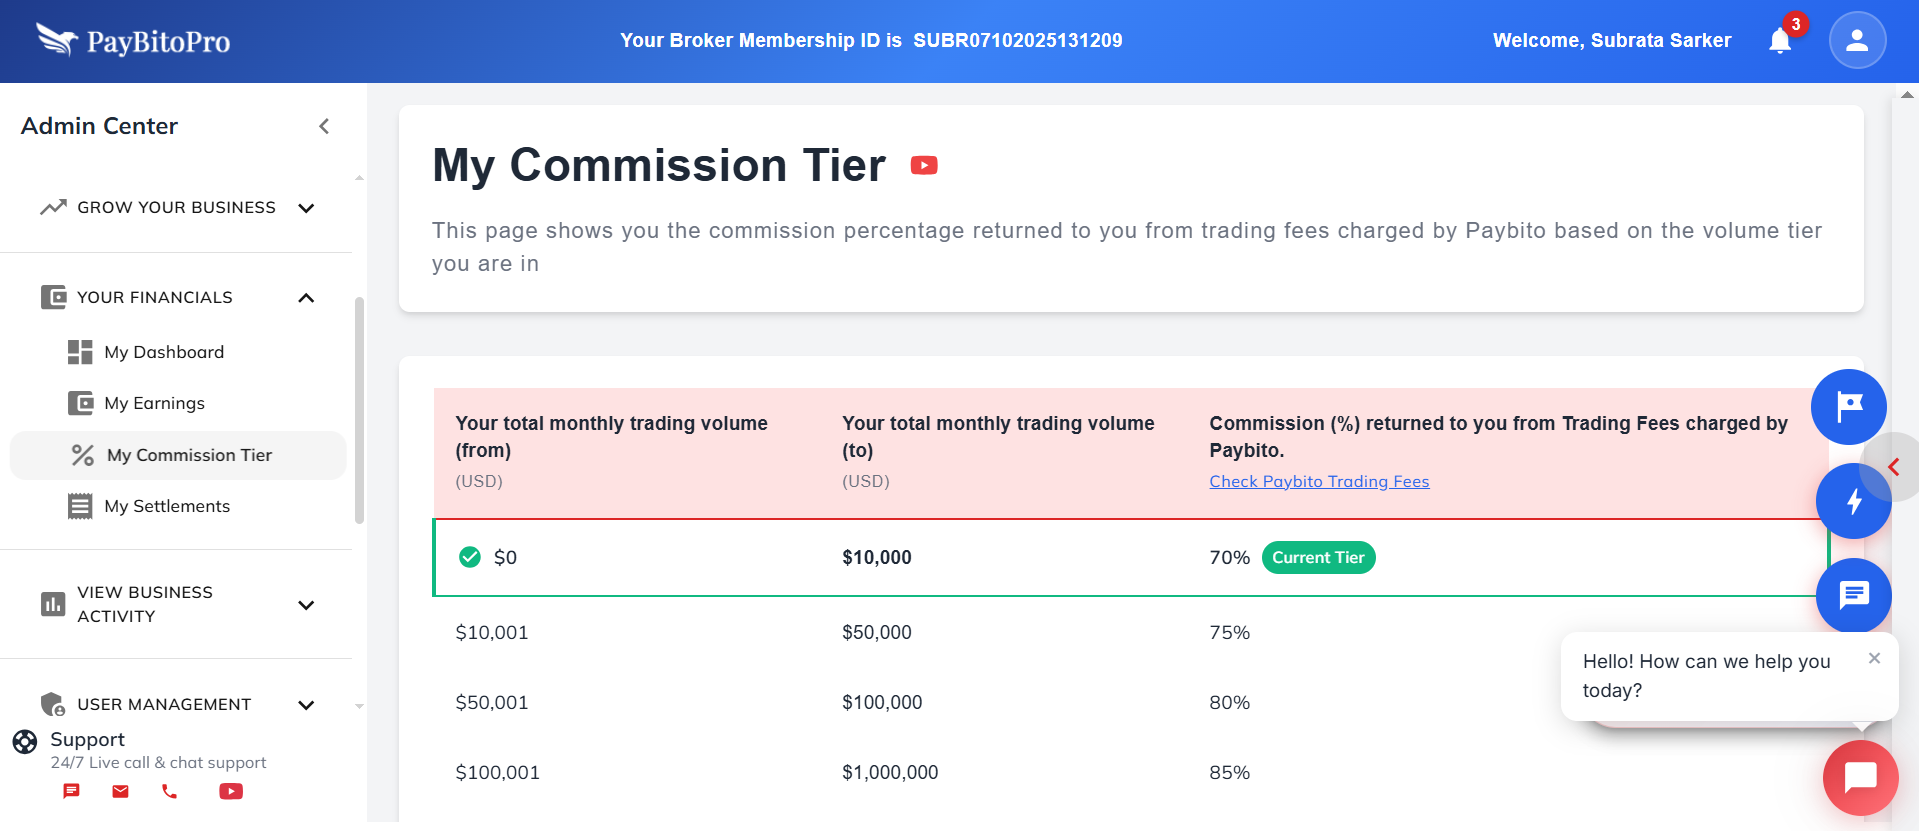
This section displays the commission percentage you earn based on your total monthly trading volume. Your commission increases as your trading volume grows.
| Monthly Volume | Commission % |
|---|---|
| Up to $10,000 | 70% |
| $10,001 - $100,000 | 75% |
| $100,001 - $1M | 80% |
| $1M - $10M | 85% |
| $10M - $100M | 90% |
| $100M - $1B | 94% |
| Over $1B | 96% |
Frequently Asked Questions
Your commission tier is based on your total monthly trading volume. As your trading activity increases, you automatically move up to higher tiers that offer a greater percentage of commission earnings.
Yes, every plan includes a 5-day free trial, allowing you to explore all features before making a payment decision.
Yes, the dashboard clearly highlights your current tier and progress. You can easily monitor how much additional trading volume is needed to reach the next commission level and boost your earnings.
My Settlements

The My Settlements section allows you to view your settlement bank details, request settlements, and check your complete settlement history. You can monitor your total amount, withdrawable amount, and take action when funds are available. If your withdrawable amount differs from the total, it may be due to pending verifications, holds, or ongoing transactions.
Your Settlement Bank information is automatically filled once you complete your KYC, as these details are required for compliance. If your KYC isn’t submitted yet, you can add your bank information manually, but settlements will only begin after your KYC is approved.
If your KYC is already verified, this section will display your registered bank details, including Beneficiary Name, Beneficiary Address, Bank Name, Account Number, Routing Number, and Account Type. You can also update this information when needed and review your complete Settlement History for transparency.
Frequently Asked Questions
The difference may be due to pending verifications, active holds, or ongoing transactions that are yet to be settled.
No. You can add your bank details manually, but settlements will only be processed after your KYC approval for compliance and security reasons.
If your KYC is verified, you can edit and update your registered bank details directly from this section. All changes will reflect in your future settlement transactions.
KYC Confirmed Users
This page displays all traders whose Tier 2 KYC documents and withdrawal bank details have been verified and approved — meaning these users are fully confirmed.
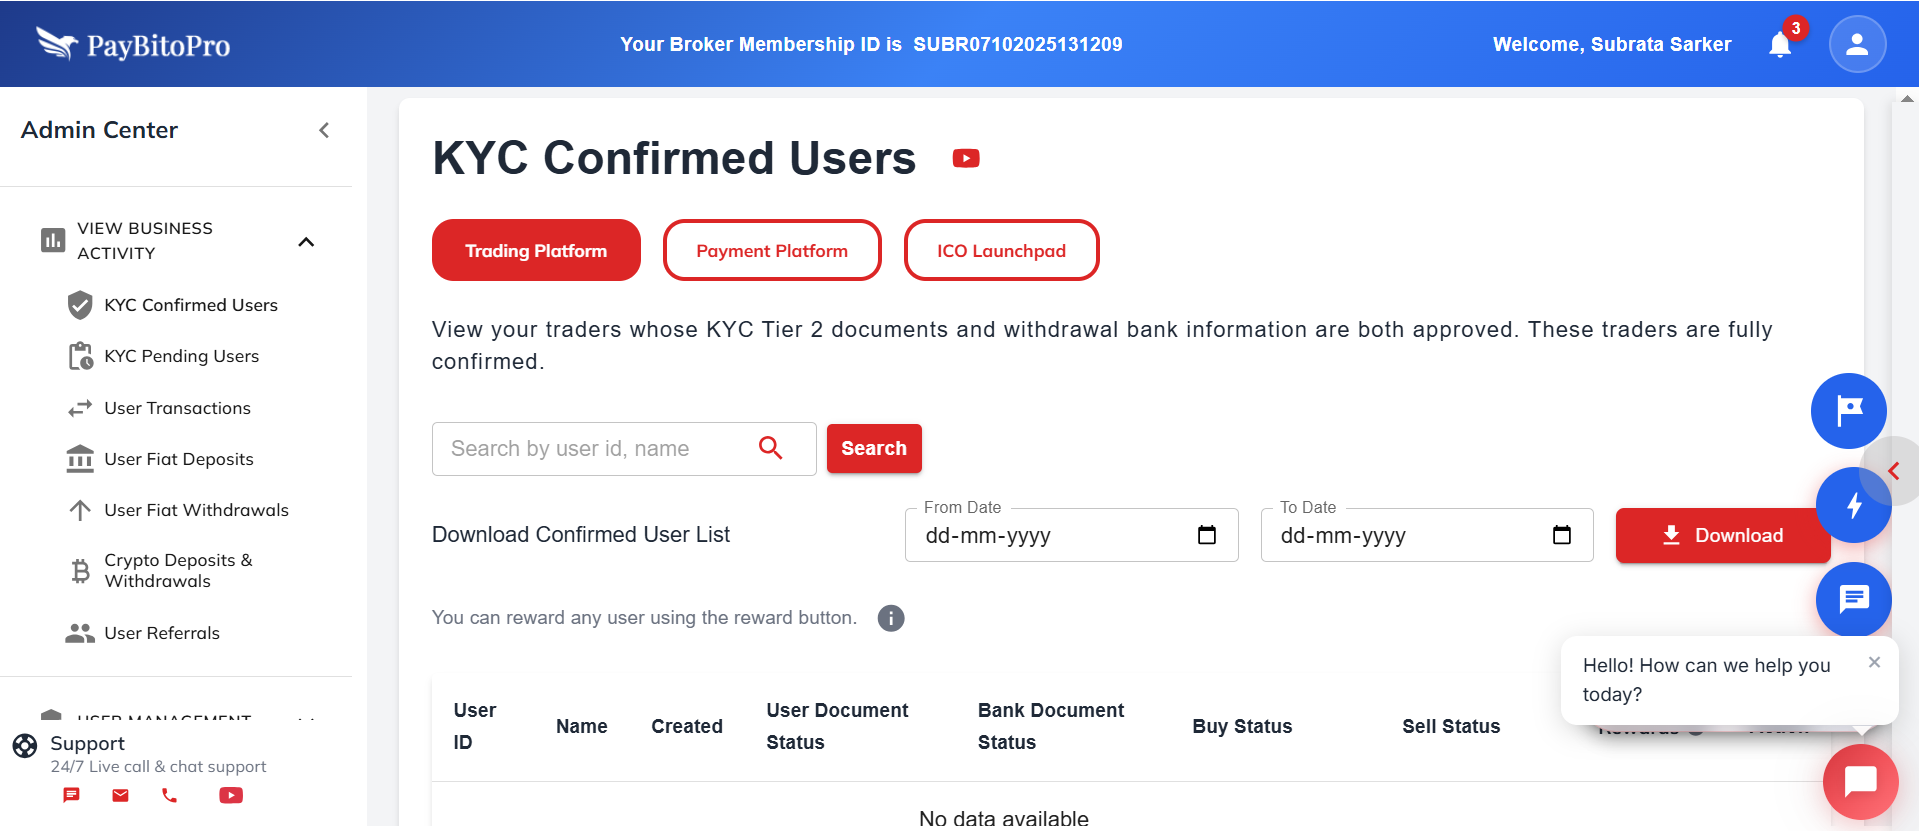
You can also view:
- 1. Payment merchants whose KYC documents are approved.
- 2. ICO contract owners with verified KYC documents, under their respective tabs.
Use the search bar to find users by User ID or Name.
You can also filter by date range (From Date – To Date) and download the list of confirmed users.
Additionally, you can reward any user directly using the Reward button.
You can reward any user you would like using this feature.
- 1. Just click on the Rewards button beside the user you would like to reward.
- 2. Key in the amount you would want to reward that user in the box that appears.
- 3. Rewards are given in USD (if available on your exchange) or in the home fiat currency available on your exchange.
- 4. Rewards are received by your user in their USD wallet (if available on your exchange) or in the home fiat currency wallet available on your exchange.
- 5. Rewards are paid from your Final Settlement amount.
Frequently Asked Questions
A confirmed KYC status means the user’s Tier 2 identity verification and withdrawal bank details have been successfully reviewed and approved. These users are fully verified and eligible for trading, deposits, and withdrawals.
To reward a user, click the “Reward” button beside their name, enter the desired amount, and confirm. Rewards are credited to the user’s USD wallet or home fiat currency wallet and are deducted from your Final Settlement balance.
Yes. You can search by User ID or Name, filter users by date range (From–To), and download the complete list of confirmed users for record-keeping or analysis.
KYC Pending Users
This section displays traders whose Tier 2 KYC documents or withdrawal bank information are either not submitted or under review.
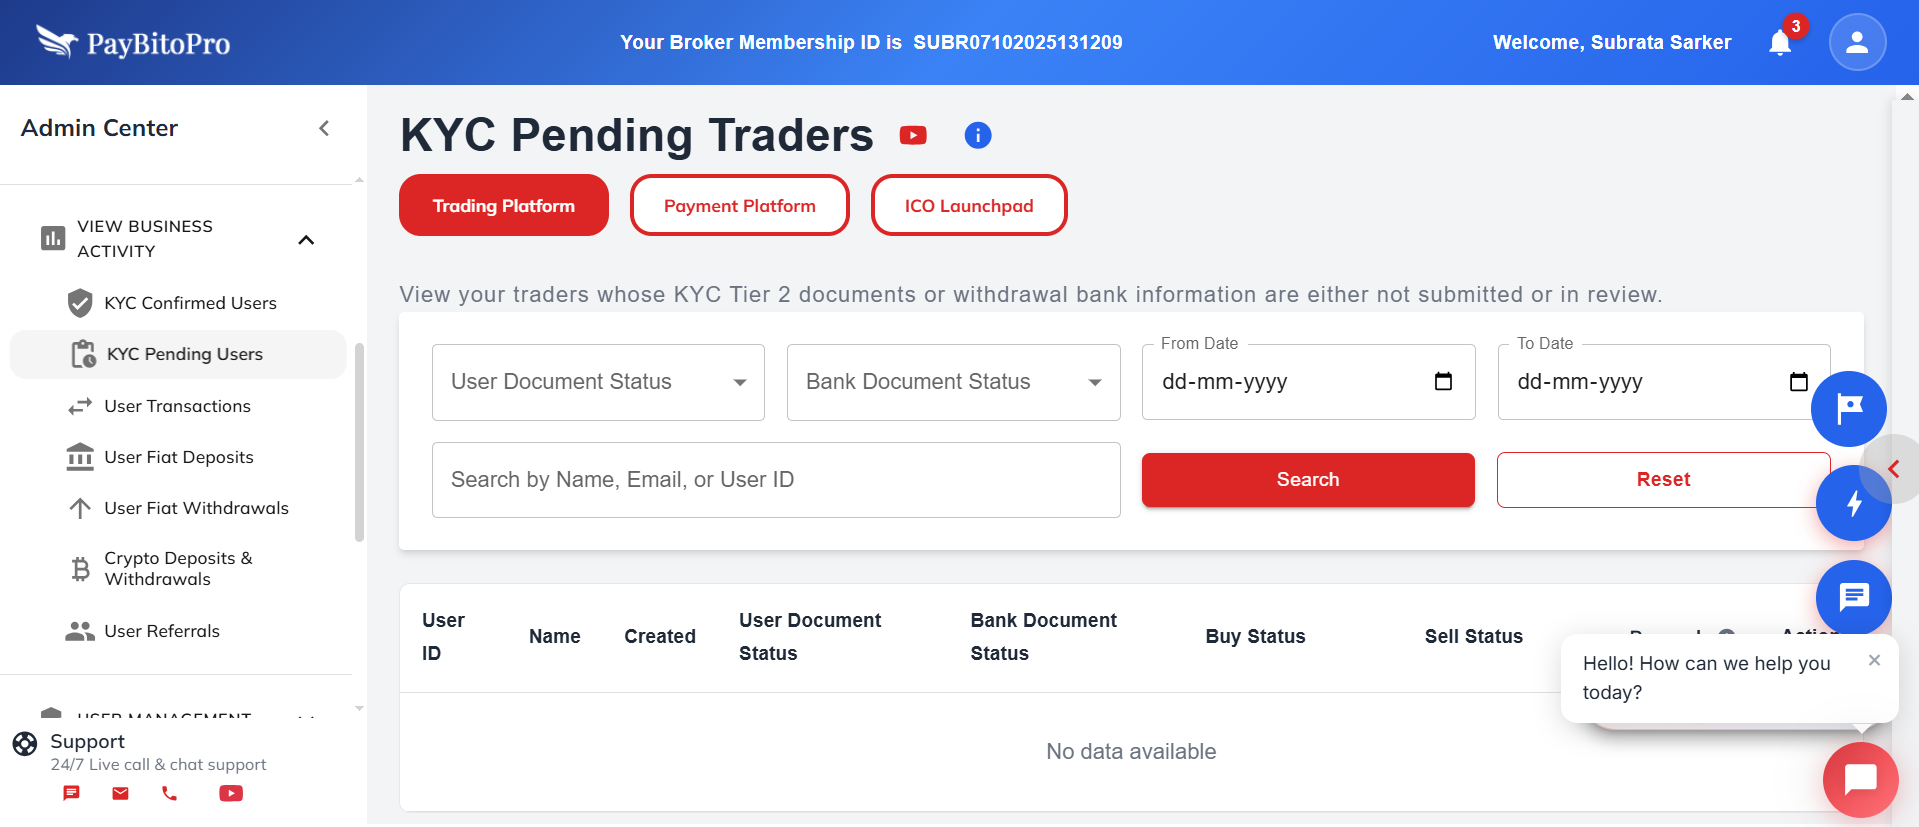
You can also view, under their respective tabs:
- 1. Payment merchants whose KYC documents are pending.
- 2. ICO contract owners with pending KYC verification.
You can search traders by Name, Email, or User ID, and filter results using the From Date and To Date fields.
Track the verification progress through:
- 1. User Document Status
- 2. Bank Document Status
This helps you easily identify which users still need to complete their KYC process for full trading access.
Frequently Asked Questions
A pending KYC status means the user’s Tier 2 identity verification documents or bank details are either not submitted or are currently under review. Such users have limited access and cannot perform full trading or withdrawal activities until verification is complete.
You can monitor each user’s User Document Status and Bank Document Status in this section. These statuses show whether the documents are Submitted, Verified, Declined, or Not Submitted, helping you identify what’s pending for approval.
Yes. Use the search bar to find traders by Name, Email, or User ID, or apply date filters (From Date – To Date) to view pending KYC submissions within a specific timeframe.
User Transactions
The Trader Buy and Sale Orders section allows you to monitor and manage your users’ trading activities in real time. This page provides detailed information about each trade executed by your registered users.

Overview
This section displays all buy and sell orders placed by traders across different markets — including Spot, Futures, Options, P2P, NFT, and Portfolio tabs. You can switch between these tabs to view trading data specific to each market type.
Search and Filter Options
You can search and filter orders using any of the following parameters:
- Customer ID
- Transaction ID
- Full Name
- Currency
You can also check the Show All option to display all available orders without filters.
Order Details Table
| Column | Description |
|---|---|
| Order ID | Unique identifier for each trade |
| Date & Time | Timestamp of trade execution |
| Customer ID | ID of user who placed order |
| Action | Buy or Sell |
| Currency / Base | Trading pair details |
| Price / Fees | Rate and fee charged |
| Order Status | Pending, Completed, Cancelled |
| Order Type | Specifies whether it’s a Market or Limit order. |
Frequently Asked Questions
Yes. You can switch between the Spot, Futures, Options, P2P, NFT, and Portfolio tabs to view trading data specific to each market type. Each tab displays all related buy and sell orders placed by your traders.
Use the search bar to look up orders by Customer ID, Transaction ID, Full Name, or Currency. You can also select “Show All” to display all available orders without any filters.
Each trade entry includes Order ID, Date & Time, Customer ID, Full Name, Action (Buy/Sell), Currency, Base Currency, Quantity, Price, Fees, Order Status, and Order Type (Market/Limit) — giving you a complete view of your users’ trading activity.
User Fiat Deposits
View and manage all fiat currency deposits made by your users. Track incoming funds, verify deposit details, and monitor transaction statuses.
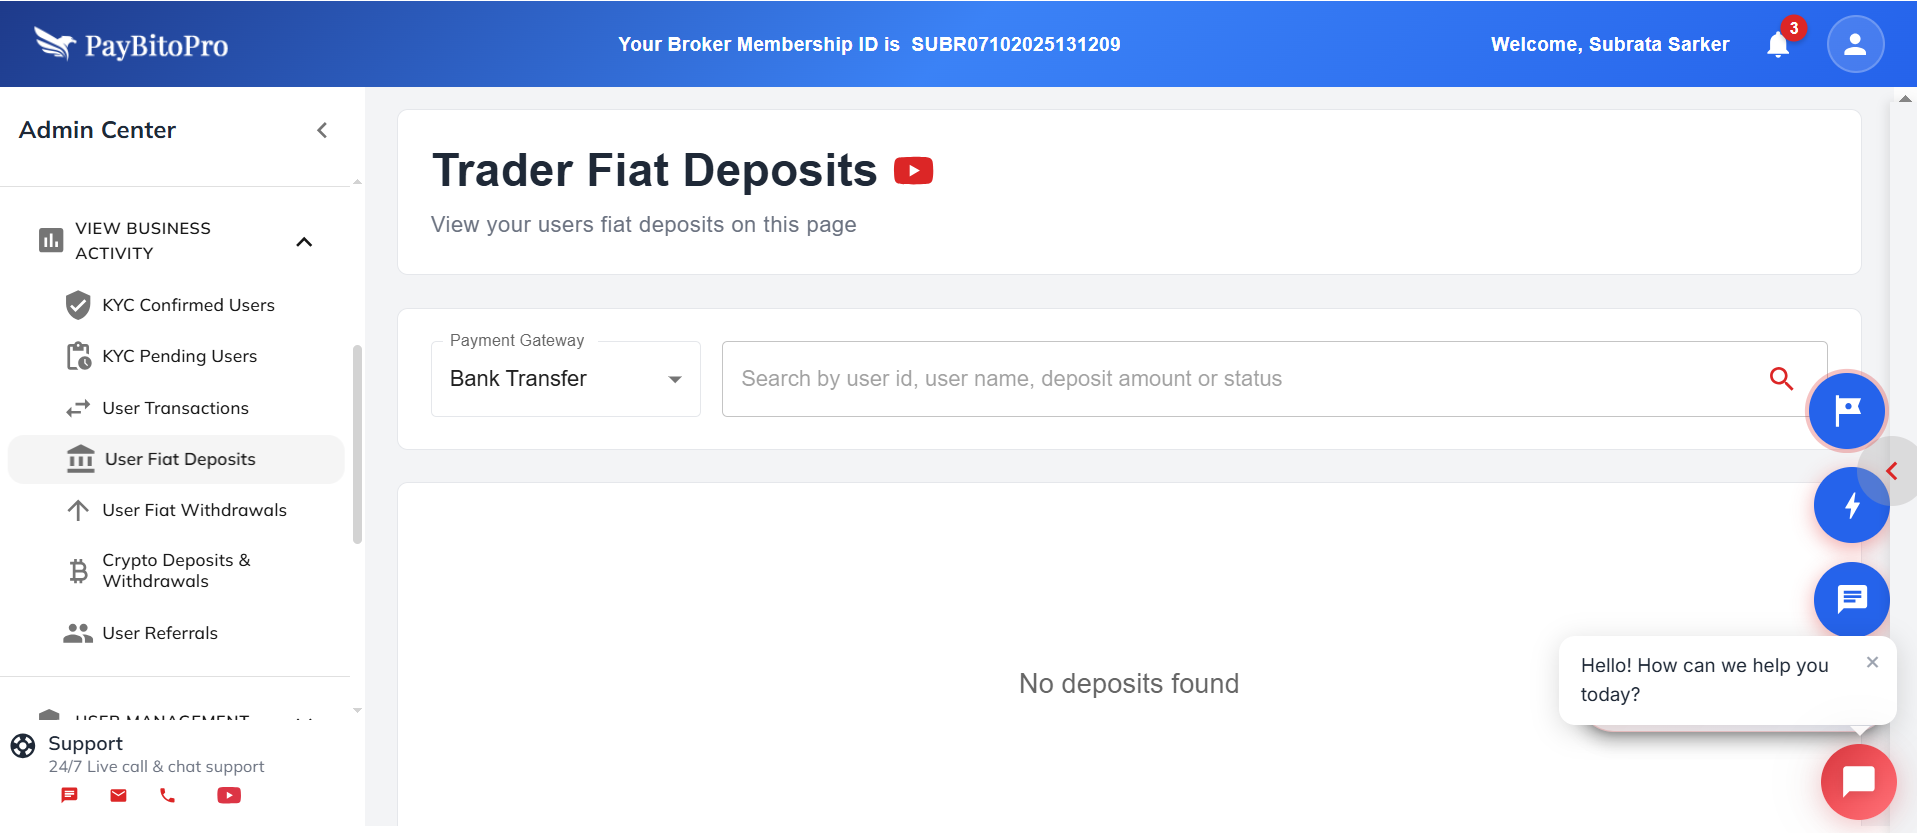
Here, you can view all user deposits made through supported payment gateways. The section displays deposit details such as user ID, username, payment amount, and status.
Payment Gateway Options
From the Payment Gateway dropdown menu, you can choose between:
Bank Transfer
Deposits made via bank transfers.
Razor Pay
Deposits via Razor Pay gateway.
Search and Filter
Use the search bar to quickly locate transactions by entering any of the following:
- User ID
- User Name
- Deposit Amount
- Deposit Status
Actions
- Refresh: Click the Refresh button to update and view the latest deposit records.
- Export: Use the Export option to download deposit data for reporting or reconciliation (enabled when data is available).
Frequently Asked Questions
Use the Payment Gateway dropdown to select between Bank Transfer and Razor Pay. The list will automatically filter to show deposits made through the selected payment method.
Yes. Enter the User ID, Username, Deposit Amount, or Deposit Status in the search bar to locate specific transactions quickly.
Click the Refresh button to update the page with the latest deposit data. Once deposit records are available, the Export option becomes active — allowing you to download the transaction list for reporting or reconciliation purposes.
User Fiat Withdrawals
The Trader Fiat Withdrawals section allows you to view and manage all fiat currency withdrawal requests made by your users. This page helps you track outgoing transactions, verify withdrawal details, and monitor their status.
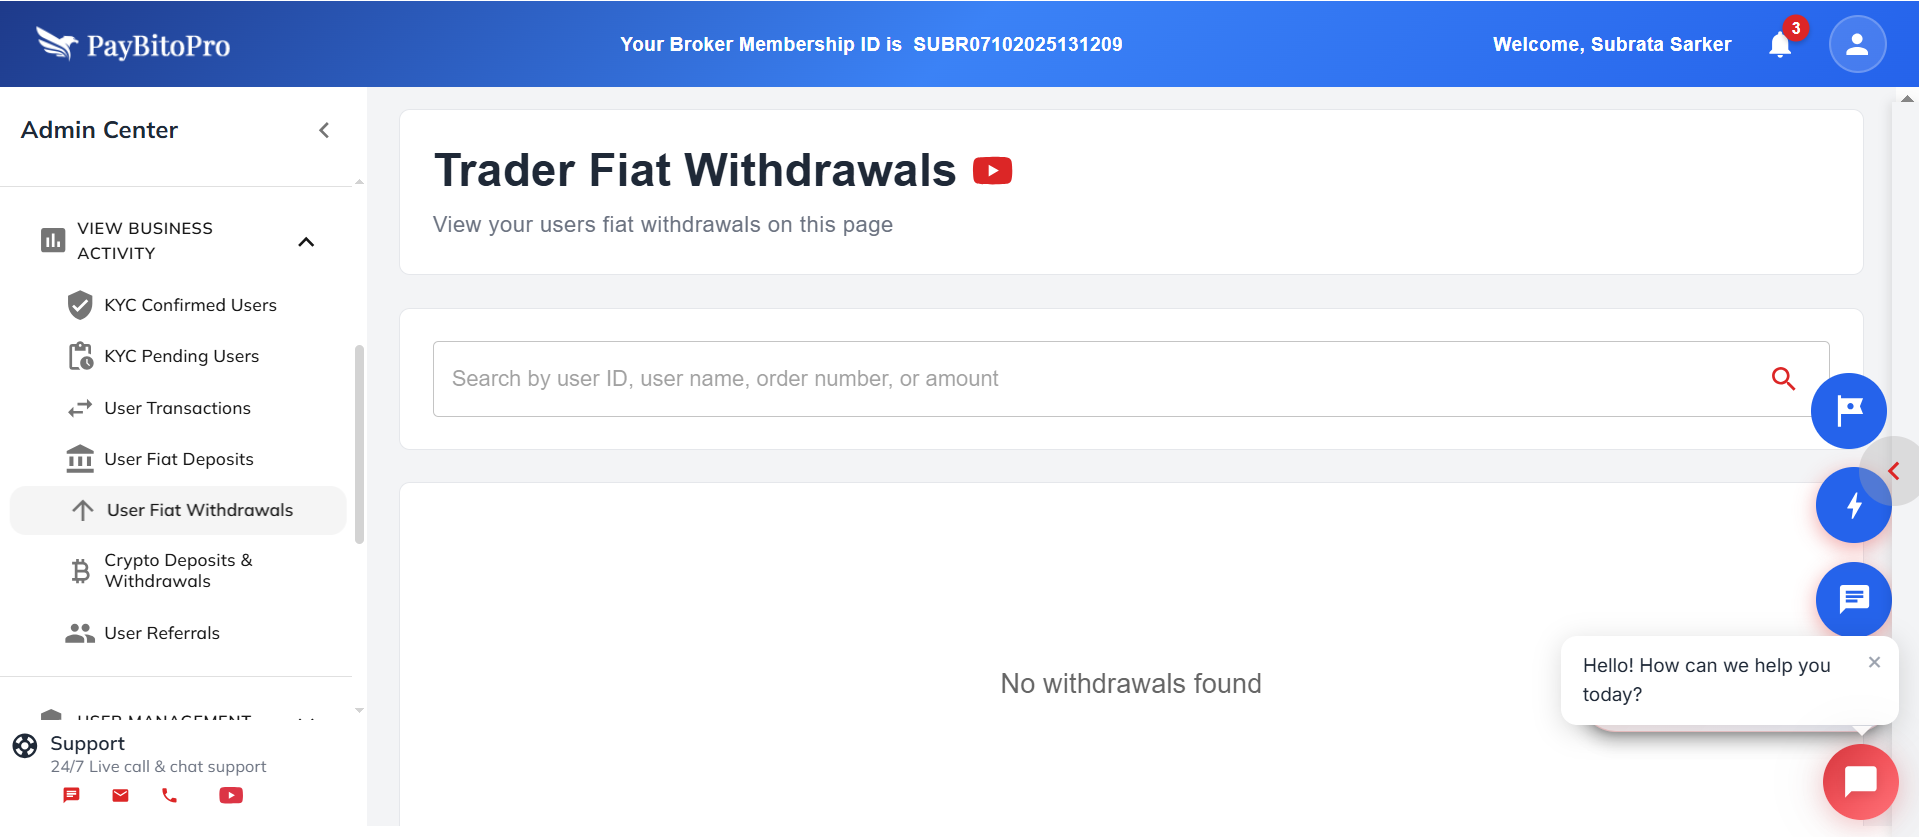
Here, you can view all withdrawal requests initiated by traders. It provides complete transparency over processed, pending, or declined fiat withdrawals.
Search and Filter
Use the search bar to find specific transactions by entering any of the following:
- User ID
- User Name
- Order Number
- Amount
Actions
Frequently Asked Questions
You can view all fiat withdrawal requests made by users, including their status (Pending, Processed, or Declined), amounts, and transaction details. This helps you track and manage outgoing payments effectively.
Use the search bar to find transactions by User ID, Username, Order Number, or Amount. This makes it easy to locate specific records for review or verification.
Yes. Click Refresh to update the list with the latest withdrawal requests. Once the data is available, you can click Export to download the full report for auditing or reconciliation.
Yes. Admins with sufficient permissions can review pending requests and approve or decline them after verifying the user’s KYC and wallet balance.
Crypto Deposits & Withdrawals
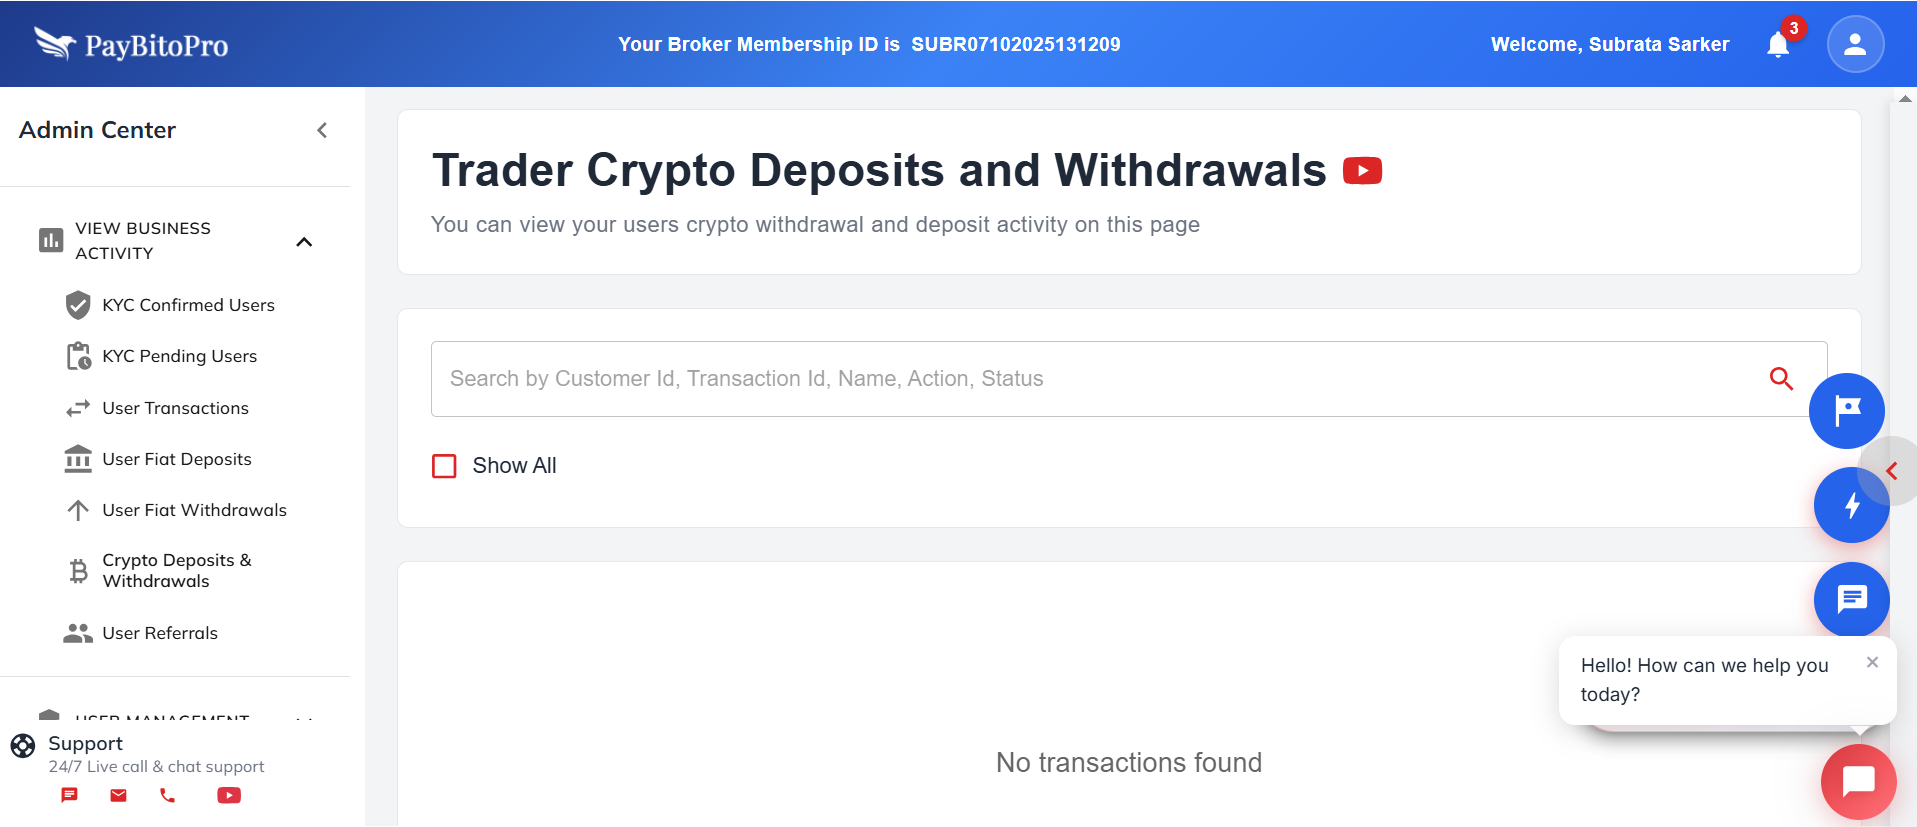
Monitor all crypto deposit and withdrawal activities of your traders. Use the search bar to find specific records by Customer ID, Transaction ID, Name, Action, or Status.
Show All Option
Tick "Show All" to display both crypto deposits and withdrawals in a single view for easier monitoring.
Frequently Asked Questions
You can view all trader crypto deposit and withdrawal activities, including details such as Customer ID, Transaction ID, Name, Action (Deposit or Withdrawal), and current Status.
Use the search bar to locate a record by entering any detail — such as Customer ID, Transaction ID, Name, Action, or Status — and click the search icon to display the results.
Yes. Tick the “Show All” checkbox to display both crypto deposits and withdrawals in a single view, making it easier to monitor overall user activity.
User Referrals
View which users have referred others in the table below. Please note that if the referred user has not completed their KYC verification and made their first transaction, no referral bonus will be awarded.
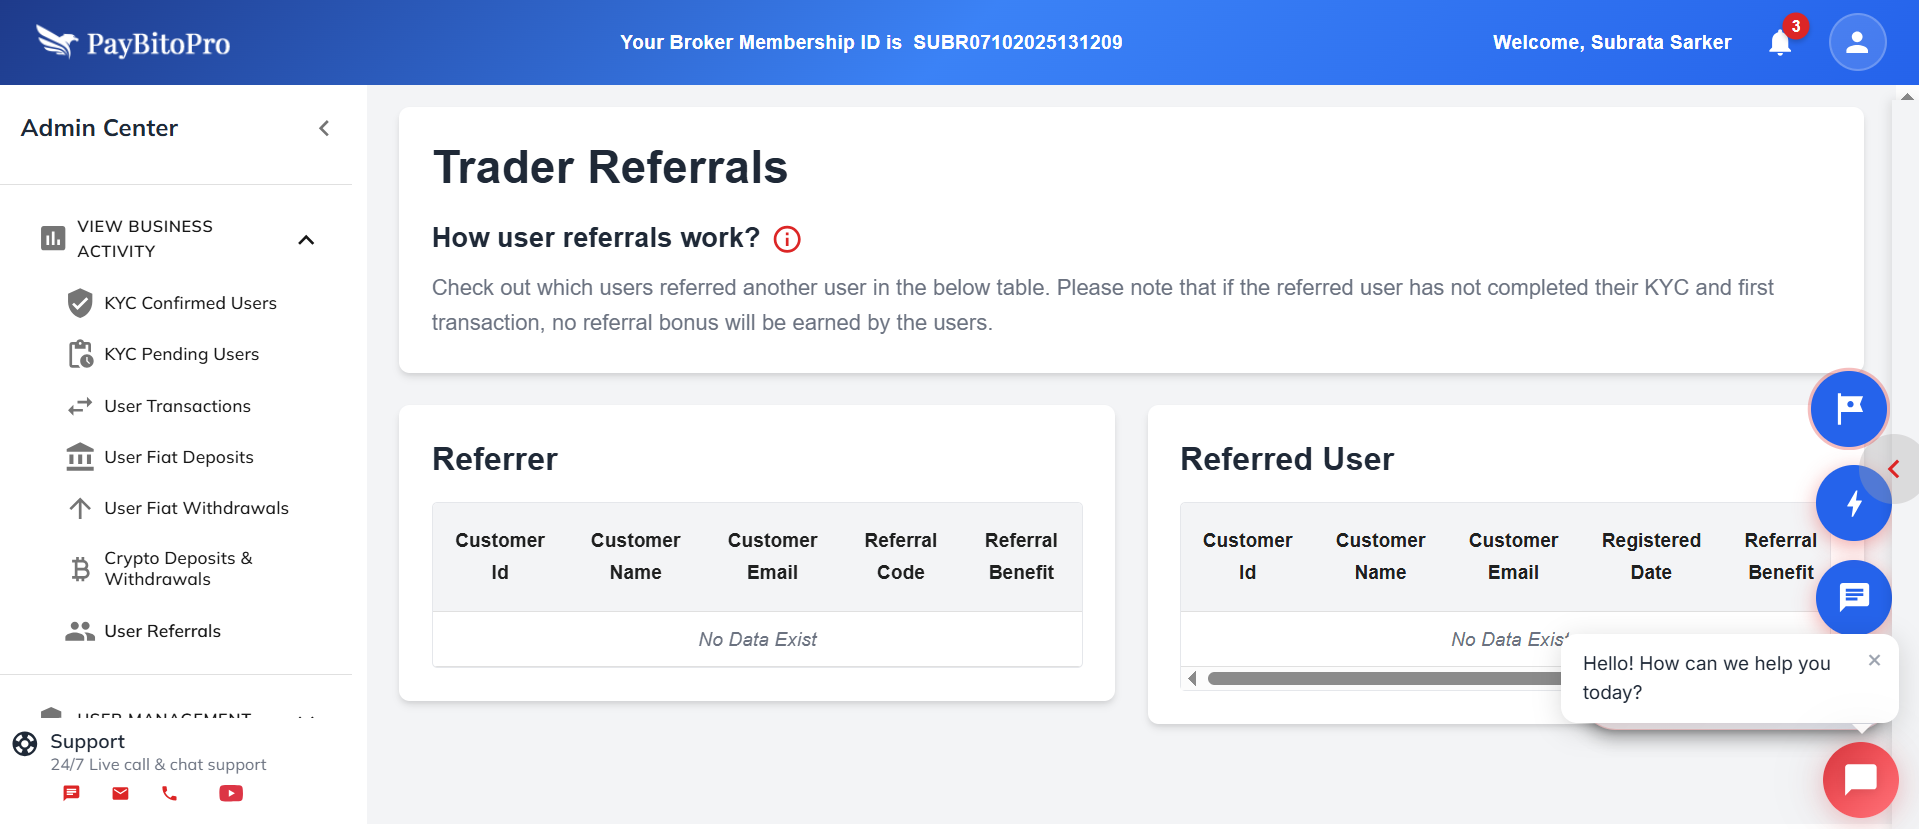
Referrer:
- Customer ID
- Customer Name
- Customer Email
- Referral Code
- Referral Benefit
Referrer:
- Customer ID
- Customer Name
- Customer Email
- Registered Date
- Referral Benefit
How User Referrals Work
Referral Code
Each user receives a unique referral code to share with friends and family.
Registration
When someone uses the referral code to sign up, they become the referred user.
Requirements
Referred user must complete KYC verification and their first transaction.
Benefits
Once both conditions are met, both referrer and referred user receive their benefits.
Tracking
You can track all your referrals and their status in the tables on this page.
Important Note
Referral benefits are only credited after the referred user completes both KYC verification and their first transaction. Incomplete referrals will not earn any benefits.
Frequently Asked Questions
You will receive the referral bonus once your referred user completes their KYC verification and makes their first transaction successfully.
If the referred user fails to complete their KYC process or doesn’t perform any transaction, neither the referrer nor the referred user will receive any referral benefit.
All your referrals are displayed on this page under the Referrer and Referred User tables. You can check their registration details and referral benefit status anytime.
Yes. There is no limit to the number of users you can refer. Each new user who registers with your referral code will appear in the Referred User list once they meet the KYC and transaction requirements.
Create Admin Users
Create Admin Users for your internal team members, Affiliates, and Sub-Affiliates with specific access permissions.
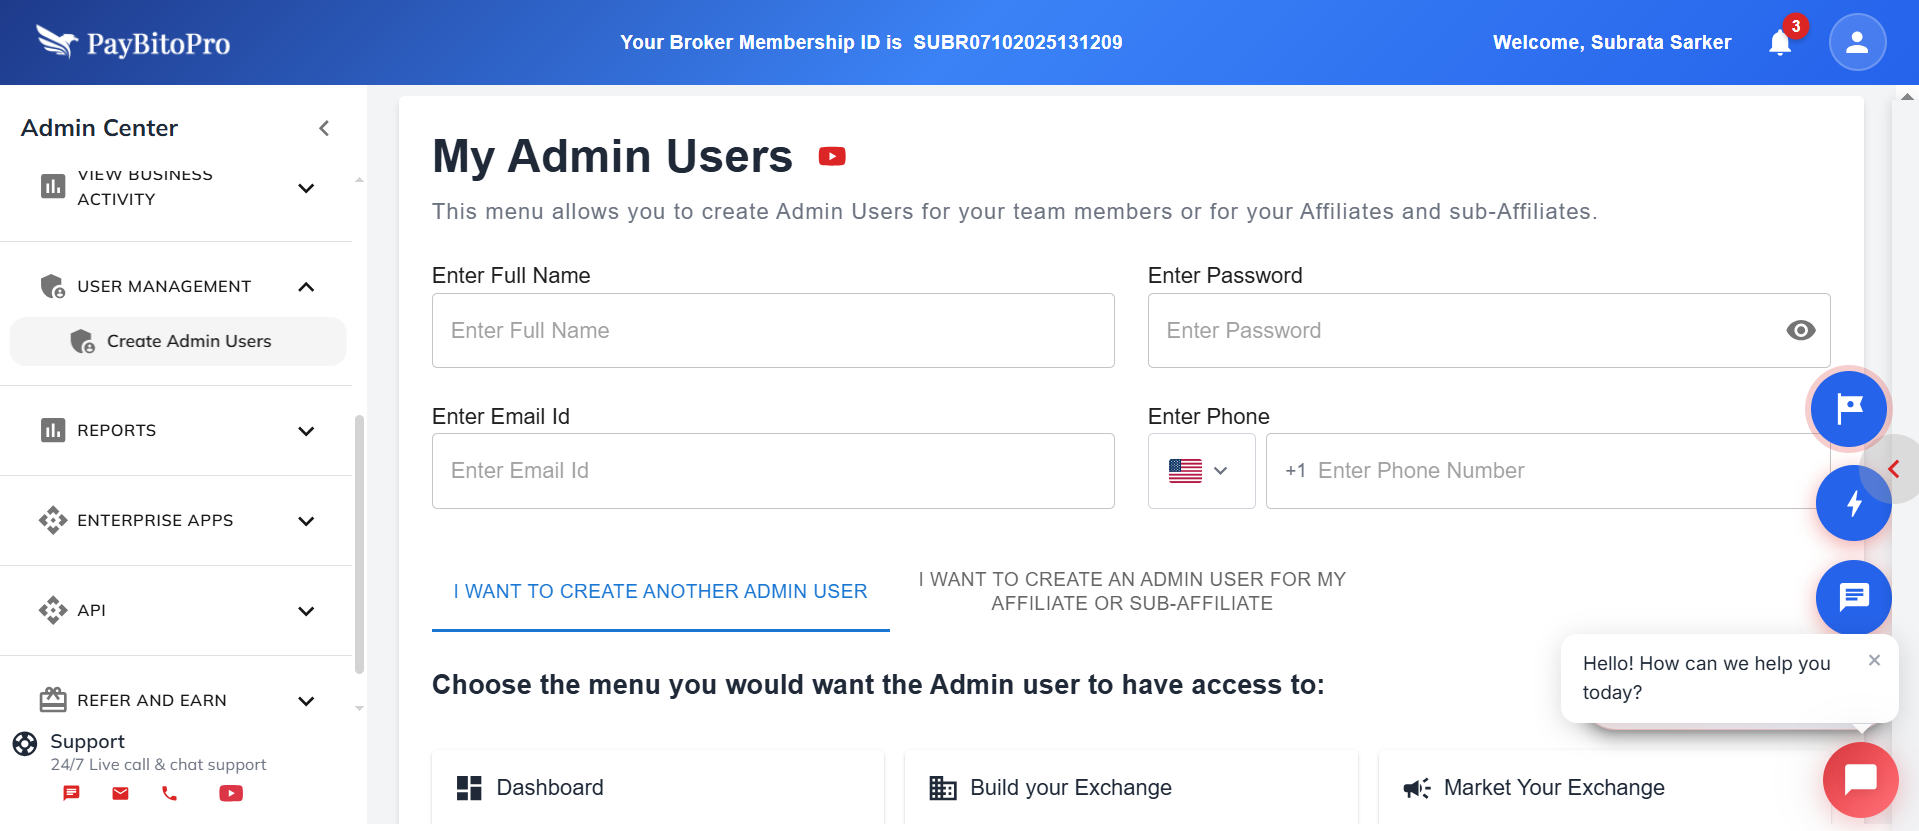
Required Details
- Full Name
- Password
- Email ID
- Phone Number
Access Permissions
Choose which menus the Admin User can access: Dashboard, Build Your Exchange, Market Your Exchange, Pricing Plan, My Earnings, My Settlements, My Commission Tier, List My Assets, My Affiliates, My Admin Users, KYC Confirmed Users, KYC Pending Users, Trader Orders, Trader Fiat Deposits, Trader Fiat Withdrawals, Crypto Deposit-Withdraw, Trader Referrals, Trader Bulk Emails, Exchange Reports, User Reports, Partner Earnings, Ad Center, Trading API, Design Your Product, BitoDesk, SalesBito, BitoBooks, Teamups, BitoHRIS, Profile Info, Settings, and Support.
Frequently Asked Questions
Yes. When creating or editing an Admin User, you can select specific menus or sections they are allowed to access. This ensures each team member, Affiliate, or Sub-Affiliate only sees the tools relevant to their role.
Absolutely. You can update permissions, reset passwords, or revoke access for any Admin User at any time to maintain control over your team’s security and operations.
Internal Admin Users are members of your own team who help manage your exchange operations. Affiliate Admin Users are created under a specific Affiliate or Sub-Affiliate, allowing them limited access to monitor and manage their referred users or earnings based on the permissions you assign.
Business Activity Reports
The Exchange Reports section allows you to generate detailed reports of your exchange activities across different markets — including Spot, Futures, and Options trading. You can analyze trading volumes, transaction history, and market performance within specific time periods and currencies.

How to Generate an Exchange Report:
How to Generate a Report
Select Report Type (Spot/Futures/Options), choose Crypto and Base Currency, set Date Range, then click Action to generate the report.
User Specific Reports
| Report Type | Description |
|---|---|
| All Transaction Details | Every trade and transfer in spot market |
| Trade History | All executed trades with buy/sell details |
| Portfolio Summary | Holdings, valuations, and asset performance |
| Wallet Transaction Summary | Deposits, withdrawals, and internal transfers |
| Gain & Loss Statement | Realized and unrealized profit/loss data |
| GST & TDS Details | Tax deductions and GST calculations |
Frequently Asked Questions
You can generate three types of reports — Spot, Futures, and Options — each providing insights into different trading markets and activities on your exchange.
Yes. You can select the Crypto and Base Currency you want to view to get focused insights on a particular trading pair.
Reports can be generated for any custom date range using the From Date and To Date fields, depending on your exchange’s data storage policy.
Each report typically includes trade volume, transaction count, market pair details, user activity, and profit/loss metrics relevant to the selected report type.
Yes. If the Export option is available, you can download the report in formats such as CSV or PDF for external review or auditing purposes.
If no trades occurred during the selected time period or for the chosen crypto/base pair, the report will appear empty. Try adjusting the date range or selecting a different trading pair.
User Specific Reports
The User Reports section allows brokers and administrators to view and download detailed reports for user trading activities across Spot, Futures, and Options markets.
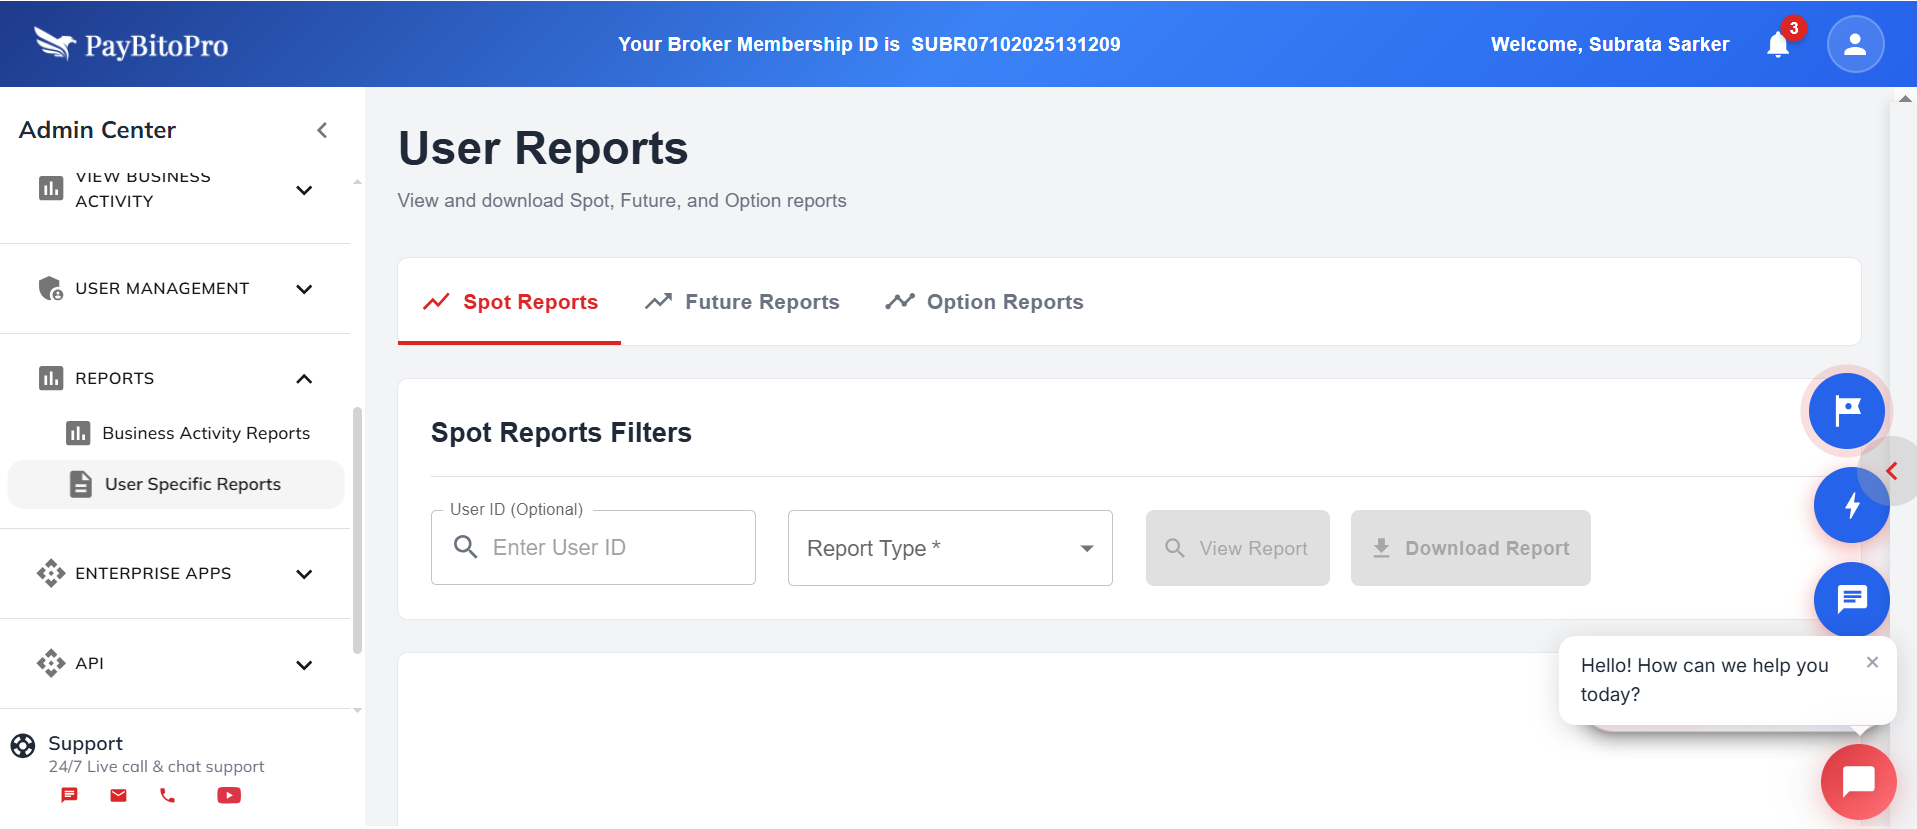
Use the filters below to customize and generate the desired report:
User ID (Optional)
Enter a specific User ID to view reports for an individual trader.
Leave this field blank to generate reports for all users.
Report Type
| Report Type | Description |
|---|---|
| All Transaction Details | Displays every trade and transfer made in the spot market. |
| Trade History | Lists all executed trades, including buy/sell details, quantities, and timestamps. |
| Portfolio Summary | Provides an overview of the user’s holdings, valuations, and asset performance. |
| Wallet Transaction Summary | Shows deposits, withdrawals, and internal wallet transfers. |
| Gain & Loss Statement | Summarizes realized and unrealized profit/loss data. |
| GST & TDS Details | Displays applicable tax deductions and GST calculations. |
From Date
Select the start date for the reporting period. Only transactions from this date onward will be included.
To Date
Select the end date for the reporting period. Only transactions up to this date will be included.
Generating the Report
- Choose the desired Report Type.
- Enter User ID (if applicable).
- Select the From Date and To Date.
- Click the View Report button to display the results on screen.
- Use the Download Report option to export the data.
Frequently Asked Questions
You can generate detailed reports across various categories, including All Transaction Details, Trade History, Portfolio Summary, Wallet Transaction Summary, Gain & Loss Statement, and GST & TDS Details.
Yes. You can enter a specific User ID to generate reports for an individual trader. If you leave the User ID field blank, reports for all users will be displayed.
Use the From Date and To Date filters to define the reporting period. Only transactions within this selected range will be included.
Yes. After viewing the report on-screen, you can click the Download Report option to export the data for offline use.
The Gain & Loss Statement provides a summary of both realized and unrealized profits or losses, giving a clear picture of each user’s trading performance over the selected period.
Enterprise Apps
Access integrated enterprise applications designed for crypto businesses to manage support, sales, HR, finances, and partnerships.
BitoDesk
All-in-One Customer Support System. Manage tickets, conversations, and customer satisfaction.
Key Capabilities
- Unified ticket management
- Multi‑channel support (email, chat, helpdesk)
- SLA & performance tracking
- Team collaboration & automation
- Secure customer data handling
SalesBito
Smart Sales & CRM Platform. Lead management, sales automation, and pipeline tracking.
Key Capabilities
- Lead & pipeline management
- Sales automation workflows
- Customer lifecycle tracking
- Performance analytics & reports
- Team productivity tools
BitoHRIS
HR & Payroll Management. Onboarding, attendance, payroll, and performance tracking.
Key Capabilities
- Employee onboarding & records
- Attendance & leave management
- Payroll & compliance tools
- Performance tracking
- Secure role‑based access
BitoBooks
Smart Accounting Platform. Expense tracking, invoicing, and financial reports.
Key Capabilities
- Expense & income tracking
- Invoicing & billing
- Financial reports & dashboards
- Audit‑ready records
- Business cash‑flow visibility
BitoLink
Partner & Affiliate Management. Tracking, commission management, and analytics.
Key Capabilities
- Affiliate & referral tracking
- Commission management
- Performance analytics
- Custom partner links
- Transparent reporting
Trading API
1. Trading Platform API
Enable automated crypto trading by connecting external applications (bots, trading terminals, algorithmic strategies) to your exchange.
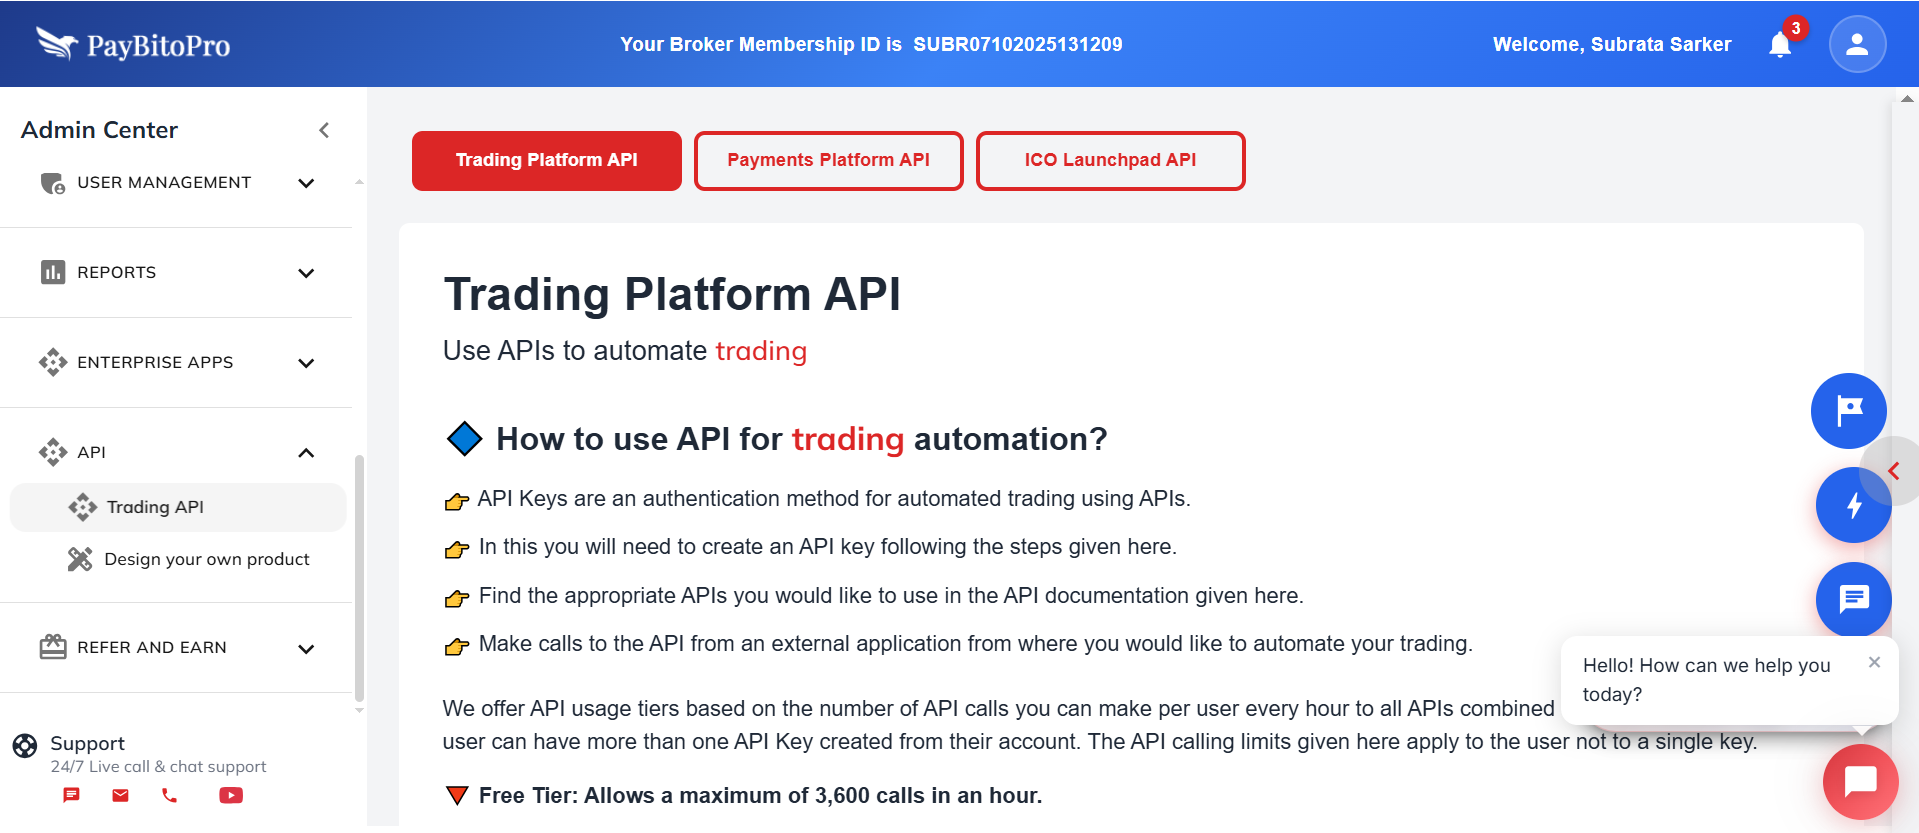
How to Start Automated Trading Using API
Follow these steps to generate an API key and begin automation:
- Create an account on your exchange.
- Log in, then click the Settings (⚙️ gear icon) on the top right
- Scroll to Create API Keys at the bottom of the Settings page.
- Click Create API, and follow on-screen instructions (click the “i” icon for details)
- Refer to the API Documentation to choose the trading APIs you need.
- Use the generated API Key to start sending API calls from your external trading application.
Links
- Create API Key: https://portal.paybito.com/settings
- API Documentation: https://docs.paybito.com
API Usage Tiers
| Tier | Limit (per hour) | Notes |
|---|---|---|
| Free | 3,600 API calls | Good for testing and small automations |
| Standard | 30,000 API calls | Ideal for active algorithmic traders |
| Premium | 60,000 API calls | Designed for high-frequency strategies |
Usage limit applies per User ID, not per API key.
A user can create multiple API keys, but their tier caps limit combined usage.
Key Subscription Rules
- Add or replace a User ID anytime.
- You may add up to 10 User IDs under one subscription.
- Deleting a User ID cancels its subscription from the next cycle.
2. Payment Platform API
The Payment Platform API allows you to automate crypto payments — ideal for merchants who accept crypto payments on websites, apps, or POS systems.
How to Start Automated Payments Using API
Follow these steps to generate an API key and begin automation:
- Create an account on your exchange.
- Go to Settings (⚙️ gear icon) after logging in.
- Scroll to Create API Keys on the Payments page.
- Create an API key using the on-screen instructions.
- Refer to the API documentation to select the payment-related APIs.
- Use the API key from your external application to automate payments.
Links
- Create API Key: https://portal.paybito.com/payments/settings
- API Documentation: https://docs.paybito.com
API Usage Tiers
| Tier | Limit (per hour) | Notes |
|---|---|---|
| Free Tier | 3,600 API calls | Suitable for basic integrations |
| Standard Tier | 30,000 API calls | Ideal for small to medium-scale merchants |
| Premium Tier | 60,000 API calls | Designed for large transaction volumes |
Key Subscription Rules
- Merchant ID can be replaced anytime.
- Up to 10 Merchant IDs can be added under one subscription.
- Removing a Merchant ID cancels its subscription from the next billing cycle.
3. ICO Launchpad API
The ICO Launchpad API allows you to automate your ICO operations — token sale management, investor tracking, transaction records, and more.
How to Automate ICO Using API
- Create an account on your exchange.
- Go to Settings (⚙️) after logging in.
- Scroll to Create API Keys under ICO Contract Owner.
- Generate the API Key (follow instructions via the “i” icon).
- Browse the ICO API endpoints from the documentation.
- Start making API calls from your external application using the API key.
Links
- Create API Key: https://portal.paybito.com/ico-contract-owner/api-keys.html
- API Documentation: https://docs.paybito.com
API Usage Tiers
| Tier | Limit (per hour) | Notes |
|---|---|---|
| Free Tier | 3,600 API calls | Best for testing or small ICOs |
| Standard Tier | 30,000 API calls | For growing ICO demand |
| Premium Tier | 60,000 API calls | Designed for large-scale ICO campaigns |
Frequently Asked Questions
An API key is a secure authentication token that allows an external system (such as a bot or application) to interact with your account programmatically without logging in manually.
Yes. You can generate multiple API keys for different systems or integrations. The usage limit applies to the User ID / Merchant ID / Contract Owner ID, not to each key individually.
The API usage limit applies to the total number of API calls per hour per ID, across all APIs combined.
Once you reach the maximum call limit for your tier, additional API requests will be temporarily blocked until the next hourly cycle begins.
Free Tier: Limited to 3,000–3,600 calls/hour, depending on product level
(Trading / Payments / ICO).
Standard Tier: 30,000 calls/hour.
Premium Tier: 60,000 calls/hour.
Higher tiers allow more API calls and support advanced automation or high-volume operations.
Yes. You can replace IDs at any time, which is useful when keys need rotation or accounts are being restructured.
Deleting the ID automatically stops subscription billing from the next cycle and removes that ID from the tier.
Yes. Upgrading tiers, swapping IDs, or adding multiple IDs applies almost immediately.
A basic understanding of API requests (REST / HTTP calls) is helpful. The documentation includes endpoint details, sample code, and parameter explanations for easier integration.
Create API Key:
Trading:
https://portal.paybito.com/settings
Payments:
https://portal.paybito.com/payments/settings
ICO Launchpad:
https://portal.paybito.com/ico-contract-owner/api-keys.html
Documentation:
https://docs.paybito.com
Design Your Own Product
Design a brand-new user experience using PayBito's powerful backend infrastructure. Create a fully custom front end, launch instantly, and enjoy all enterprise-grade features.
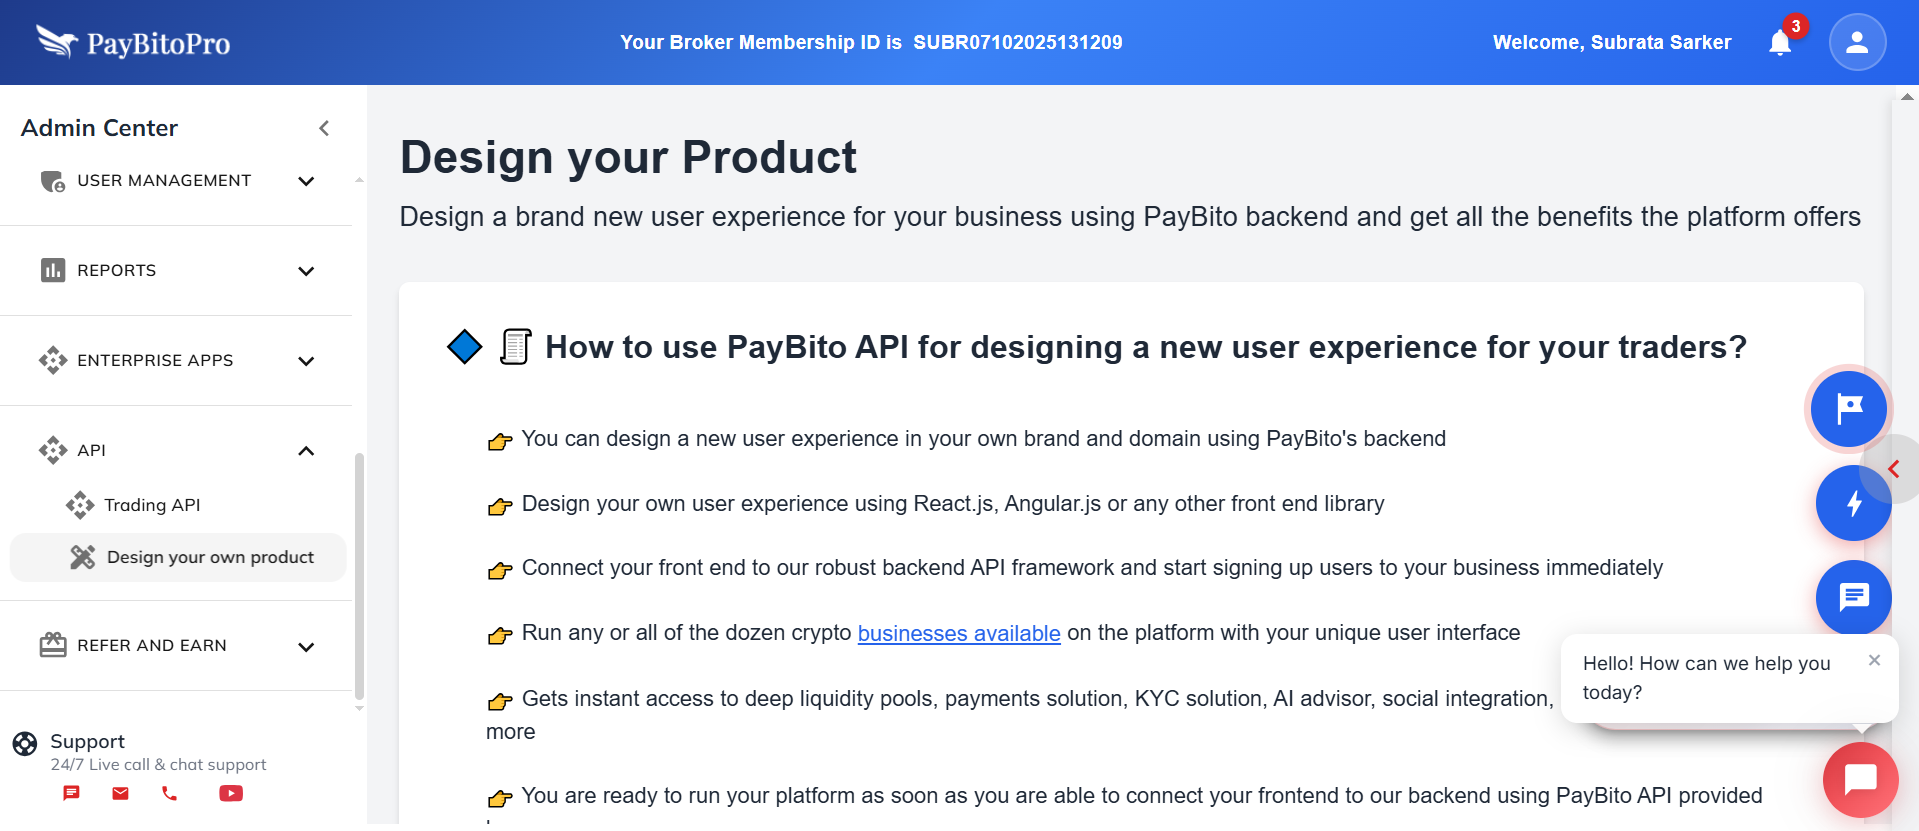
How to use PayBito API to design your own user experience
- Build your own branded frontend (React.js, Angular.js, etc.).
- Connect it to PayBito’s backend APIs and start onboarding users instantly.
- Run Spot, Convert, OTC, and other crypto modules with your custom UI.
- Get immediate access to liquidity, payments, KYC, AI advisor, social features, and affiliate systems.
- Manage everything from the same Admin panel and start generating revenue right away.
How to Design a New User Experience
Review API Documentation
Review the API documentation at http://paybito.com/api-build-your-exchange/
Design and build your frontend
Design and build your frontend using any UI library (React.js, Angular.js, Vue.js, etc.)
Connect your frontend to the PayBito backend using APIs
Implement authentication, trading, deposits, withdrawals, and more
Host & Configure Domain
Host your frontend on your own server and point your domain. Install SSL certificate.
Point your domain to your frontend server
Update DNS settings from your domain registrar
Install the SSL certificate on your server
Required for secure API communication
Once connected, your custom-branded platform goes live — with all PayBito capabilities running behind the scenes.
Build Your Self-Branded Exchange
- You’re only a few steps away from launching your own exchange — live on your brand, your logo, your domain.
- Give a name to your crypto exchange and follow the next steps to continue.
- Once you create your own exchange, select a subscription plan that fits your growth and usage.
- 10 New Business Owners started their own exchange this week!
Frequently Asked Questions
No. PayBito provides the complete backend infrastructure, including the trading engine, payment gateway, KYC, liquidity, and admin management. You only need to build the frontend (UI) on your brand and domain.
You can use any modern frontend framework such as React.js, Angular.js, Vue.js, or even a fully custom-built UI. PayBito APIs are framework-agnostic and support all modern technologies.
Yes. You can enable any or all modules supported by PayBito’s backend, including Spot Trading, Convert, OTC, and other available services.
Once your frontend is successfully connected to the backend APIs and your domain is whitelisted, your exchange platform can go live immediately.
Absolutely. All enterprise-grade features — including liquidity pools, KYC verification, payment processing, AI advisor, social trading, and affiliate systems — are fully accessible through PayBito APIs.
Yes. You will host your own frontend on your preferred server environment (cloud, VPS, or dedicated server), while PayBito continues to manage the entire backend infrastructure.
Domain whitelisting ensures that only approved domains can connect to PayBito APIs, enhancing security and preventing unauthorized access.
Yes. Even with a fully custom UI, you continue using PayBito’s Admin panel to manage users, trading activities, payments, commissions, and earnings.
Partner Earnings
View all the partners you have referred, along with their activity, total transactions, and your corresponding earnings.
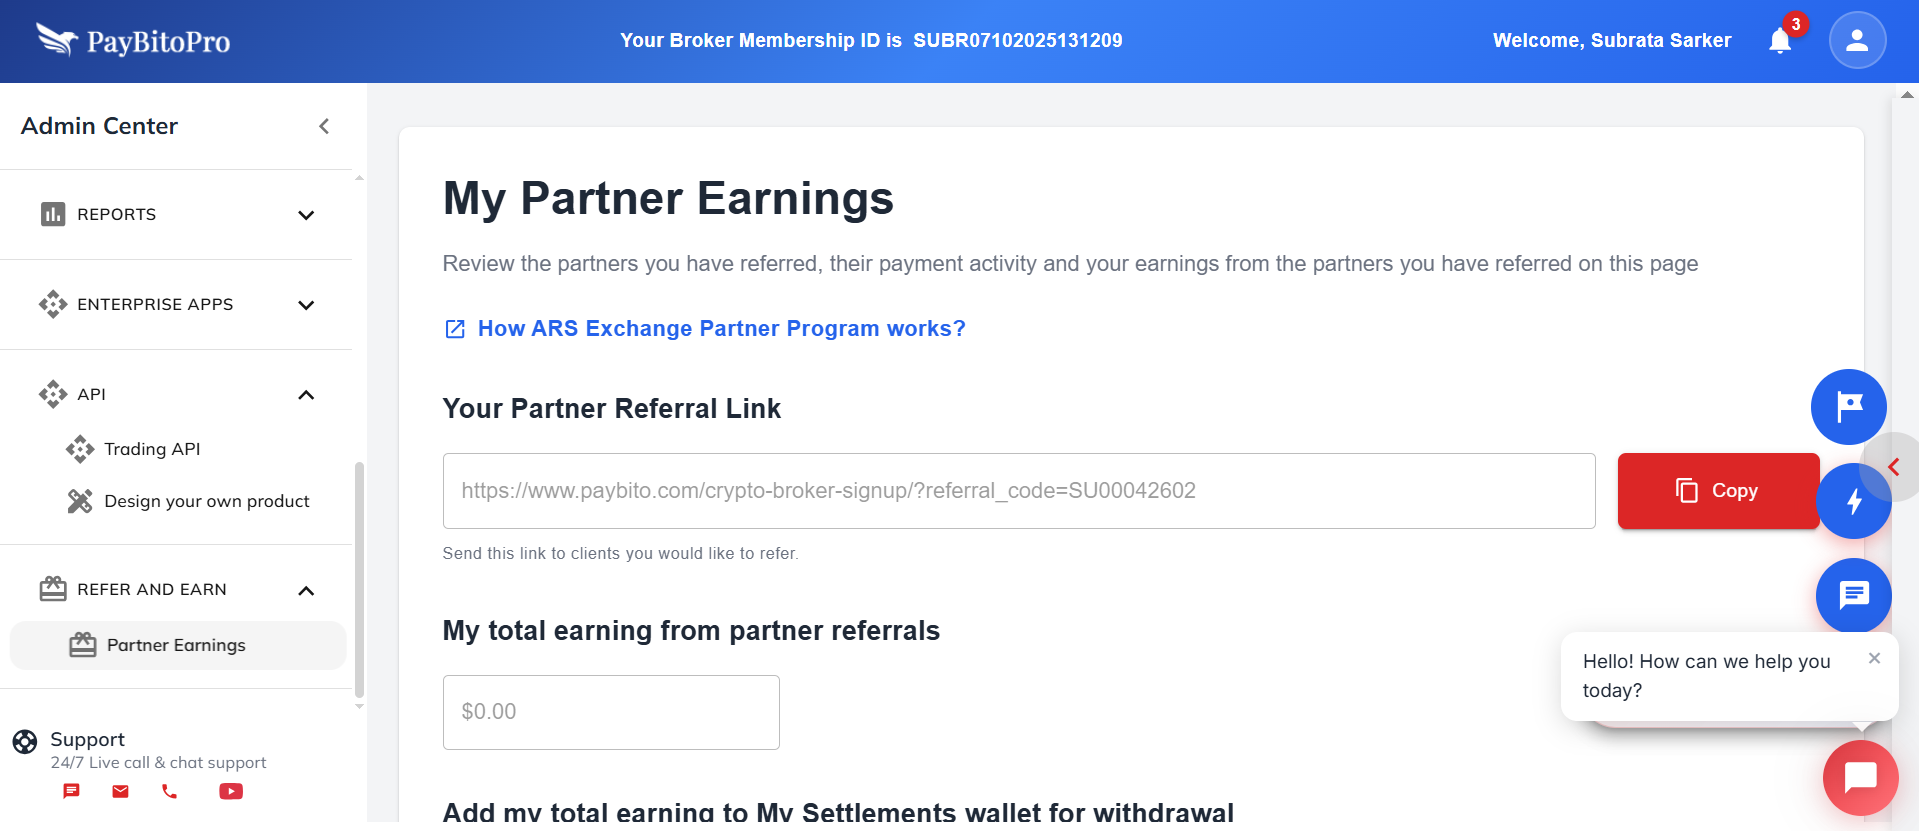
How to Use This Section
Your Partner Referral Link
Your unique partner referral link is displayed at the top. Copy and share it with potential clients who may want to join as PayBito brokers.
Track Total Earnings
"My total earnings from partner referrals" displays the total amount earned from all referred partners. This updates automatically.
Add Earnings to Settlements Wallet
Click “Add my total earnings to My Settlements wallet for withdrawal” to move your earnings into your settlements wallet. Once added, you can withdraw the amount by visiting the My Settlements section from the main menu on the left.
View Partners You Have Referred
The “Partners I Have Referred” table displays detailed information, including:
- First Name & Last Name - The partner’s registered name.
- Email & Phone - Contact details
- Broker ID - Unique ID assigned to the referred broker.
- Total Amount - Total business generated by the partner.
- My Earning - The amount you have earned from that partner.
- View Details - Click to view detailed activity and commission breakdown for each partner.
Monitor Partner Activity
Keep track of how your referred partners are performing. The more active your referred brokers are, the higher your earnings potential becomes.
Frequently Asked Questions
The Partner Earnings section allows you to view the list of partners you have referred, track their payment activity, and monitor your total earnings generated from their referrals.
You can refer a new partner by sharing your unique Partner Referral Link. When a referred client signs up using your link, their activity is automatically tracked under your account.
Your total earnings are displayed under “My total earnings from partner referrals”, showing the cumulative amount you’ve earned through the PayBito Partner Program.
To withdraw your earnings, click “Add my total earnings to My Settlements wallet for withdrawal”. Then navigate to the My Settlements menu on the left panel to initiate the withdrawal process.
Yes. The “Partners I Have Referred” table lists all referred partners along with their name, contact details, Broker ID, total transaction amount, and your individual earnings. You can click “View Details” to see detailed performance information for each partner.