Overview
Digital currency is rapidly becoming the currency of the future. Digital assets attract more users every day, and their values can swing dramatically due to high demand and limited supply. For eCommerce merchants, adapting to this trend is no longer optional — it's a growth opportunity.
The PrestaShop PayBito Pay Payment Gateway module lets your store accept payments in a wide range of digital assets, seamlessly connecting buyers who hold digital asset wallets to your PrestaShop checkout. Once installed, customers can pay with their preferred coin and wallet — all without leaving your store experience.
This module is multi-shop compatible, so you can deploy it across multiple PrestaShop storefronts from a single installation.
Features
The PayBito Pay gateway module adds a rich set of capabilities to your PrestaShop store:
Digital Assets
100+
Card Networks
4
Wallets Supported
50+
Shop Support
Multi
Card Payments — Visa, Mastercard, Amex & JCB
Accept all major debit and credit cards at checkout. PayBito Pay supports Visa, Mastercard, American Express, and JCB — covering the vast majority of global cardholders with fully PCI-compliant processing.
Apple Pay & Google Pay
Let customers pay in one tap with their saved wallet. Apple Pay and Google Pay are supported at checkout for both mobile and desktop browsers — no card details to type, faster conversions, and reduced cart abandonment.
New Payment Gateway at Checkout
A dedicated "Pay with PayBito Pay" option appears to all customers at checkout, giving them a smooth path to pay with cards, digital wallets, or their preferred digital asset.
Wide Digital Assets Support
Customers can choose from BTC, BCH, ETH, WBTC, DOGE, GUSD, USDC, PAX, DAI, XRP, BUSD, and 100+ more digital assets to complete their purchase.
50+ Compatible Wallets
PayBito Pay, Coinbase, Copay, Exodus, Binance, Edge, Electrum, Bitnovo, and more — customers can use the wallet they already trust.
Sandbox & Live Modes
Test your integration thoroughly in sandbox mode before switching to live, with no real funds at risk during testing.
Configurable Transaction Speed
Set transaction confirmation speed to High, Medium, or Low. PayBito Pay waits for the required number of blockchain confirmations before marking an order as paid.
Order Management
All orders placed via PayBito Pay are fully visible in the PrestaShop back-office orders list, with automatic status updates once payment is confirmed.
Secure & Reliable
Payment processing is handled entirely through PayBito's infrastructure — your store never stores sensitive payment details.
Multi-Shop Compatible
If you run multiple storefronts on a single PrestaShop installation, this module works seamlessly across all of them.
Installation
Installing the module takes just a few clicks through the PrestaShop back-office. No FTP or manual file uploads are required.
Get the Module from PrestaShop Addons Marketplace
Access the official PayBito Pay module on the PrestaShop Addons Marketplace:
Alternatively, download the .zip package directly from the top banner.
Open Module Manager
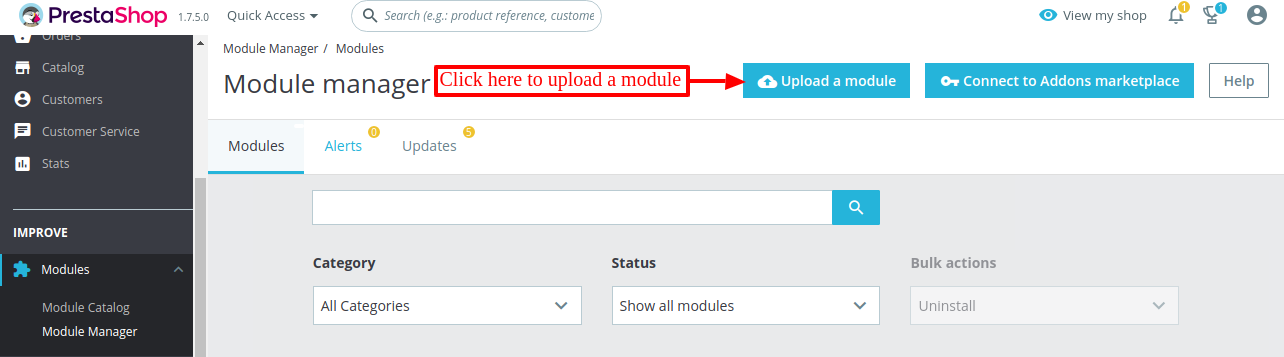
Log in to your PrestaShop back-office. Navigate to Modules → Module Manager in the main menu.
Upload the Module
Click the "Upload a module" button in the top-right corner of the Module Manager page.
Select the Module File
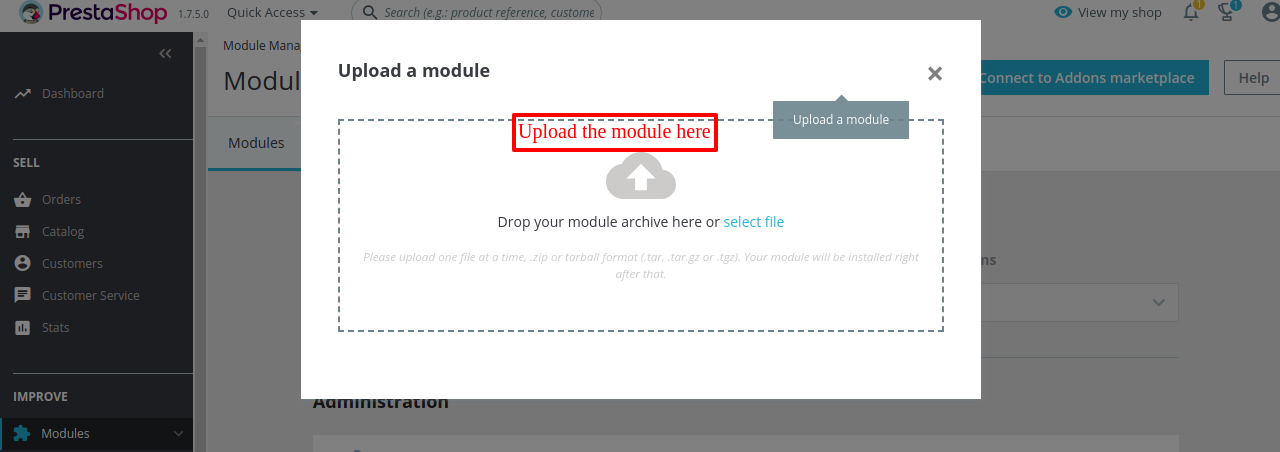
In the upload dialog, drag and drop the .zip module file onto the dropzone, or click to browse your local filesystem and select it.
Installation Complete
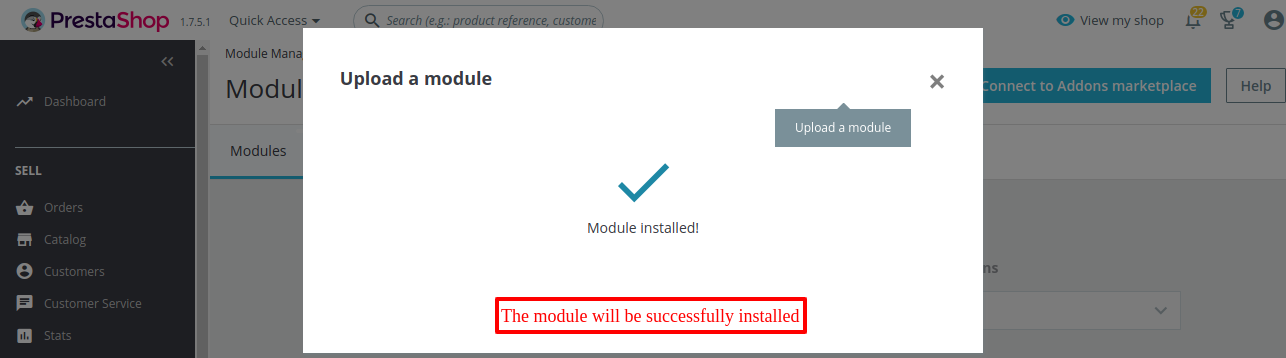
PrestaShop will automatically install and activate the module. You will see a success confirmation message. The module is now ready to configure.
Supported versions: PrestaShop 8.0.0 to 9.2.0. Ensure your store is running one of these versions before installing.
Configuration
After installation, navigate to the module configuration page through Modules → Module Manager → PayBito Pay → Configure. The settings are organized into three groups.
General Settings
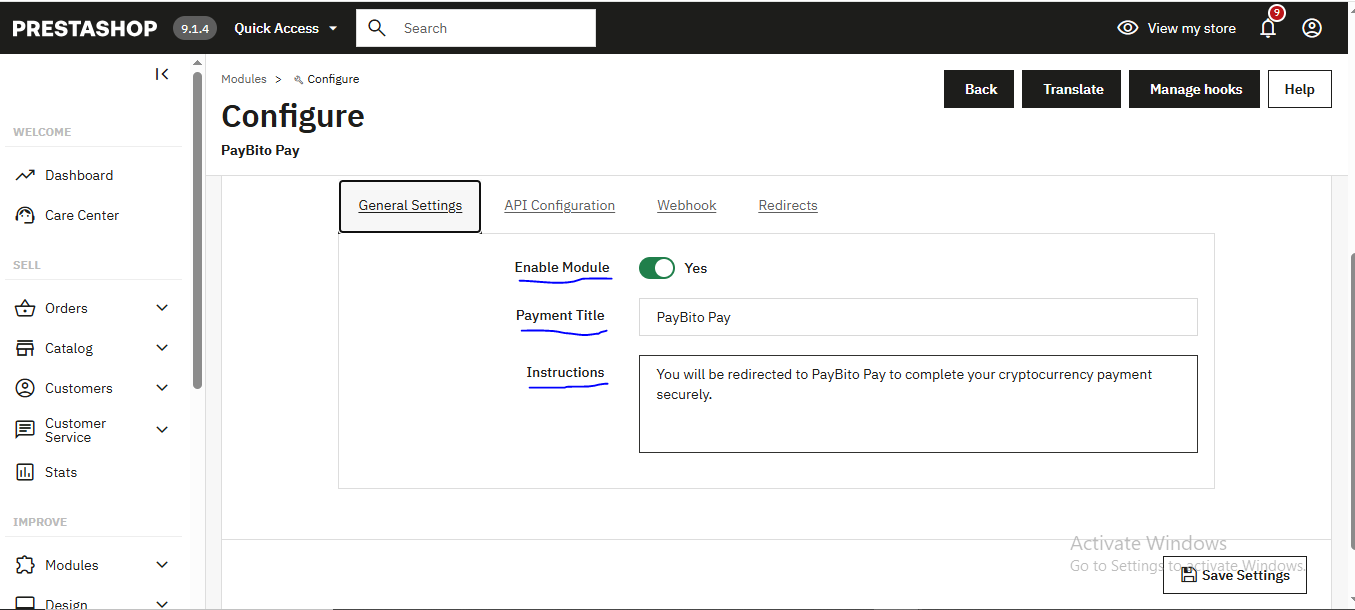
General Settings
Enable Module
Toggle this switch to activate or deactivate the PayBito Pay payment option on your store's checkout page. Disable it while making configuration changes.
Payment Title
The label displayed to customers at checkout — for example, "Pay with PayBito Pay" or "Digital Asset Payment". Keep it concise and recognizable.
Instructions
Optional text shown to the customer after they select this payment method, before they are redirected to PayBito Pay. Use this to set expectations, such as "You will be redirected to PayBito Pay to complete your payment securely."
API Configuration
API Configuration
API Key
Enter the API key obtained from your PayBito Merchant Account. See Get API Keys for step-by-step instructions.
API Secret Key
The secret key paired with your API key. Treat this like a password — do not share it or commit it to source control.
Merchant ID
Your unique PayBito Merchant ID, available in your PayBito Merchant Account profile. This identifies your business on the PayBito platform.
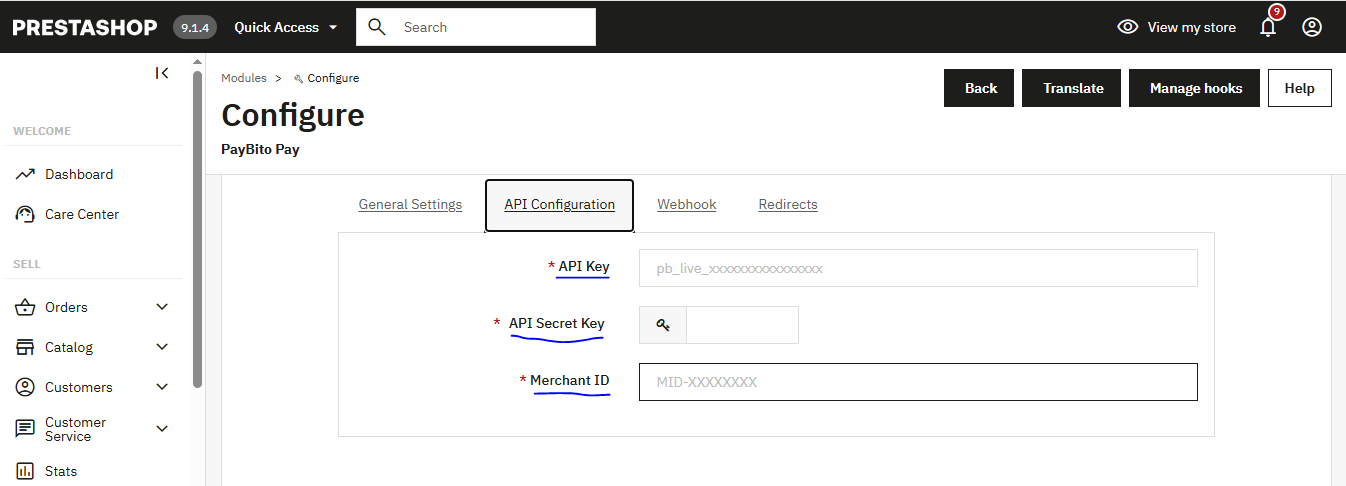
For sandbox (test) mode, use credentials from the sandbox environment. Switch to live credentials when you are ready to accept real payments.
Webhook Settings
Webhooks allow PayBito Pay to notify your PrestaShop store in real time when a payment event occurs — such as a confirmed payment, a refund, or a failed transaction. Without webhooks, order statuses will not update automatically.
Webhook Settings
Webhook Secret
A secret string used to verify that incoming webhook events genuinely originate from PayBito Pay. Copy this from your PayBito Merchant Dashboard's Webhooks section and paste it here.
Webhook URL
The endpoint on your store that PayBito Pay will call when a payment event occurs. This URL is auto-generated by the module — copy it and register it in your PayBito Merchant Account under Developers → Webhooks.
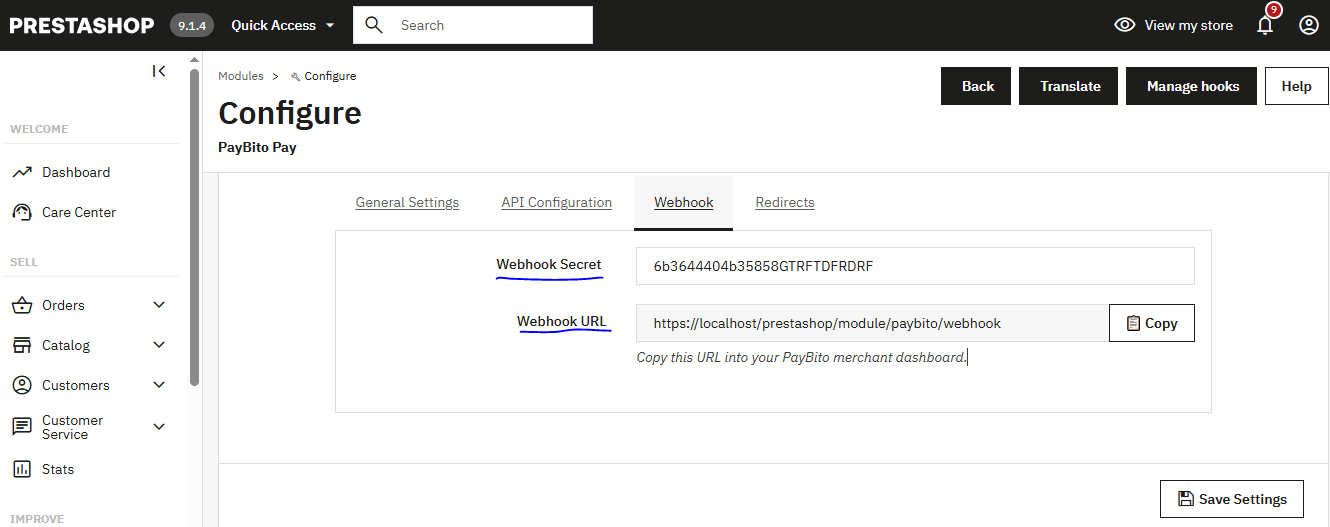
Make sure your Webhook URL is publicly accessible. Stores behind a firewall or running on localhost will not receive webhook events from PayBito Pay.
Get API Keys
To connect your PrestaShop store to PayBito Pay, you need API credentials from your PayBito Merchant Account. Follow these steps:
Step 1 — Create a Merchant Account
If you do not already have a PayBito Merchant Account, register for one at:
https://trade.paybito.com/payments/
Navigate to the Registration Page
Go to trade.paybito.com/payments/signup. Click the "Business" button in the top-left corner of the page.
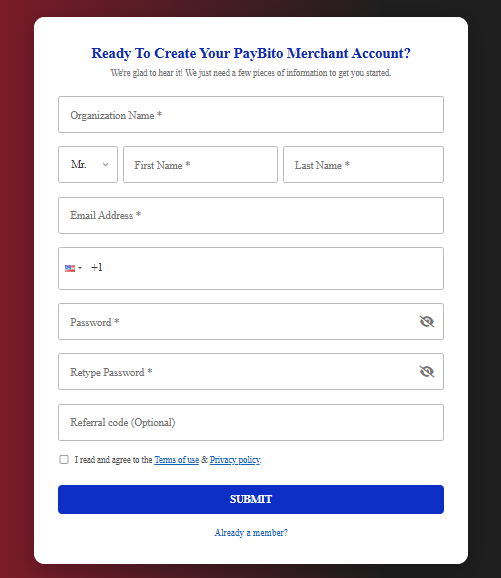
Fill in Your Business Details
Complete all required fields on the registration form — business name, email, and contact information — then click "Create Account".
Go to trade.paybito.com/payments/business-settings.
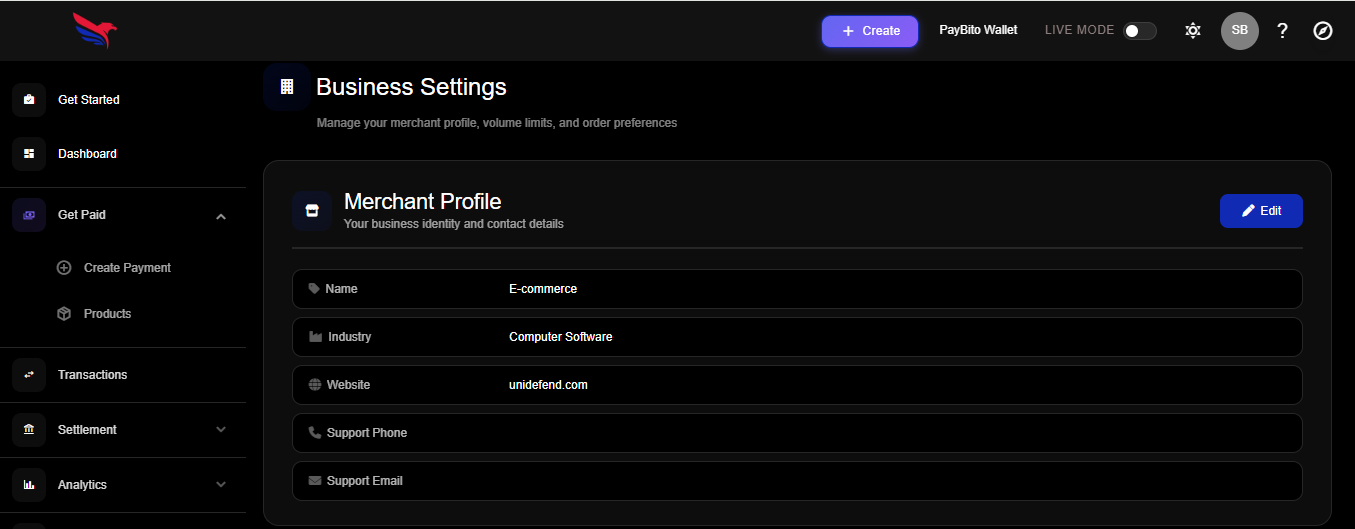
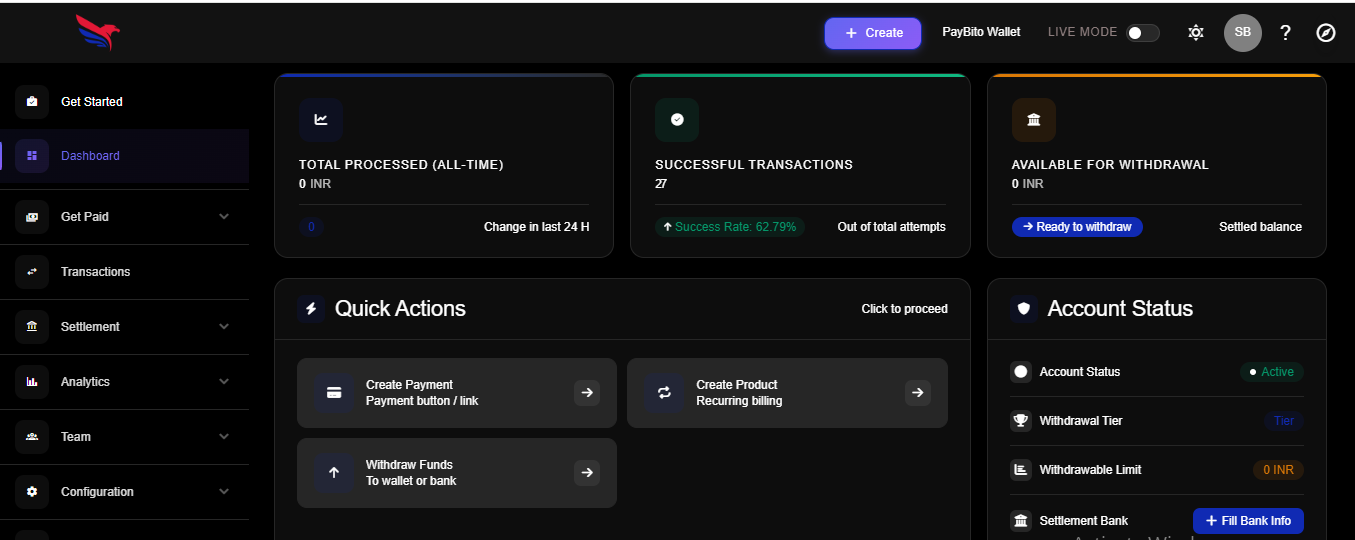
Access Your Merchant Dashboard
After account creation, log in to your Merchant Dashboard. From here you can access API keys, webhooks, transaction history, and account settings.
Go to trade.paybito.com/payments/dashboard.
Step 2 — Generate API Keys
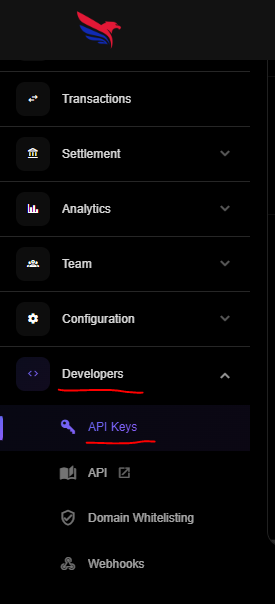
Navigate to Developers → API Keys
https://trade.paybito.com/payments/api-key
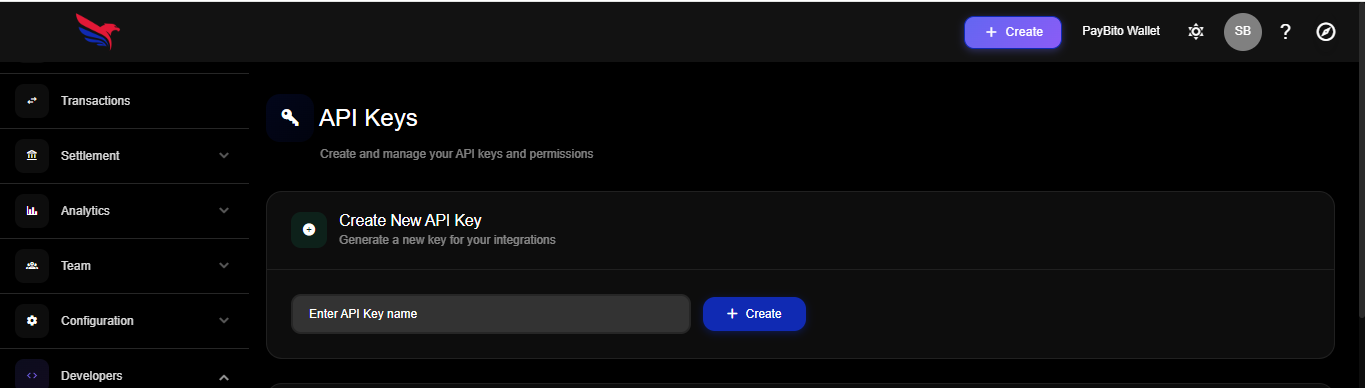
Click "New API Key"
Generate a new key pair. Copy and securely save both the API Key and API Secret Key — the secret is shown only once.
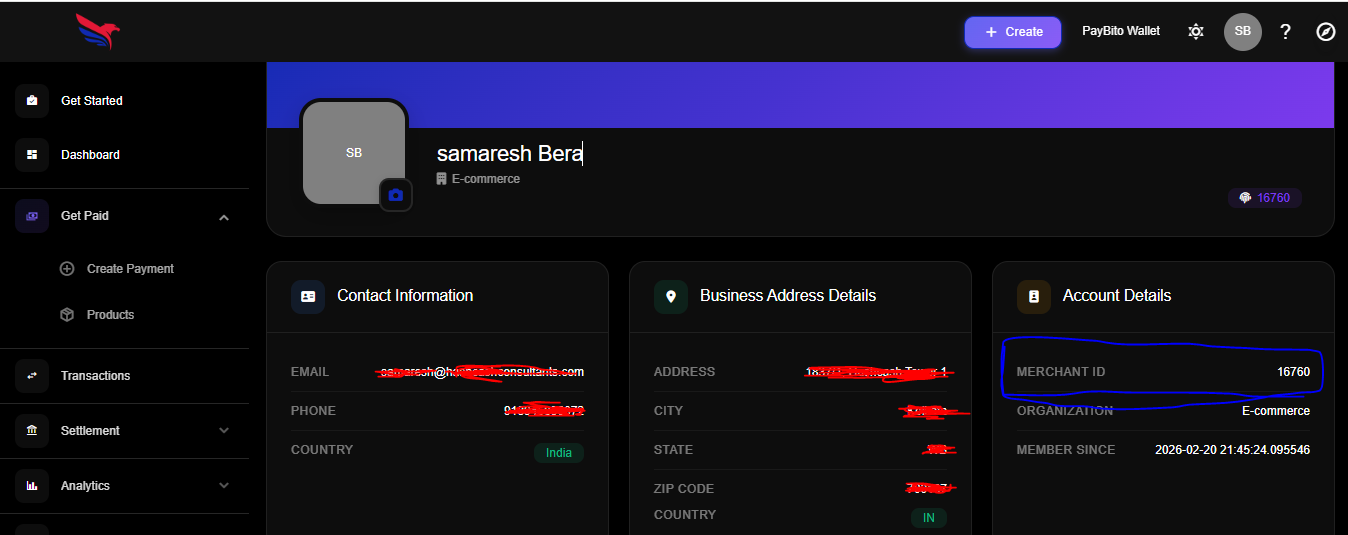
Copy Your Merchant ID
Go to User → Profile in your Merchant Account to find your Merchant ID. Copy it for use in the module configuration.
Step 3 — Register the Webhook
Navigate to Developers → Webhooks
https://trade.paybito.com/payments/webhooks
Add an Endpoint
Click "Add an endpoint" and paste the Webhook URL from your PrestaShop module configuration page.
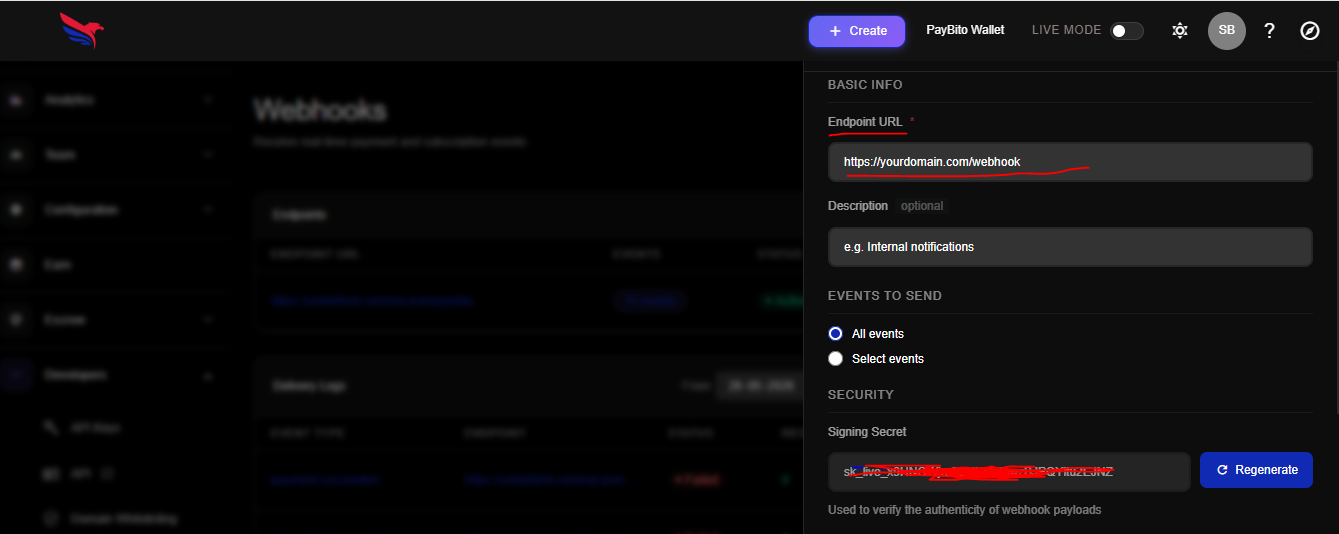
Copy the Shared Secret
Click "Show shared secret" and copy the value. Paste it into the Webhook Secret field in your PrestaShop module configuration, then save.
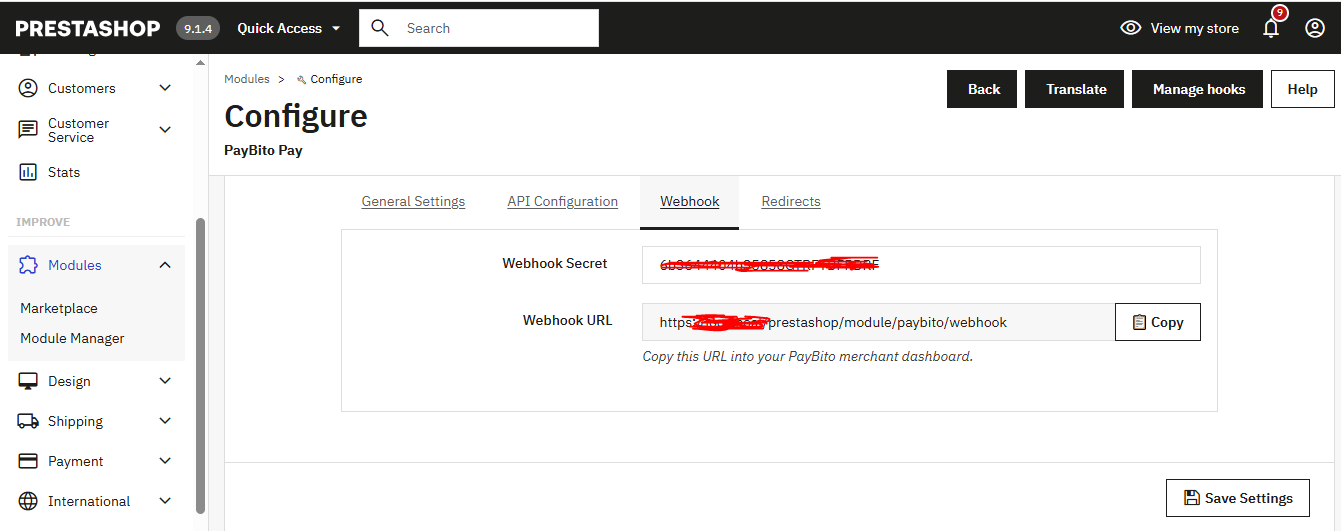
After saving all settings, PayBito Pay will send a test ping to your webhook URL. A green checkmark in the PayBito dashboard confirms the connection is active.
Front-End Workflow
Once the module is configured and enabled, this is the complete journey a customer experiences when paying with digital assets.
Prerequisite for customers: Buyers must have their own digital asset wallet funded with the digital asset they want to pay with in order to complete a purchase via PayBito Pay.
Customer Reaches Checkout
When a customer proceeds to checkout, a new payment method called "Pay with PayBito Pay" appears alongside other available options such as credit card or bank transfer.
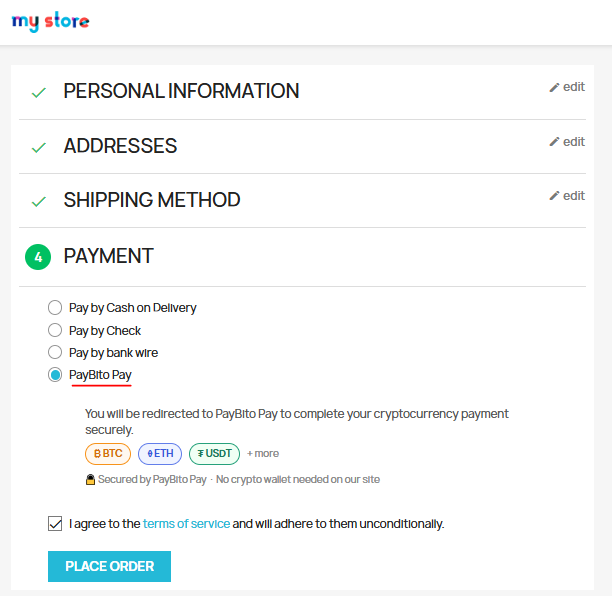
Customer Selects PayBito Pay
The customer selects "Pay with PayBito Pay" and confirms their order. They are then redirected to the PayBito Pay payment portal.
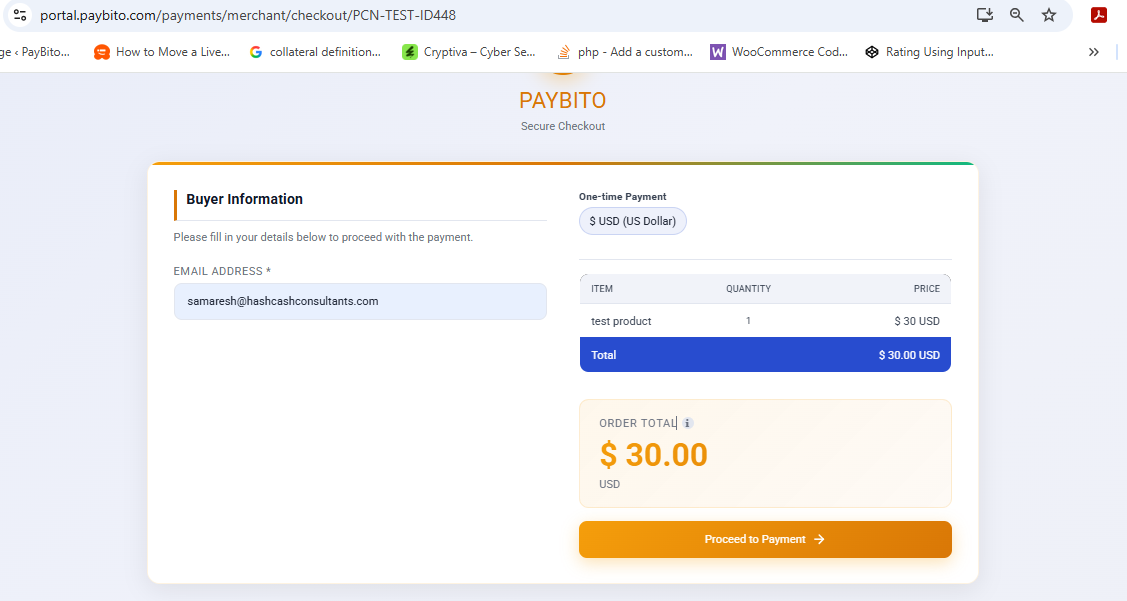
Choose Digital Assets
On the PayBito Pay portal, the customer selects the digital asset they want to use from the list of supported coins (BTC, ETH, DOGE, etc.).
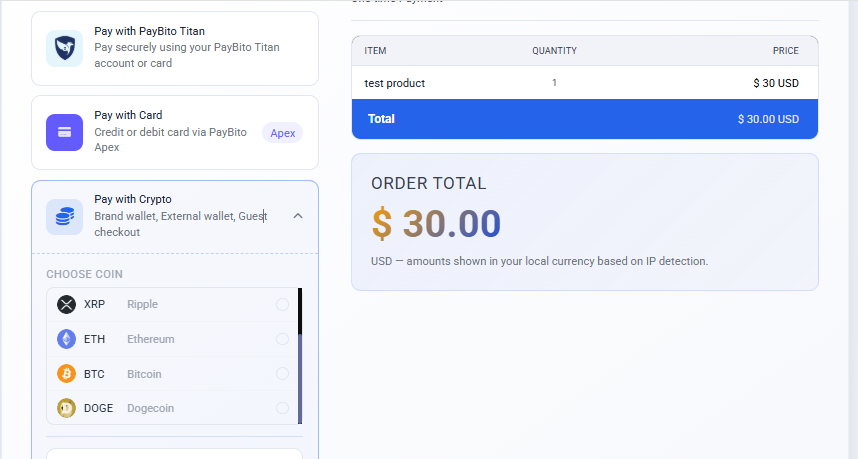
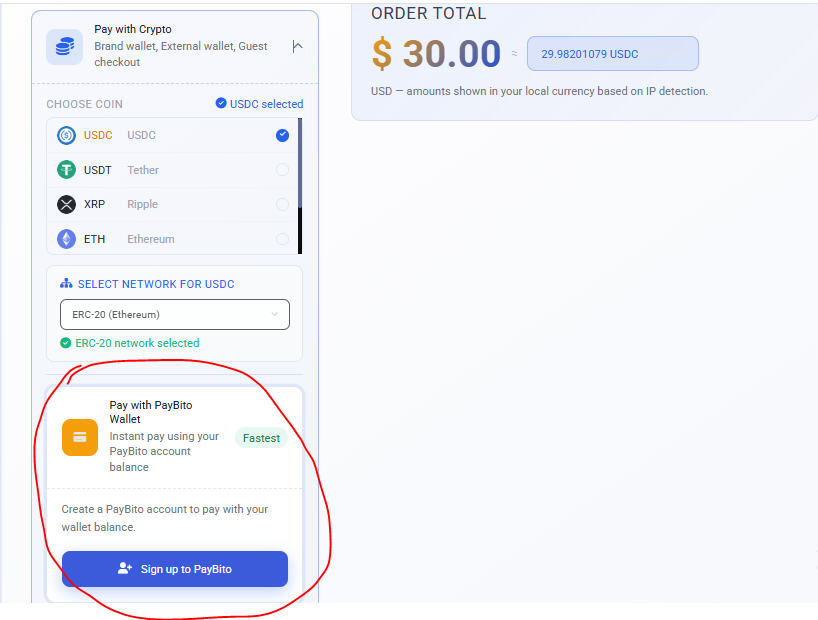
Scan Wallet Address & Pay
A unique wallet address and QR code are displayed for this transaction. The customer sends the exact amount from their digital asset wallet to this address.
Payment Confirmed
PayBito Pay waits for the required blockchain confirmations based on your chosen transaction speed. Once confirmed, the order status in PrestaShop is automatically updated to "Payment accepted" and the customer receives their order confirmation.
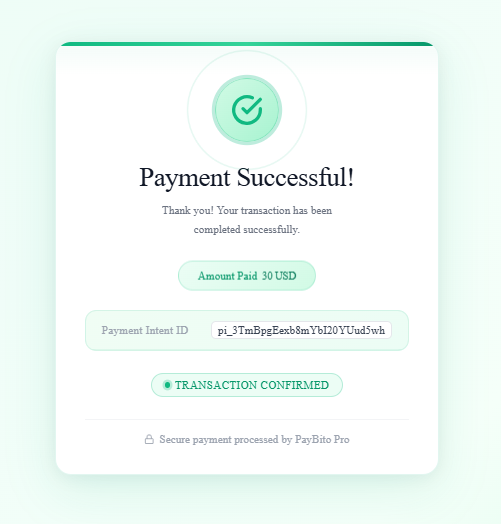
The time to complete payment varies depending on the Transaction Speed setting and network conditions. High speed = fewer confirmations required = faster processing.
Supported Coins & Wallets
Supported Digital assets
Customers can use any of the following digital assets to pay for their orders:
Supported Wallets (50+)
Customers can pay using more than 50 compatible digital asset wallets. Some of the most popular include:
Any wallet that supports sending digital assets to an external address will work with PayBito Pay, even if not listed here. The list above covers wallets that have been explicitly tested and verified.
Coin Compatibility Table
| Digital Assets | Symbol | Type | Status |
|---|---|---|---|
| Bitcoin | BTC | PoW | Supported |
| Bitcoin Cash | BCH | PoW | Supported |
| Ethereum | ETH | PoS | Supported |
| Wrapped Bitcoin | WBTC | ERC-20 | Supported |
| Dogecoin | DOGE | PoW | Supported |
| Gemini USD | GUSD | Stablecoin | Supported |
| USD Coin | USDC | Stablecoin | Supported |
| Paxos Standard | PAX | Stablecoin | Supported |
| DAI | DAI | Stablecoin | Supported |
| Ripple | XRP | Ledger | Supported |
| Binance USD | BUSD | Stablecoin | Supported |
Frequently Asked Questions
No. Customers do not need a PayBito account. They only need a compatible digital asset wallet funded with the digital asset they wish to pay with. PayBito Pay acts as the payment processor behind the scenes.
The module supports PrestaShop 8.0.0 to 9.2.0. Make sure your store is running one of these versions before installation.
Yes. The module includes a Sandbox mode. Use your sandbox API credentials (obtained from the PayBito test environment) to run test transactions without processing real payments.
Order status updates are triggered by PayBito Pay's webhook notifications. Make sure: (1) the Webhook URL is correctly registered in your PayBito Merchant Dashboard, (2) the Webhook Secret matches in both places, and (3) your server is publicly accessible and not blocking incoming POST requests.
Yes. The module is fully multi-shop compatible. You can enable and configure it independently for each shop in a multi-store PrestaShop installation.
All PayBito Pay orders appear in your standard PrestaShop Orders list under Orders → Orders. Each order will include a PayBito Pay transaction detail block showing the payment reference and confirmed amount.
Any wallet that supports sending digital assets to an external address will work. The module has been verified with 50+ wallets including PayBito Pay, Coinbase, Copay, Binance, Edge, Electrum, and Bitnovo.
Confirmation time depends on both the Transaction Speed setting in your module configuration and the current load on the respective blockchain network. High speed mode is typically confirmed in minutes; low speed mode may take longer but offers stronger fraud protection.
Support
If you run into any issues during installation, configuration, or day-to-day usage of the PayBito Pay gateway, the support team is available to help.
Get in Touch
For technical assistance, questions about API credentials, or any other queries related to the PrestaShop PayBito Pay module, raise a support ticket or send a direct email.
support@paybito.comBefore Contacting Support
To help the support team resolve your issue as quickly as possible, gather the following information before reaching out:
- Your PrestaShop version (e.g., 8.1.2 or 1.7.8.x)
- The exact error message or unexpected behavior you are seeing
- Steps to reproduce the issue
- Whether the issue occurs in sandbox mode, live mode, or both
- Your Merchant ID (do not share your API Secret Key)
- Any relevant PrestaShop or server error logs
Supported framework versions: PrestaShop 8.0.0 to 9.2.0. Issues on unsupported versions may not be resolvable by the support team.