1. Server Environment Prerequisites
Before installing Magento 2 and deploying the PayBito Pay extension, verify that your server environment satisfies the official requirements for Adobe Commerce / Magento 2:
| Component | Supported Specification / Requirement |
|---|---|
| Operating System | Linux (Ubuntu 22.04 LTS / Debian 11+ / RHEL 8+) |
| Web Server | Apache 2.4 (with mod_rewrite enabled) or Nginx 1.18+ |
| PHP Version | PHP 8.2 or PHP 8.3 |
| Required Extensions | bcmath, ctype, curl, dom, fileinfo, gd, intl, mbstring, openssl, pdo_mysql, simplexml, soap, sockets, xsl, zip |
| Database | MySQL 8.0 or MariaDB 10.6+ |
| Search Engine | OpenSearch 2.x or Elasticsearch 7.17+ |
| Package Manager | Composer 2.x |
Ensuring all prerequisites and search engines (OpenSearch/Elasticsearch) are running will prevent setup errors during dependency compilation and static deployment.
2. Database Creation & Magento 2 Installation
Follow these standard steps to initialize your database, download Magento 2, and execute the command-line installation.
Step 2.1: MySQL Database Setup
Log in to MySQL as root and create a dedicated database and user with appropriate privileges:
# Connect to MySQL CLI as root
mysql -u root -p

# Execute SQL statements
CREATE DATABASE magento2_prod CHARACTER SET utf8mb4 COLLATE utf8mb4_unicode_ci;
CREATE USER 'magento_user'@'localhost' IDENTIFIED BY 'SetStrongPasswordHere!';
GRANT ALL PRIVILEGES ON magento2_prod.* TO 'magento_user'@'localhost';
FLUSH PRIVILEGES;
EXIT;
Step 2.2: Download & Install Magento 2 via CLI
Download the Magento Community Edition codebase via Composer and execute the automated setup script:
# Navigate to web root and download Magento 2
cd /var/www/html
composer create-project --repository-url=https://repo.magento.com/ magento/project-community-edition magento2
cd /var/www/html/magento2

# Execute command line installation
bin/magento setup:install \
  --base-url="https://yourstore.com/" \
  --db-host="localhost" \
  --db-name="magento2_prod" \
  --db-user="magento_user" \
  --db-password="SetStrongPasswordHere!" \
  --admin-firstname="Store" \
  --admin-lastname="Admin" \
  --admin-email="admin@yourstore.com" \
  --admin-user="admin" \
  --admin-password="AdminPassword123!" \
  --language="en_US" \
  --currency="USD" \
  --timezone="UTC" \
  --use-rewrites=1 \
  --search-engine=opensearch \
  --opensearch-host=localhost \
  --opensearch-port=9200
Step 2.3: Set File Permissions
Ensure correct file ownership and security permissions for your web server user (www-data):
sudo chown -R www-data:www-data /var/www/html/magento2
sudo find /var/www/html/magento2 -type d -exec chmod 755 {} +
sudo find /var/www/html/magento2 -type f -exec chmod 644 {} +
sudo chmod +x /var/www/html/magento2/bin/magento
3. PayBito Pay Extension Installation
Deploy the official PayBito Pay extension into your Magento 2 codebase using standard module installation practices.
Step 3.1: Upload Module Files
Extract the magento-paybito-pay module files into the following directory structure inside your Magento root:
/var/www/html/magento2/app/code/Paybito/Pay/
Step 3.2: Enable and Compile
Run the Magento command-line sequence to activate the module, upgrade the database schema, compile dependency injections, and deploy static assets:
cd /var/www/html/magento2
php bin/magento module:enable Paybito_Pay
php bin/magento setup:upgrade
php bin/magento setup:di:compile
php bin/magento setup:static-content:deploy -f
php bin/magento cache:flush
After compiling and flushing cache, the PayBito Pay payment method will appear in your Magento Admin configuration panel.
4. Payment Gateway Configuration
Configure the PayBito Pay gateway in your Magento Admin Panel to connect your store with your merchant account.
Step 4.1: Access Magento Admin Settings
- Log in to your Magento Admin Panel (https://yourstore.com/admin).
- Navigate to Stores → Configuration → Sales → Payment Methods.
- Expand PayBito Pay and configure the parameters as shown in the table below:
| Configuration Field | Recommended Value | Description |
|---|---|---|
| Enabled Required | Yes | Toggles PayBito Pay visibility on the storefront checkout. |
| Title Required | PayBito Pay (Cards, Bank Transfer, Crypto) | Payment method title displayed to buyers during checkout review. |
| Merchant ID Required | [Your_Merchant_ID] | Obtained from your PayBito Merchant Portal Developers menu. |
| API Key Required | [Your_API_Key] | Public API key (starts with pk_) used for checkout session creation. |
| API Secret Required | [Your_API_Secret] | Private secret key (starts with sk_) for HMAC signature validation. |
| Environment Mode | Live or Sandbox | Select Sandbox for testing or Live for production processing. |
| New Order Status | Pending Payment | Initial status assigned to the order before on-chain or card settlement. |
Click Save Config in the top-right corner of the Magento admin page.
Step 4.2: Getting Your API Keys from PayBito
Sign in at portal.paybito.com, expand Developers in the left sidebar, and select API Keys:
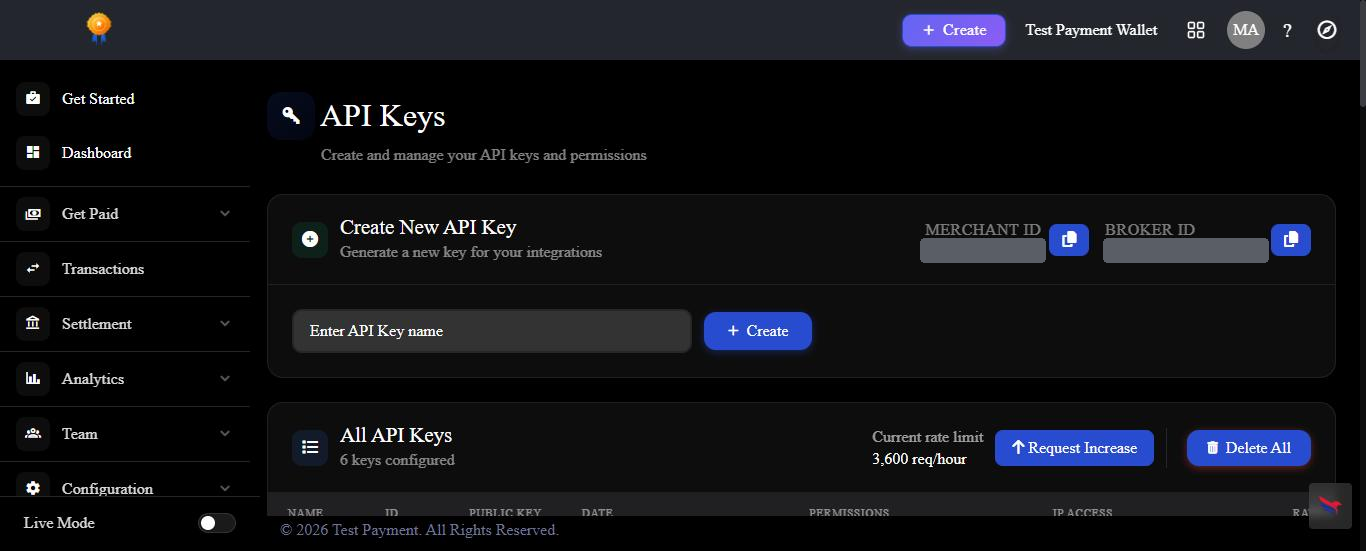 The PayBito Merchant Console API Keys screen. Obtain your Merchant ID, public API Key (pk_...), and Secret Key (sk_...).
5. Webhook & IPN Configuration
To enable real-time, automated order status updates when customer transactions settle:
Open Webhooks in PayBito Portal
Log in to your PayBito Merchant Dashboard (portal.paybito.com) and navigate to Settings → Webhooks / IPN.
Configure the Webhook URL
Enter your store's REST endpoint:
https://yourstore.com/rest/V1/paybito/webhook
Subscribe to Events
Check and subscribe to the following automated event notifications:
- PAYMENT_COMPLETED — Marks orders as Processing / Complete upon confirmation.
- PAYMENT_FAILED — Updates order status if a transaction fails or is rejected.
- PAYMENT_EXPIRED — Cancels unpaid invoices when the checkout timer expires.
All webhook requests sent to your store are signed with your API Secret key via HMAC SHA-256 headers, preventing spoofing and ensuring tamper-proof order updates.
6. Merchant Admin Features
The PayBito Pay extension registers a dedicated management section in your Magento admin menu, giving you granular control over the payment experience:
Setup Wizard
An intuitive onboarding tool to verify API connectivity, credentials validity, and test checkout readiness before launching to real buyers.
Fee Handling
Configure custom surcharge or handling fee rules applied directly to transactions when customers select digital asset payments.
Discount Management
Incentivize crypto adoption by offering percentage or fixed promotional discounts exclusively for customers paying through PayBito.
Custom Shipping
Define shipping rules, restrictions, and carrier rates tailored specifically for digital asset and alternative payment orders.
Transaction Logs & Audit Trail
Maintain a real-time audit log of all inbound payments, blockchain transaction hashes, settlement confirmations, and webhook response payloads directly within your dashboard.
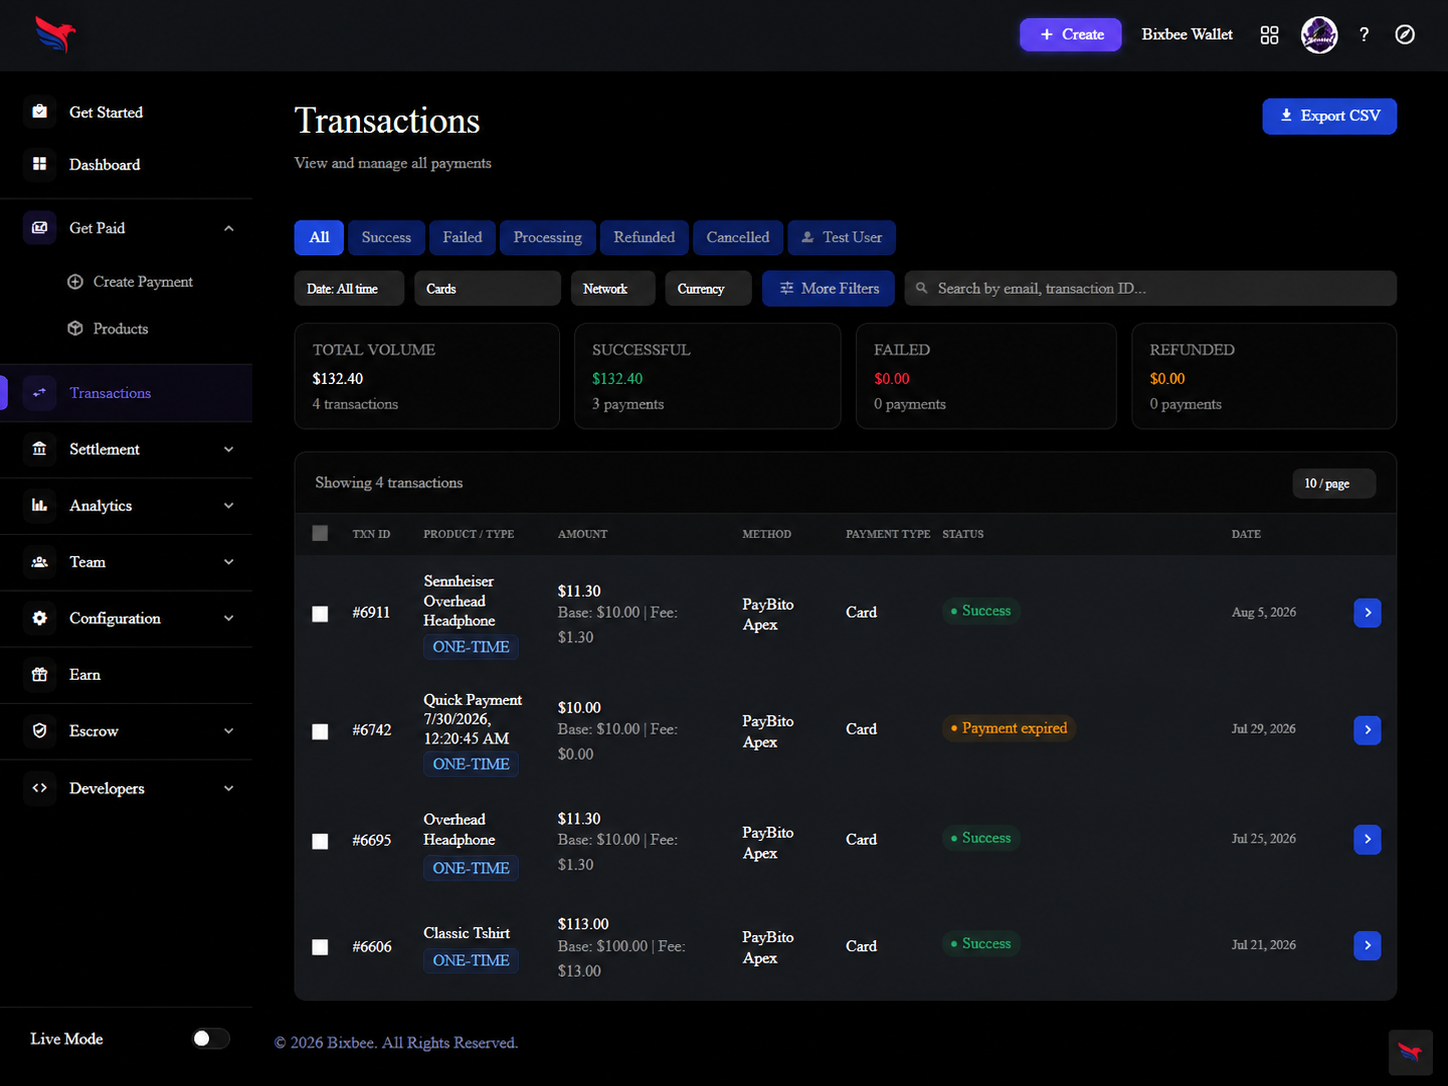 The PayBito Merchant Dashboard Transactions view for monitoring settlements, statuses, and exporting audit data.
7. Front-End Customer Checkout Workflow
Below is the complete customer journey from browsing your Magento storefront to final payment completion:
Step 1: Product Selection & Add to Cart
Customers browse your catalog on Magento 2 (such as the default Luma storefront) and add their desired products to the shopping cart.
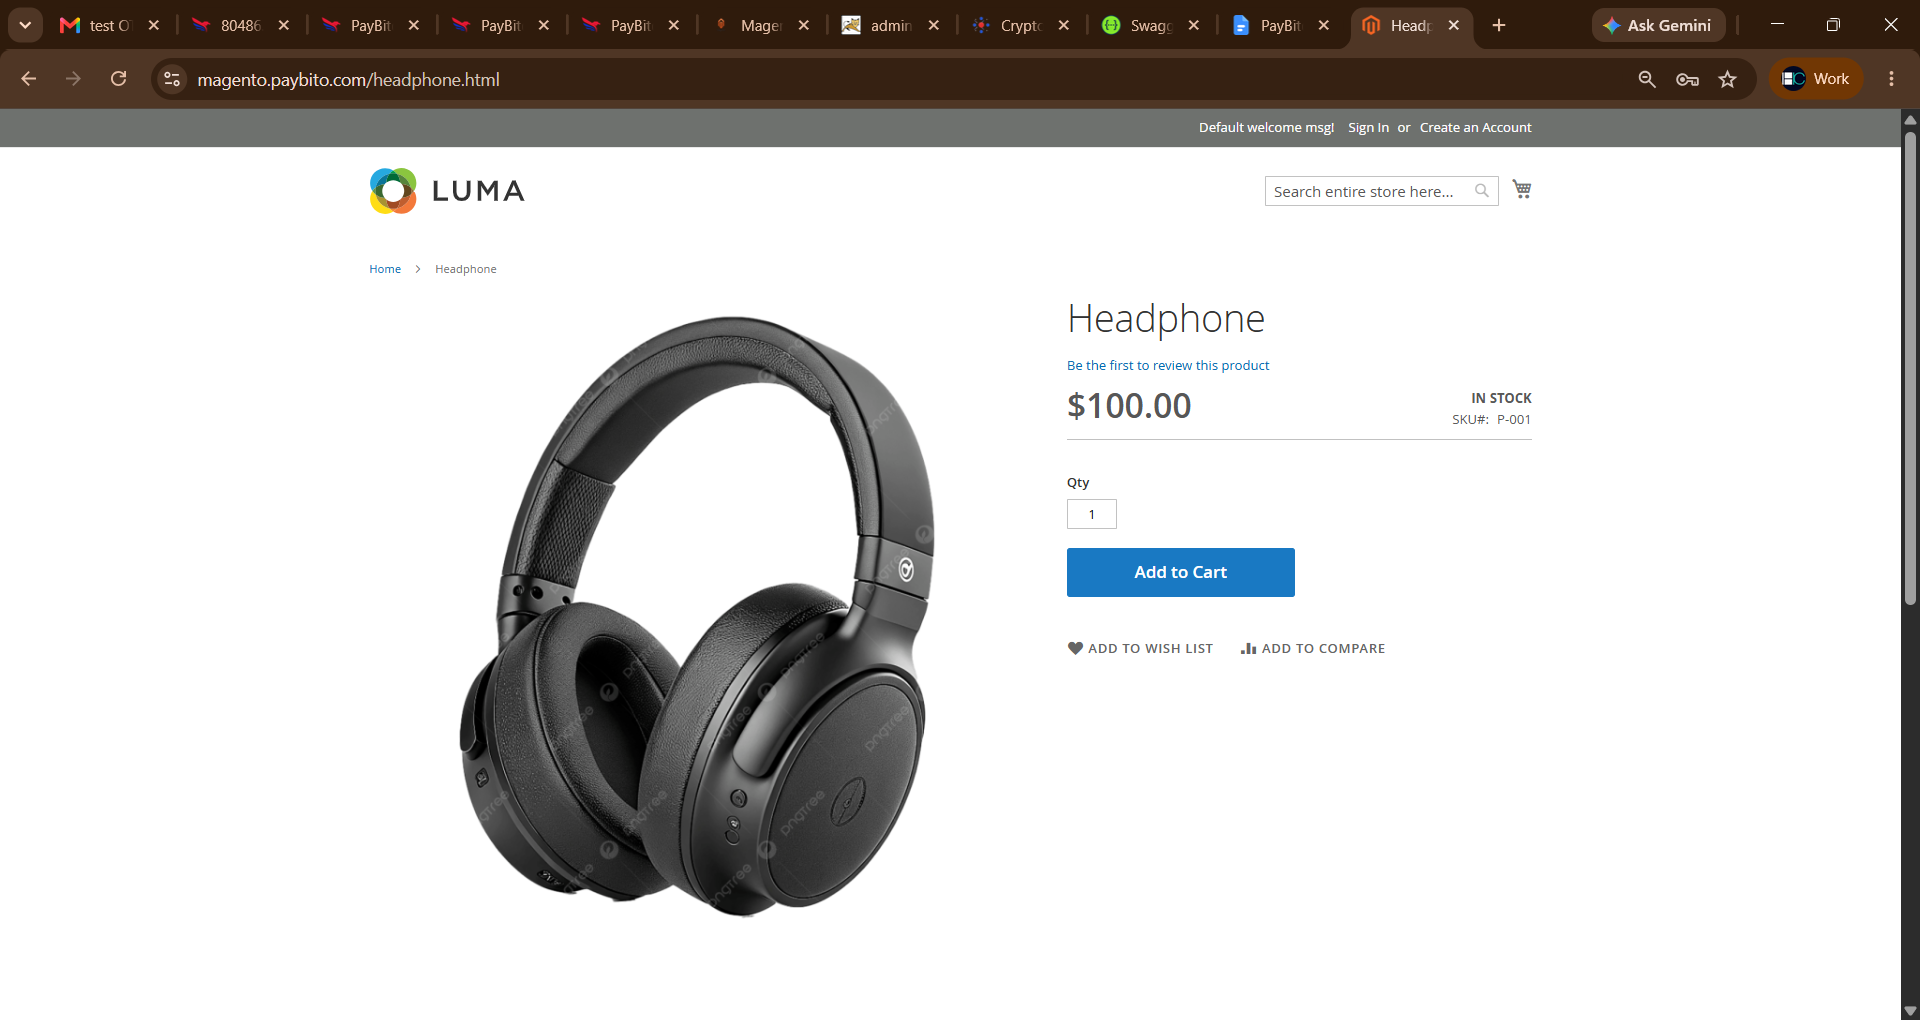 Step 1: Magento 2 storefront product page (magento.paybito.com).
Step 2: Proceed to Checkout
At the Magento checkout page under Review & Payments, customers see PayBito Pay (Cards, Bank Transfer, Crypto) listed among the available payment methods.
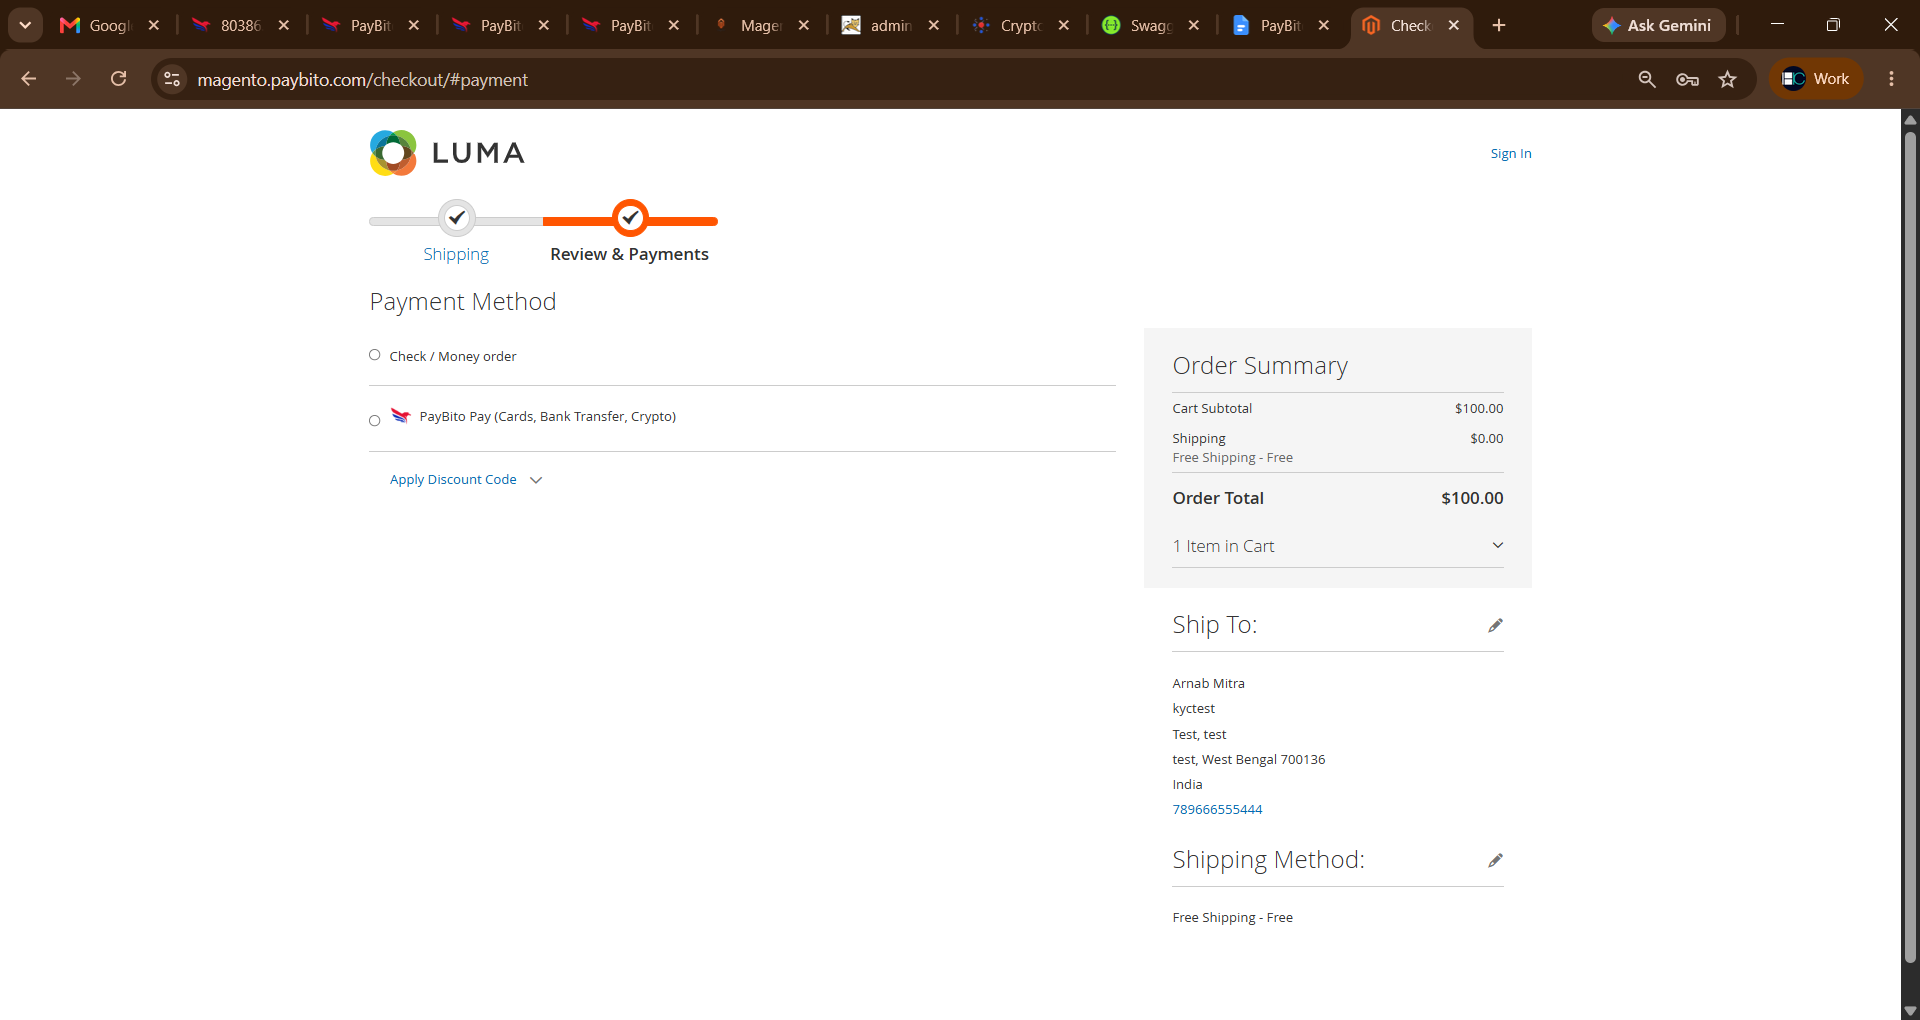 Step 2: Magento 2 checkout payment selection.
Step 3: Select PayBito Pay & Continue
When PayBito Pay is selected, the customer sees clear instructions indicating they will be redirected to complete their payment securely via Credit Card, Bank Transfer, or Supported Digital Assets. Clicking Continue to PayBito initiates the checkout session.
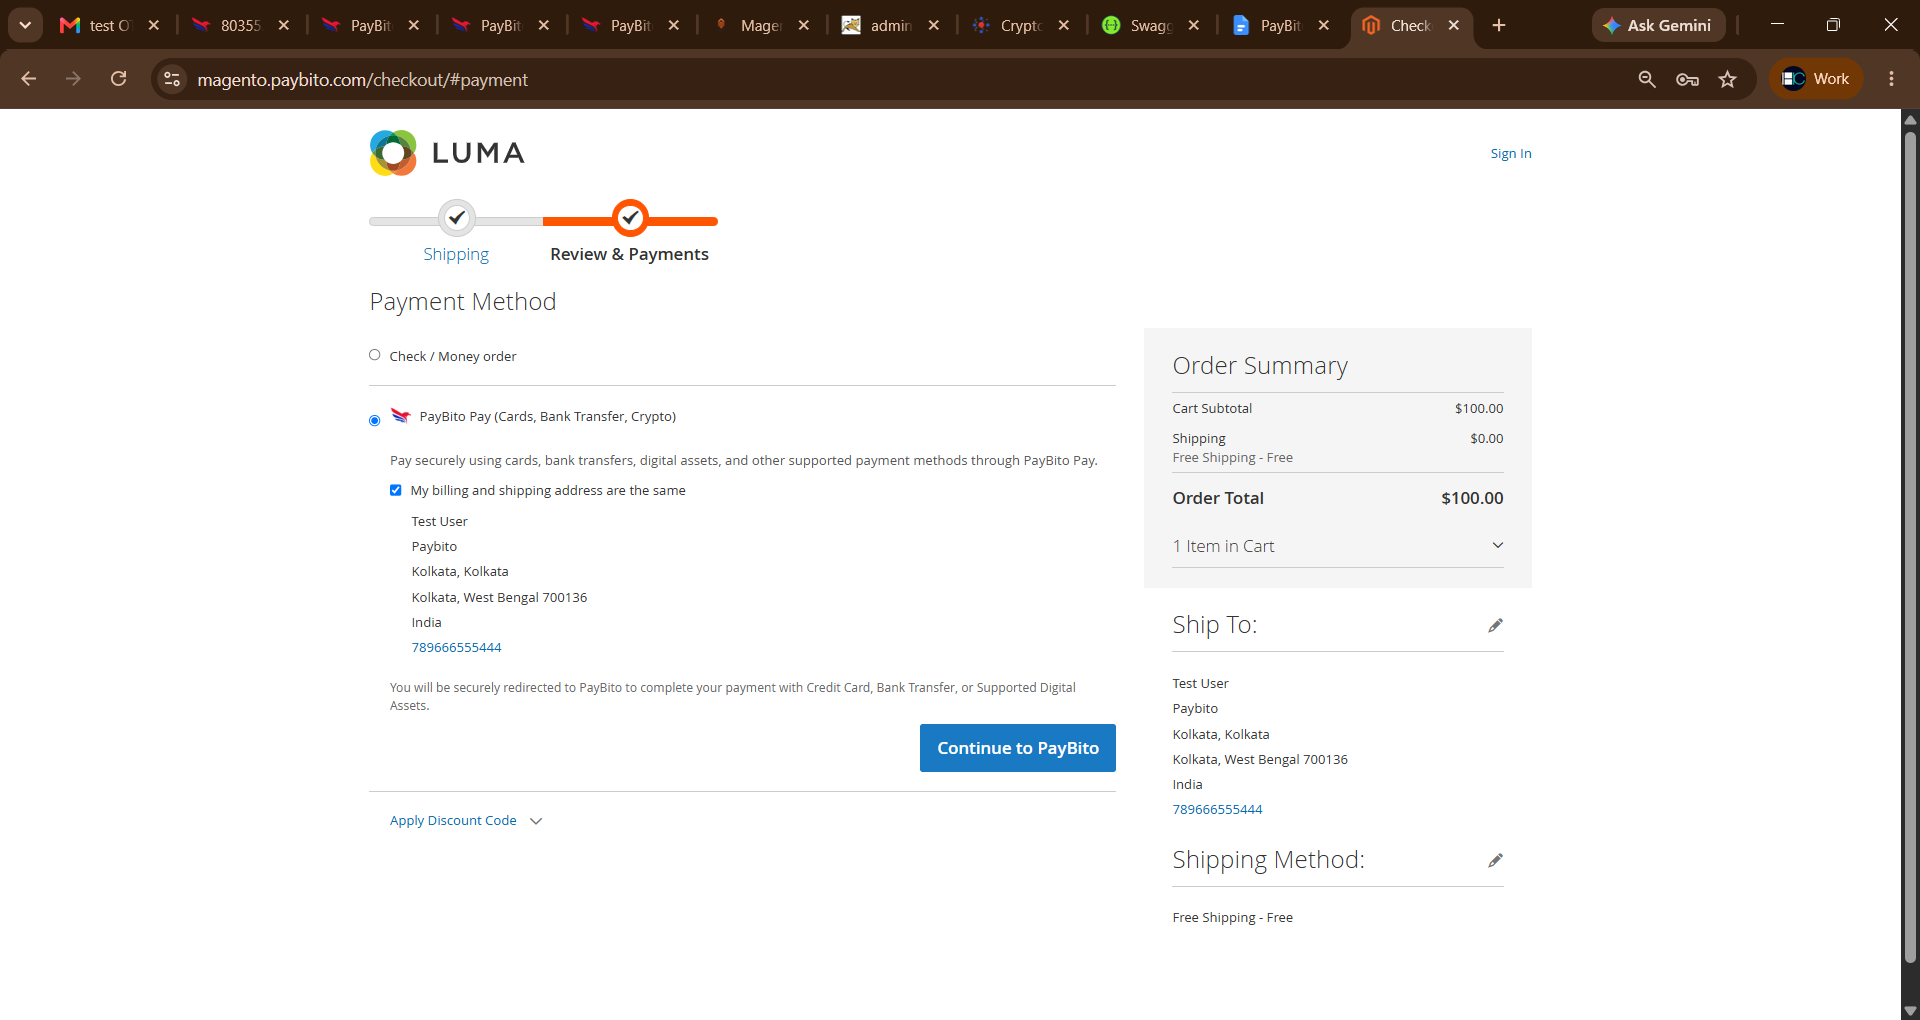 Step 3: Payment instructions and Continue to PayBito button.
Step 4: Secure Hosted Payment Completion
The customer is redirected to the PayBito Secure Hosted Checkout interface, where order items and total amount are pre-filled. They enter their email and select their preferred payment method to complete the purchase.
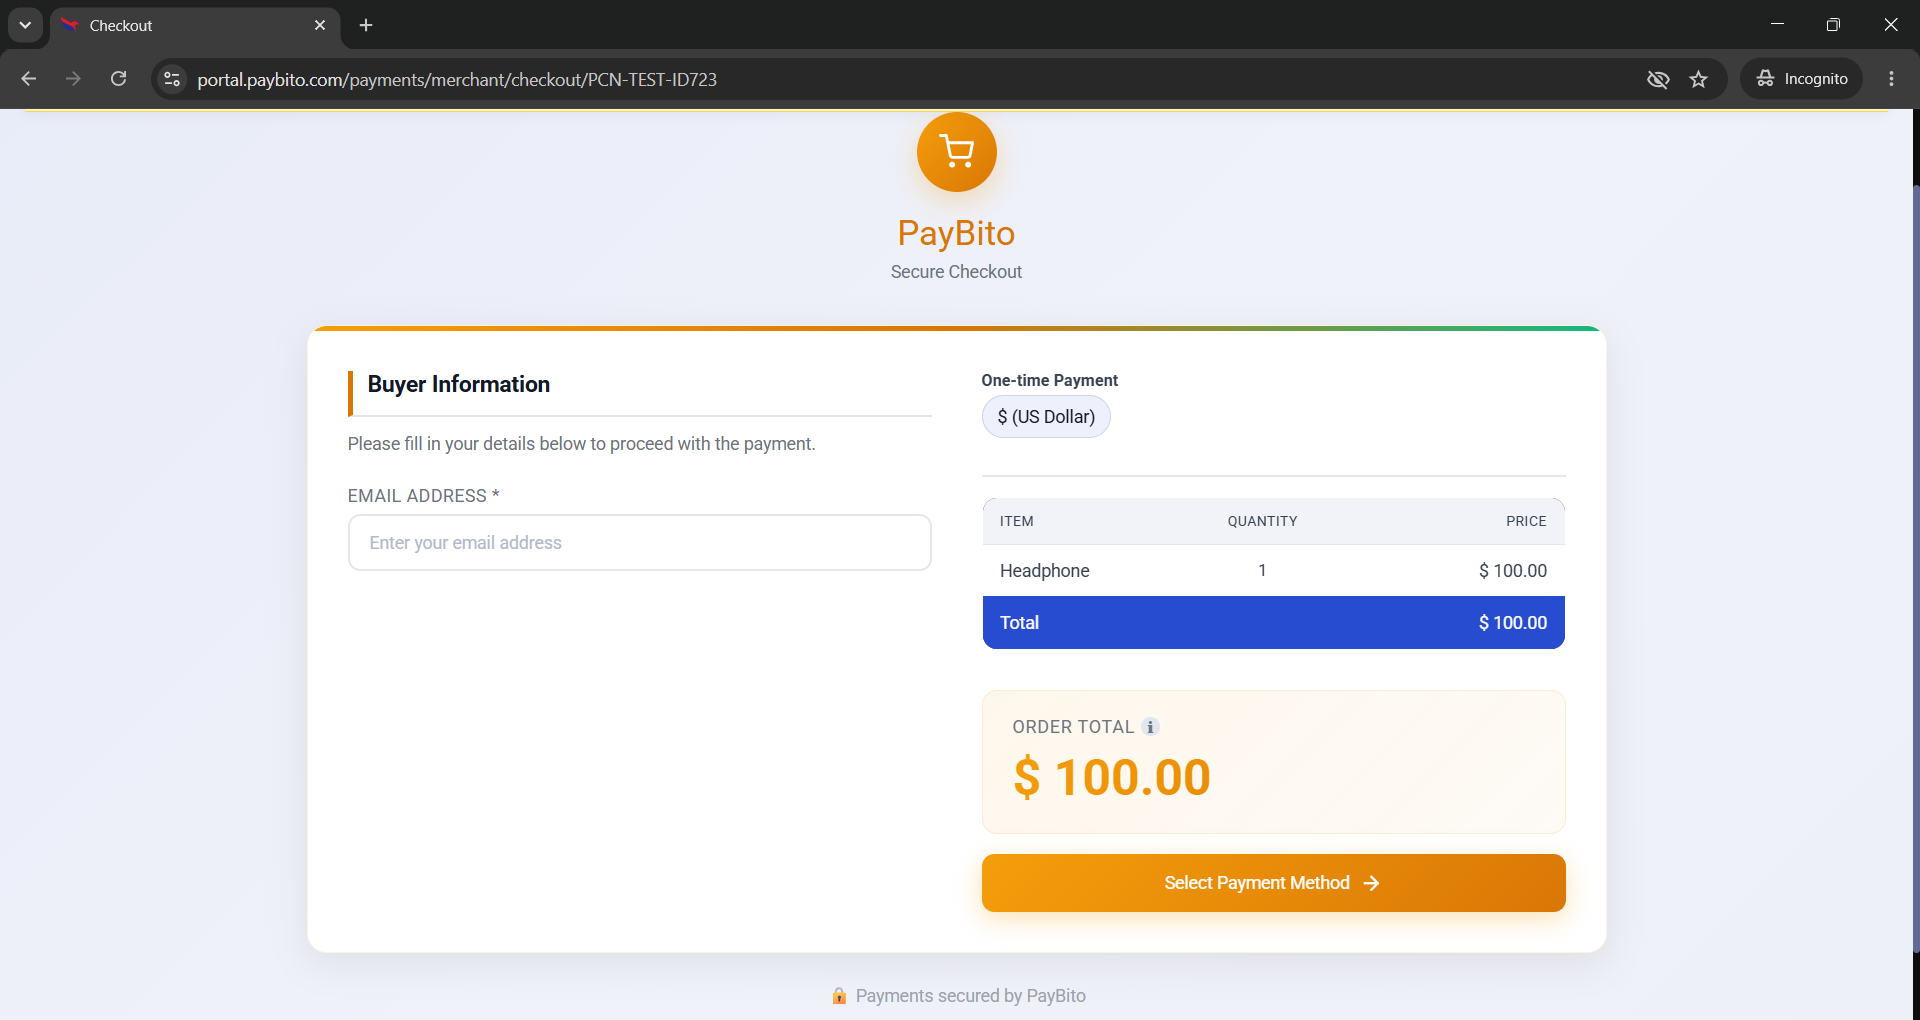 Step 4: PayBito Secure Checkout screen with Order Summary ($100.00) and Select Payment Method button.
8. Troubleshooting & Verification
If you experience any unexpected behavior during installation or testing, check the following common solutions:
Checkout Stalled / Missing "Next" Button
Ensure that at least one shipping carrier (e.g., Flat Rate or Free Shipping) is active and properly configured under Stores → Configuration → Sales → Delivery Methods in Magento Admin.
Orders Not Confirming Automatically
Verify that your server firewall, Cloudflare, or CDN security rules do not block external incoming HTTP POST requests to https://yourstore.com/rest/V1/paybito/webhook.
Reviewing Server Application Logs
Inspect the dedicated PayBito payment log files on your Magento server to troubleshoot specific transaction exceptions:
# Tail live PayBito payment logs
tail -f /var/www/html/magento2/var/log/paybito.log

# Tail general Magento exception logs
tail -f /var/www/html/magento2/var/log/exception.log
9. Frequently Asked Questions
The PayBito Pay extension supports Adobe Commerce and Magento Community Edition 2.4.x running on PHP 8.2 and PHP 8.3.
Customers can pay with major credit/debit cards (Visa, Mastercard, Amex, JCB), Apple Pay, Google Pay, Bank Transfers, and over 100+ digital assets including Bitcoin, Ethereum, USDT, USDC, and more.
You can switch the Environment Mode in the Magento Admin extension settings to Sandbox. Use your test API keys generated from the PayBito portal to simulate complete orders without transferring real funds.
No. All blockchain processing, private key security, and settlements are handled entirely through PayBito's institutional-grade infrastructure. Your store never touches private keys or raw blockchain nodes.
10. Support
If you require technical assistance or need help onboarding your Adobe Commerce / Magento 2 store with PayBito Pay, our merchant engineering team is ready to help.
Need Help with Your Integration?
Contact our dedicated developer support team for assistance with API keys, module compilation, or custom deployment configurations.
Contact Support: support@paybito.com