Prerequisites
Before configuring PayBito Pay, make sure all three of the following are in place:
A Shopify Store
With at least one product in your catalog and an online store theme published.
Your .myshopify.com Address
Every store has one, even if customers reach it through your own domain. You will find it in your Shopify admin under Settings → Domains, in the form your-store.myshopify.com. Your installation link is issued against this address.
PayBito Merchant Account
Sign up at portal.paybito.com if you don't have one yet.
Installation
Request Your Installation Link
PayBito Pay is not listed in the Shopify App Store. It is distributed privately, and each installation link is generated for one specific store — so the first step is to request yours. There is nothing to download, upload or unzip.
Request the link
Click Get Installation Link and fill in your name, your email address and your store's .myshopify.com address.
Receive it by email
The PayBito team generates a link for your store and emails it to the address you entered.
Install the app
Open the link while logged in to that store's Shopify admin, click Install, and accept the permissions Shopify asks for.
Open the app
In your Shopify admin, go to Apps → Paybito Pay. The app opens on a setup checklist that marks each of the steps below as done or still to do, reading your published theme to check.
An installation link only works for the store it was generated for. If you run more than one store, request a link for each, and double-check the .myshopify.com address you enter — your own custom domain cannot be used for this.
Installing the app adds two things to your theme editor: a Paybito Pay app embed that loads the PayBito shopping cart on every page, and a Paybito Pay Add to Cart block for your product pages. Both stay switched off until you turn them on in the setup steps below.
Setup
Configuration happens in three places: the PayBito Pay app in your Shopify admin, the Developers screens of the PayBito portal, and your Shopify theme editor. All of them are required — the cart will not work with only some of them done.
Step 1: Enter Your PayBito Credentials
In your Shopify admin, open Apps → Paybito Pay and click Open settings on the first checklist step. You will find every one of these values in your PayBito merchant account under Developers → API Keys.
Where to find these values in the PayBito merchant console
Sign in at portal.paybito.com, then expand Developers in the left sidebar and choose API Keys. Note the Domain Whitelisting entry in the same menu — you will come back to it in Step 2.
https://portal.paybito.com/payments/api-key
All four values you need are on this one screen. Enter a name for the key — use something that identifies this store, such as shopify — and click Create. Your Merchant ID and Broker ID are displayed at the top right of the same card, each with a copy button.
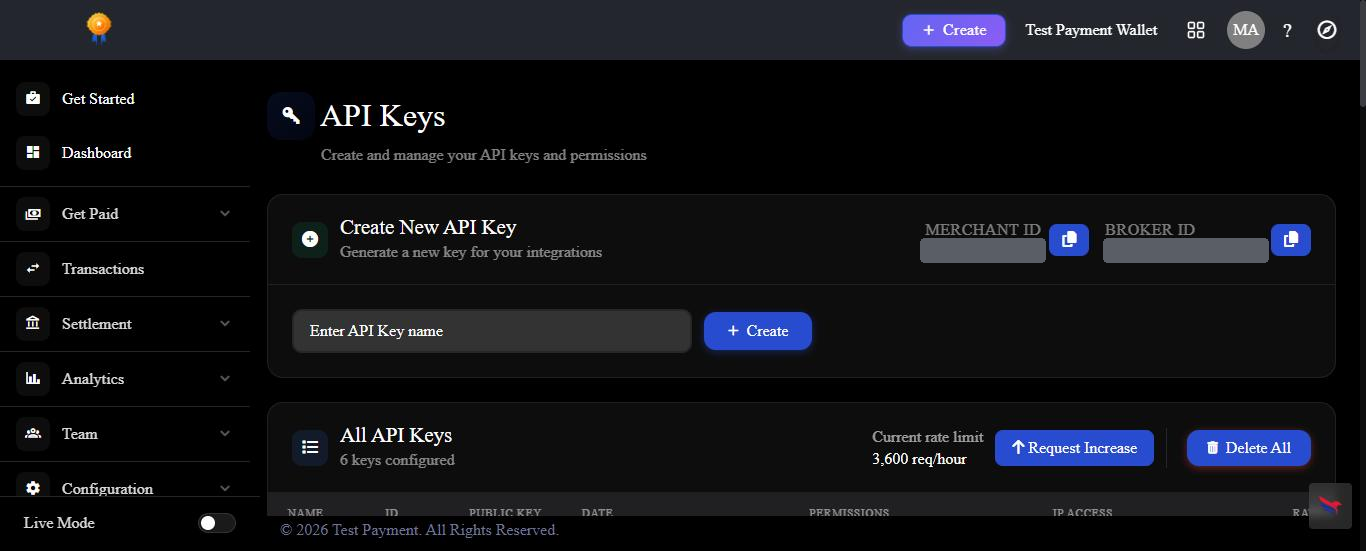 The API Keys screen. Create New API Key on the left; Merchant ID and Broker ID with copy buttons on the right.
Once the key exists, take its Public Key (beginning pk_) into Public key, and its Secret Key (beginning sk_) into Secret key in the app's settings.
| Field | What to Enter |
|---|---|
| Merchant ID Required | The Merchant ID shown on your PayBito account |
| Public key Required | Your public key, beginning pk_. This one is sent to shoppers' browsers, which is why your store's domain has to be whitelisted in Step 2. |
| Secret key Recommended | Your secret key, beginning sk_. Stored encrypted and never sent to a shopper's browser. Once saved, the field shows as masked — leave it blank to keep the stored value. |
| Broker ID Required | Unlike the Wix app, this is required on Shopify. Without it the cart cannot find its checkout, which shoppers see as a checkout button that does nothing. |
Click Save. The badge at the top of the card changes to Cart active once Merchant ID, Public key and Broker ID are all saved — until then, the PayBito blocks stay hidden from your theme editor entirely.
Live vs test keys. Test keys work only against the PayBito sandbox. Turn TEST MODE off in the portal and create a live key before you accept real payments.
Step 2: Whitelist Your Store's Domain
PayBito only accepts cart requests from domains you have explicitly whitelisted. This step happens in the PayBito portal, not in Shopify.
Whitelisting your domain
Find your storefront domain
The app's settings page names it in the help text under Public key — for example https://www.yourstore.com. This is the address your customers shop on, not the app's own address, and it is the exact value PayBito checks.
Add it in the PayBito portal
Go to Developers → Domain Whitelisting and paste the domain in. Strip the https:// first — this field expects a bare domain such as www.yourstore.com.
Verify it worked
Back in the app's settings, click Test connection. A green result means PayBito is accepting requests from your storefront.
Finding the Domain Whitelisting screen
Sign in at portal.paybito.com, expand Developers in the left sidebar, and click Domain Whitelisting — the third item in that menu, below API Keys and API.
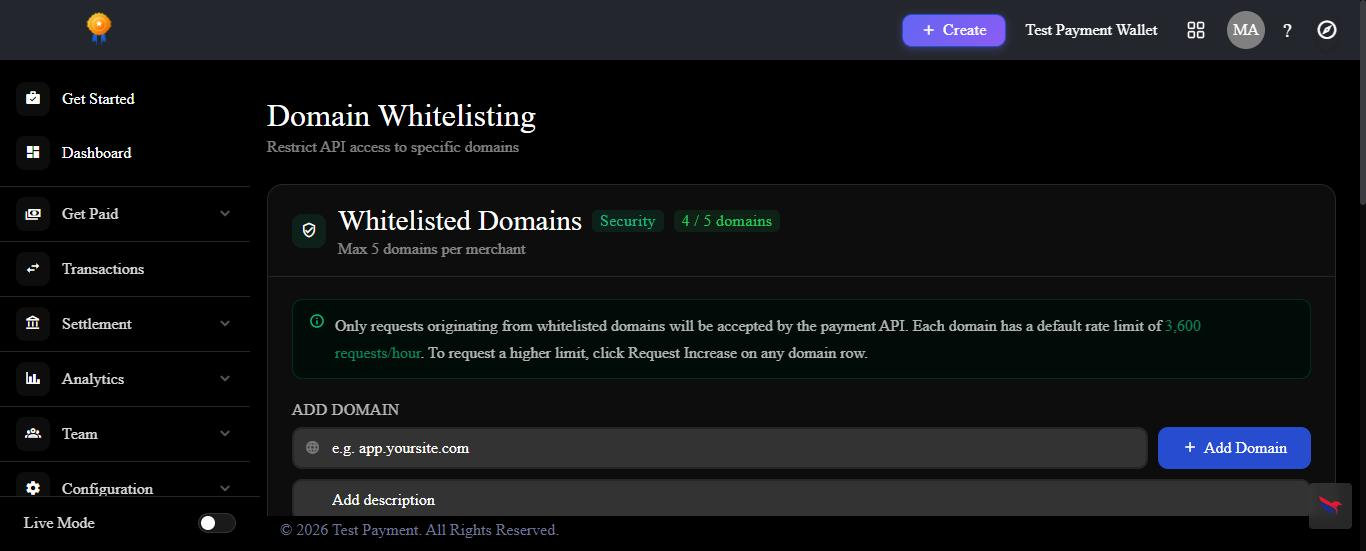 The Domain Whitelisting screen. Paste your storefront domain into ADD DOMAIN, optionally add a description, then click Add Domain. Each merchant may whitelist up to five domains.
Once added, the domain appears in the Whitelisted Domains list marked APPROVED, with its own request-rate allowance:
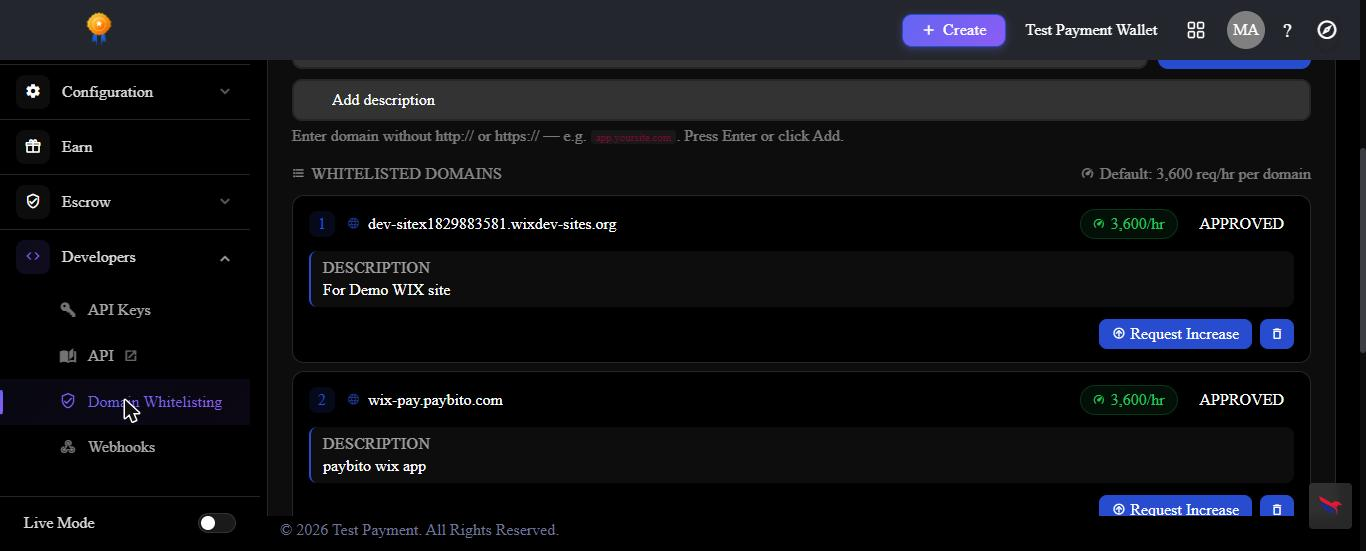 An approved domain in the Whitelisted Domains list. Note the sidebar path — Developers → Domain Whitelisting — and that the stored value carries no https:// prefix.
More than one domain? If customers can reach your store on several addresses — with and without www, or a separate domain per market — whitelist each of them.
Skip this and nothing looks broken — until someone tries to buy. Your storefront will render perfectly normally, because PayBito only rejects the cart request itself. The failure shows up the moment a customer clicks Add to Cart. Always finish with Test connection.
Step 3: Register Payment Notifications
This is how payment results reach the app. Unlike the Wix app, which registers its webhook automatically, on Shopify you add it in the PayBito portal yourself — once.
Registering the webhook
Copy your webhook URL
After your first save in Step 1, the app's settings page shows a Webhook URL under Payment notifications. It is unique to your store.
Add it in the PayBito portal
Under Developers, add the URL as a webhook endpoint.
Until the webhook is registered, payments still complete — their status just stays Pending in the app instead of updating on its own.
Treat the webhook URL as a secret. Anyone holding it can post payment updates for your store. Don't paste it into support tickets or share it outside the PayBito portal.
Step 4: Turn On the App Embed
The app embed loads the PayBito cart — the floating cart button and the cart drawer — on every page of your store. You switch it on yourself in the theme editor; the app's checklist then confirms it is on.
Enabling the embed
Open the theme editor
In your Shopify admin, go to Online Store → Themes and click Customize on your published theme.
Switch Paybito Pay on
Click the App embeds icon at the bottom of the left sidebar and turn Paybito Pay on. There is nothing to configure — the embed has no settings.
Save
Click Save at the top right of the editor.
Step 5: Add the Button to Your Product Page
The last step puts the PayBito Add to Cart button on your product pages. Without it, the cart loads on your storefront but there is nothing to add to it.
Placing the button
Open your product template
In the theme editor, use the template dropdown at the top to open Products → Default product.
Add the block
Find your product section in the left sidebar — themes call it Product information, Product details or Buy buttons — and click Add block → Apps → Paybito Pay Add to Cart.
Position it and save
Drag it directly under your theme's own buy buttons, where it looks closest to native. If it looks too wide, set Maximum width on the block. Click Save. If you use more than one product template, repeat this on each of them.
Turn off Buy it now
Shopify's accelerated checkout buttons skip the PayBito cart, so switch them off. Still on the product template, click your theme's Buy buttons block, deselect Show accelerated checkout buttons, and click Save. Not every theme has this setting — if yours doesn't, the next step covers it.
Hide your theme's own buy controls (optional)
PayBito Pay never hides or changes anything in your theme. If you want your theme's own Add to Cart, cart icon or quick-add buttons out of the way, the app's setup checklist gives you a CSS snippet matched to your theme. Paste it under Theme settings → Custom CSS in the theme editor; deleting it puts everything back.
Place the PayBito button first. The CSS hides your theme's buy buttons whether or not the PayBito button is there — applied too early, it leaves a product page with no way to buy anything. Check a product page, a collection page and your header in the editor's preview before you save.
Before you go live, know how the PayBito cart behaves. While it is active, orders are recorded in the PayBito portal, not in your Shopify admin. Shopify inventory is not reduced, and Shopify discounts, shipping rules and tax rules do not apply. Prices are charged in USD, and refunds are issued from the PayBito dashboard.
Checkout
Here is the complete path a customer takes, from browsing your catalog to a confirmed payment.
1. Your storefront works exactly as it did before
Your product catalog displays normally. Customers browse items and view pricing as usual — the only visible addition is the floating PayBito cart.

2. The customer opens a product
Product pages keep your theme's standard layout. Customers choose their options and quantity, then use the PayBito Add to Cart button.

3. They review the cart
The cart panel lists every item with its selected options, quantities and the order total, and is marked Secured by PayBito. From here the customer clicks Proceed to Checkout.

4. They choose how to pay
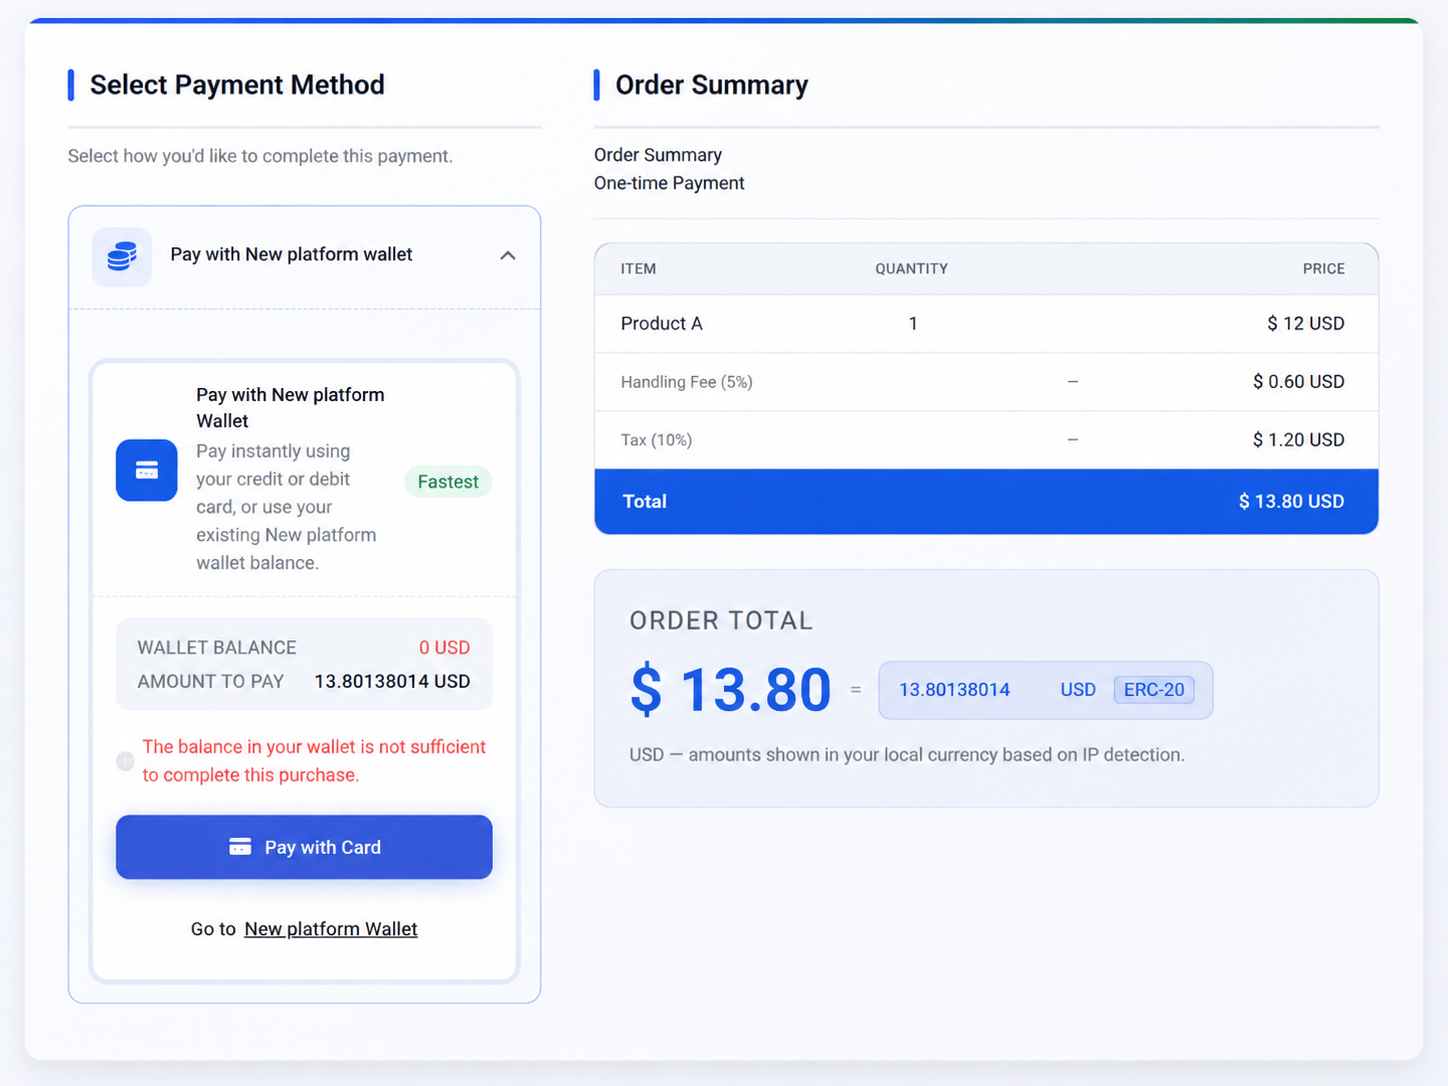
Proceed to Checkout takes the customer to PayBito Secure Checkout. They enter their email address, review the order, and click Select Payment Method.
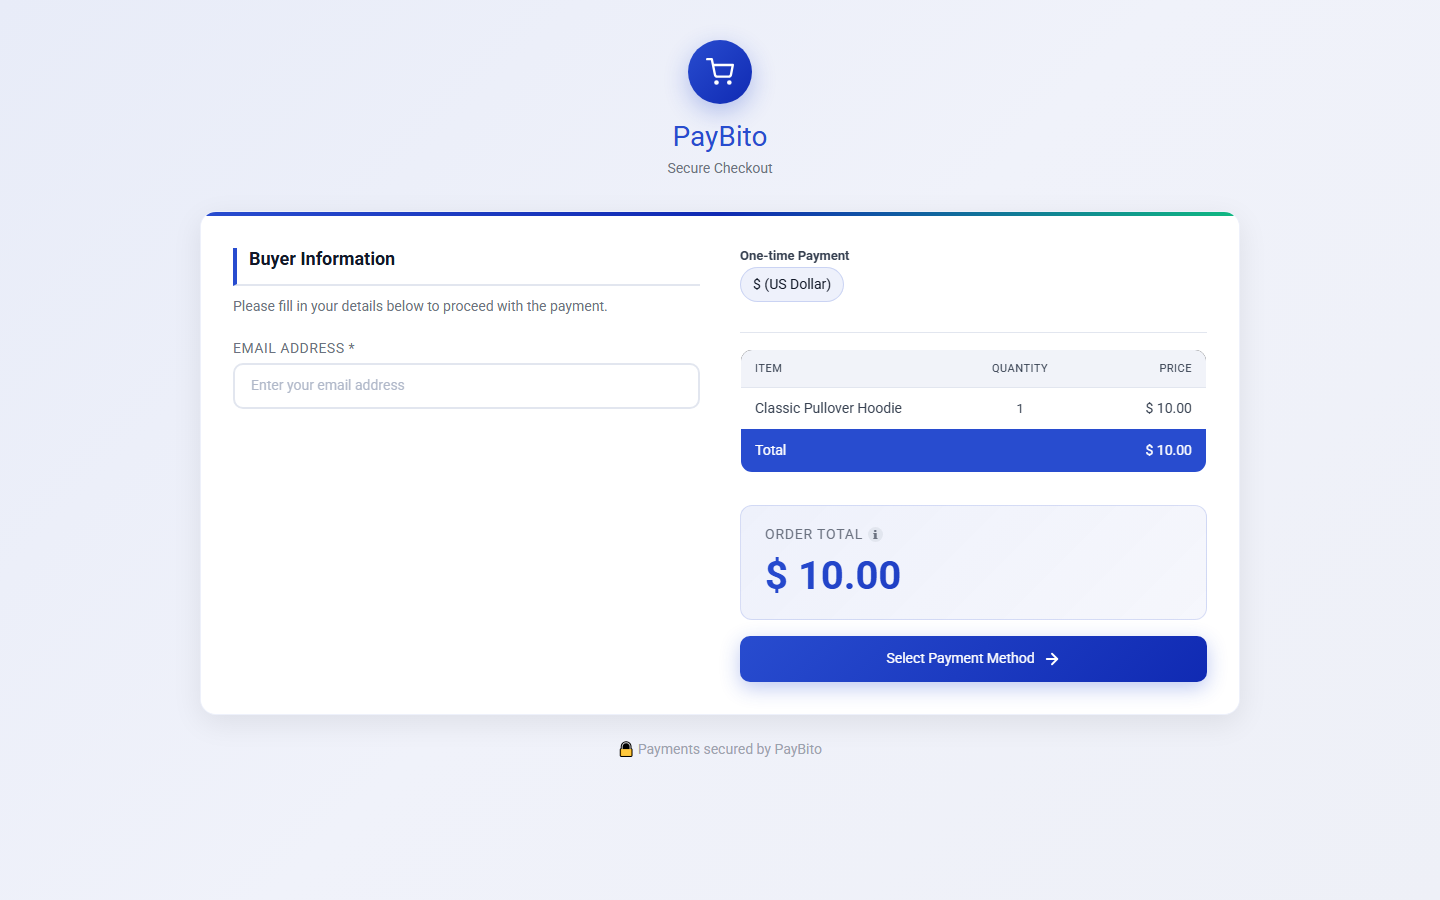
They then pick a payment method and review the full order summary — including any handling fee and tax — before confirming the amount due.
5. The payment is confirmed
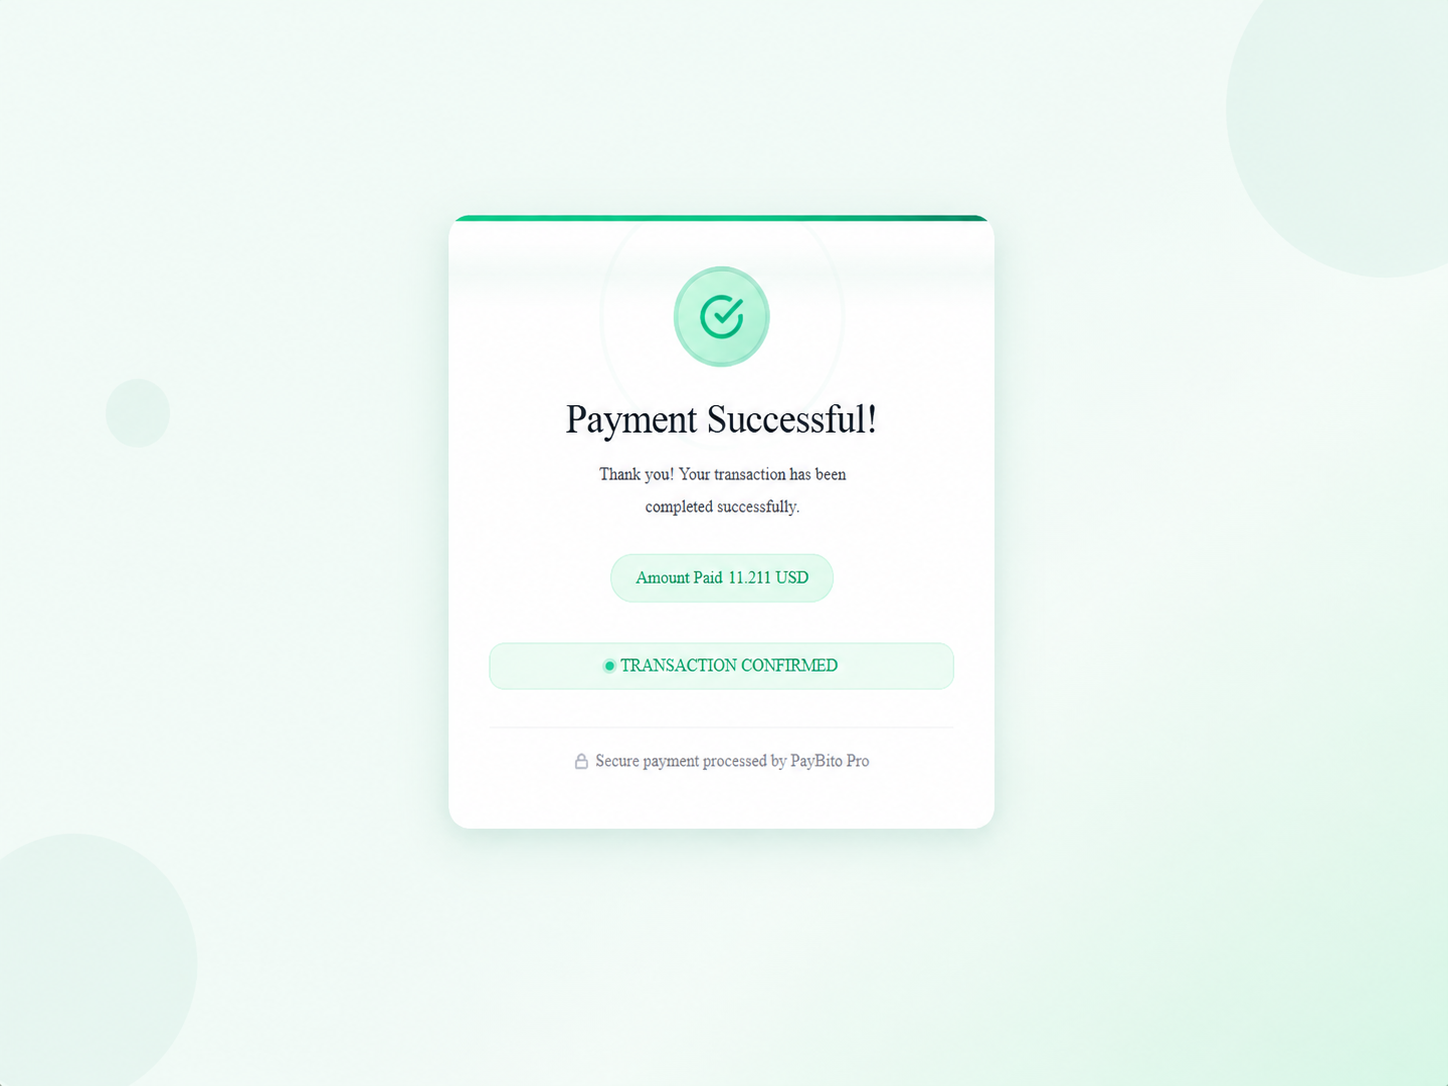
Once the transaction completes, the customer sees a confirmation screen with the amount paid and a confirmed transaction status.
6. You track it from the PayBito dashboard
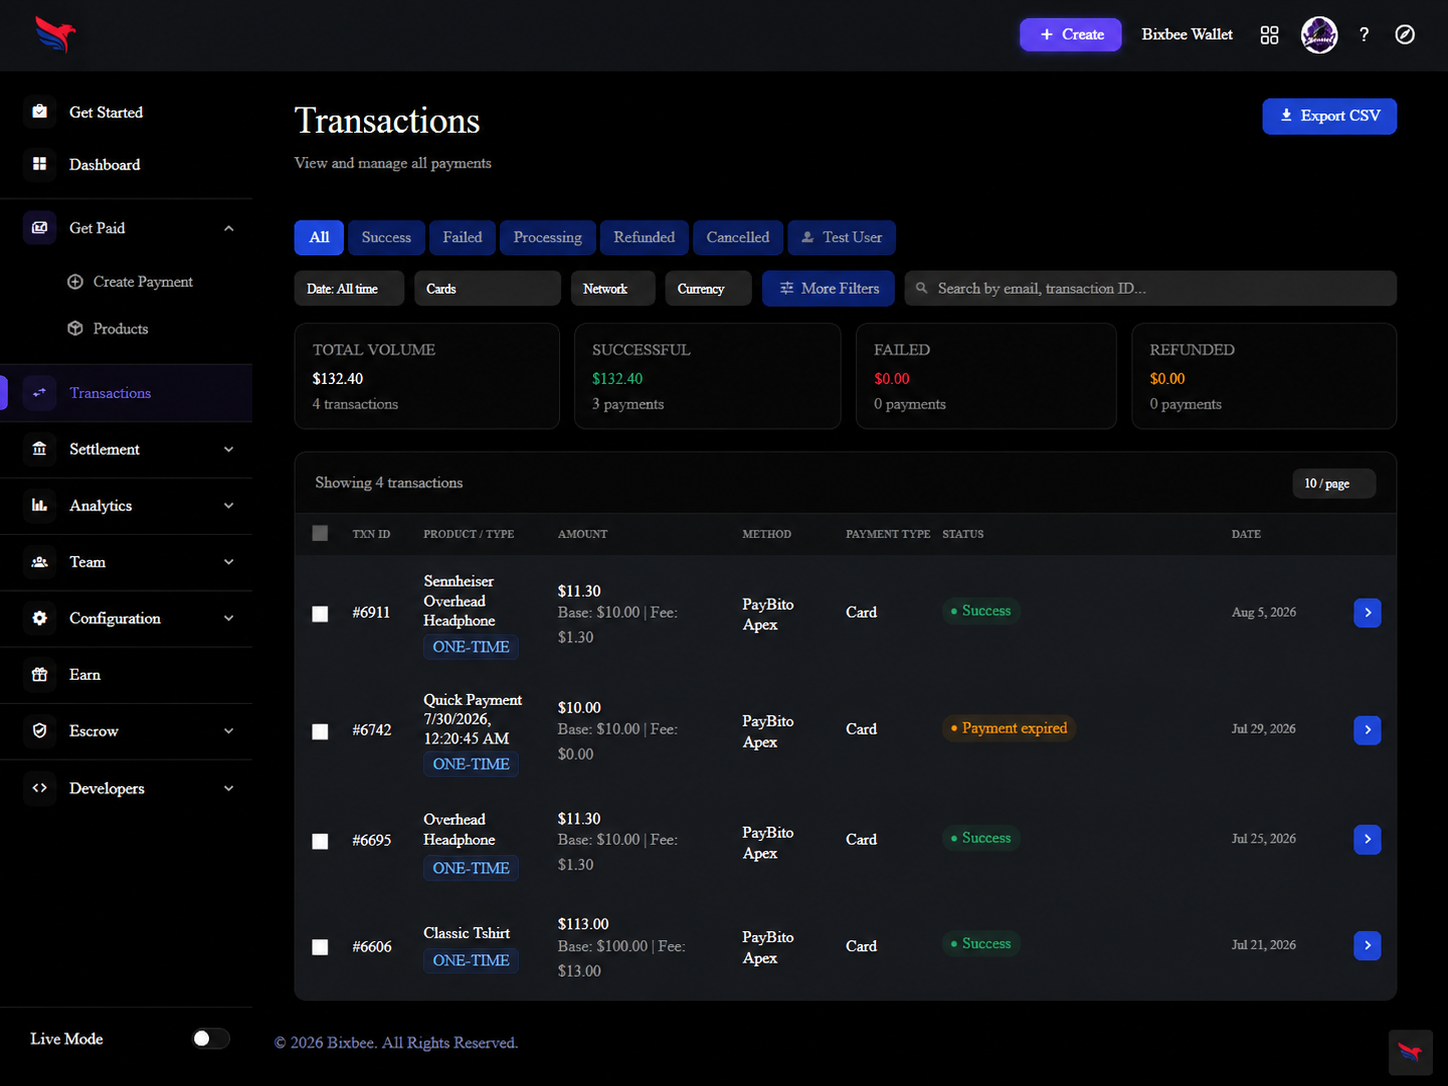
Every payment appears in the PayBito dashboard's Transactions view — totals, status, method and per-order detail, with CSV export. This is where your PayBito orders live; they are not written to your Shopify admin.
Stuck on any of this? Email support@paybito.com with your store's .myshopify.com address and your Merchant ID — but never your Secret Key or webhook URL.