Prerequisites
Before setting up PayBito Pay, make sure all three of the following are in place:
A Squarespace 7.1 Store
A Squarespace 7.1 site with Commerce enabled and at least one product in your shop. The version is shown at the bottom of the Pages panel.
A Core Plan or Higher
PayBito Pay is added with a short snippet in Squarespace's Code Injection, which Squarespace offers on Core, Plus and Advanced plans (and during the free trial).
PayBito Merchant Account
Sign up at portal.paybito.com if you don't have one yet.
Sign In
Open PayBito Pay for Squarespace
There is no app to install from a marketplace and nothing to download. Everything is set up from the PayBito Pay dashboard, and your store only needs one snippet.
Open the dashboard
Go to PayBito Pay for Squarespace:
https://squarespace-pay.paybito.com/
Sign in with your PayBito account
Click Log in with PayBito. New to PayBito? Click Create PayBito account first - it's the same account you'll use for payouts.
Follow the five setup steps
The dashboard walks you through five steps: PayBito account, API keys, Your store, Check the connection and Install on Squarespace. The next section covers each one.
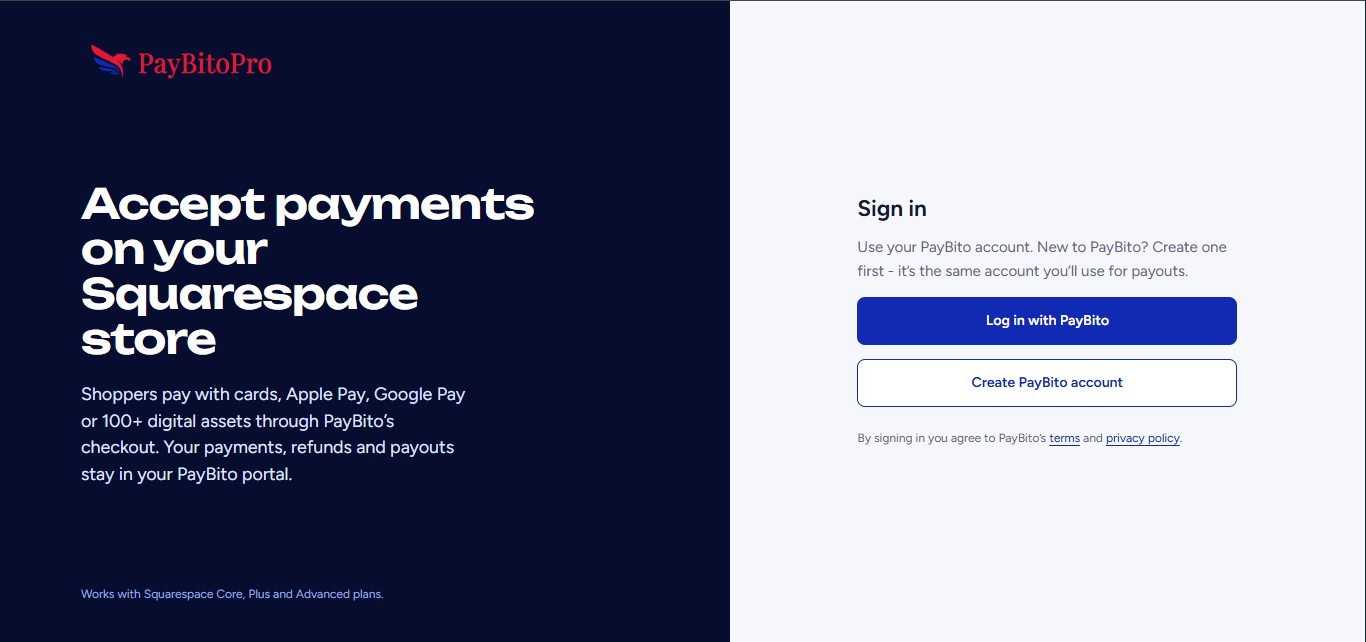 The sign-in screen. Use Log in with PayBito, or Create PayBito account if you don't have one yet.
Setup
Configuration happens in three places: the PayBito Pay dashboard, the PayBito portal (API keys, Domain Whitelisting and Webhooks) and the Code Injection page in Squarespace. All three are required - the cart will not work with only some of them done.
Step 1: Enter Your PayBito Credentials
Fill in the first two steps of the dashboard, PayBito account and API keys. You will find every one of these values in your PayBito merchant account under Developers → API Keys.
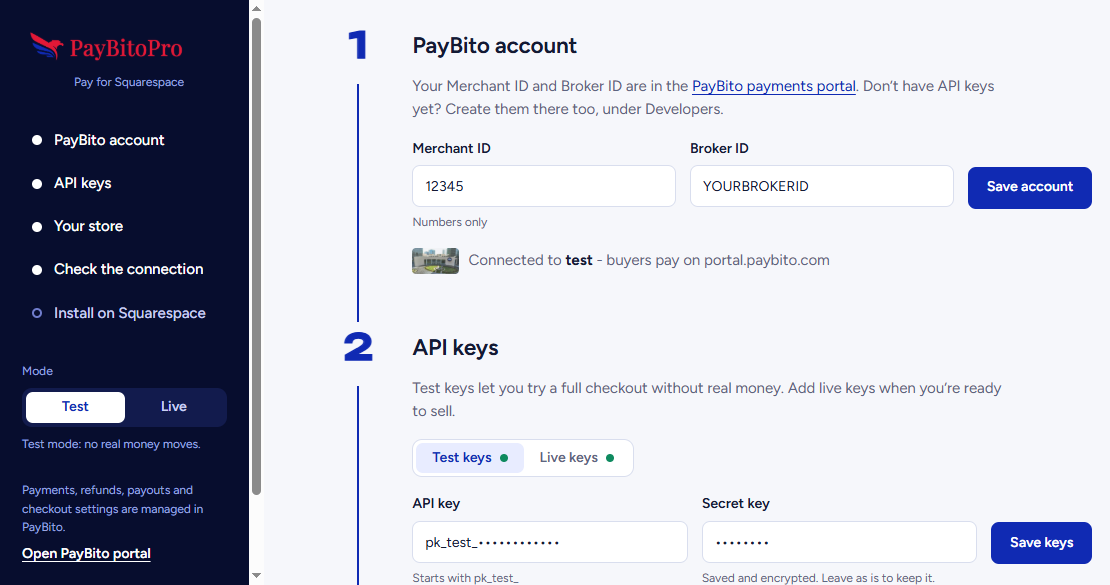 PayBito account takes your Merchant ID and Broker ID; API keys takes a key pair for Test and another for Live.
Where to find these values in the PayBito merchant console
Sign in at portal.paybito.com, then expand Developers in the left sidebar and choose API Keys. Note the Domain Whitelisting and Webhooks entries in the same menu - you will come back to them in Steps 2 and 5.
https://portal.paybito.com/payments/api-key
Enter a name for the key - use something that identifies this store, such as squarespace - and click Create. Your Merchant ID and Broker ID are displayed at the top right of the same card, each with a copy button.
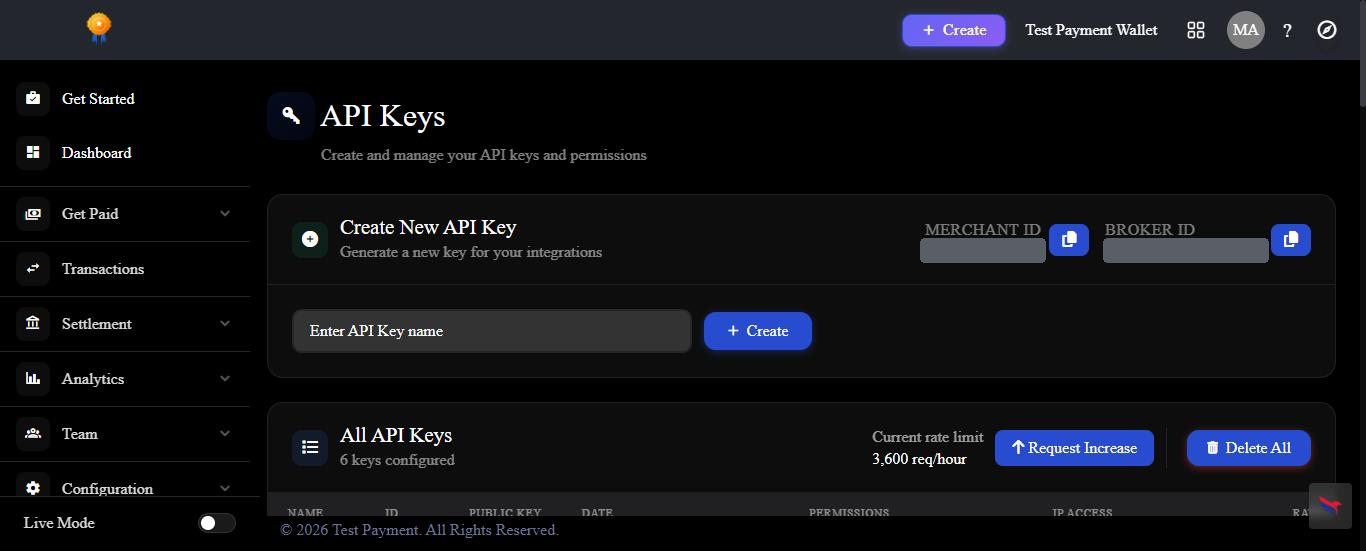 The API Keys screen. Create New API Key on the left; Merchant ID and Broker ID with copy buttons on the right.
| Field | What to Enter |
|---|---|
| Merchant ID Required | The Merchant ID shown on your PayBito account (numbers only) |
| Broker ID Required | The Broker ID shown next to it. It is checked with PayBito when you click Save account. |
| API key Required | Your public key, beginning pk_test_ on the Test keys tab or pk_live_ on the Live keys tab |
| Secret key Required | Your secret key, beginning sk_. Stored encrypted and never sent to a shopper's browser. |
Click Save account, then Save keys. Start with your test keys; add live keys when you're ready to sell.
Live vs test keys. Test keys work only against the PayBito sandbox, so no real money moves. Create a live key in the portal, and save it on the Live keys tab, before you accept real payments.
Step 2: Add and Whitelist Your Store Address
PayBito only accepts cart requests from addresses you have explicitly whitelisted. List your store's addresses in the dashboard, then approve the same addresses in the PayBito portal.
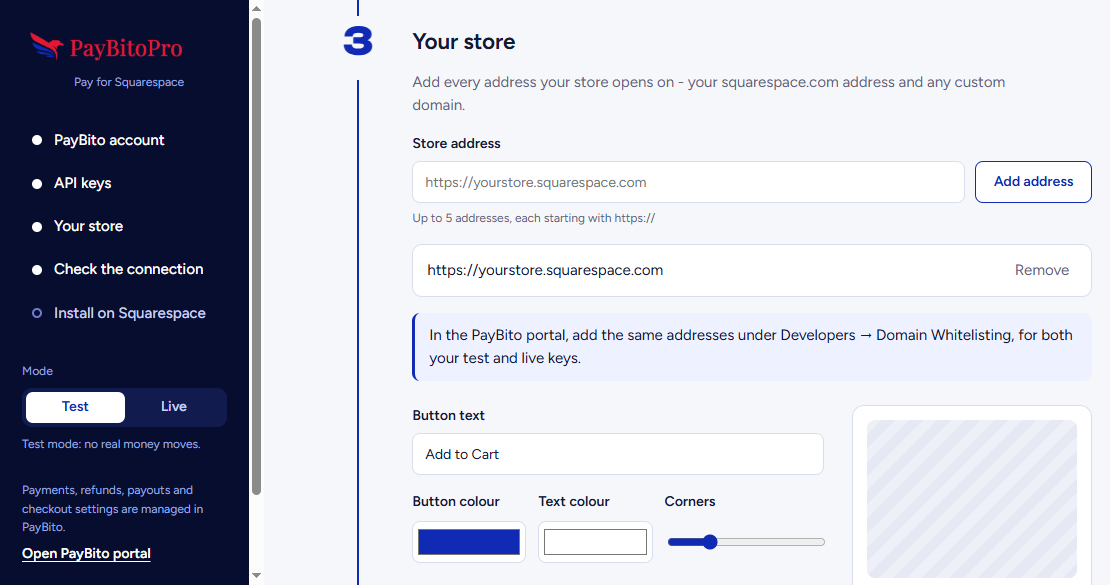 The Your store step. Add every address your store opens on, each starting with https://.
Whitelisting your store
Add your store addresses in the dashboard
In Your store, add your https://yourstore.squarespace.com address and any custom domain you use, with and without www. Up to five addresses.
Add the same addresses in the PayBito portal
Go to Developers → Domain Whitelisting and add each address, without the https:// - for example yourstore.squarespace.com. Do this for both your test and live keys.
Verify it worked
Back in the dashboard, run Check the connection (Step 3 below). A green result means PayBito is accepting requests from your store.
Finding the Domain Whitelisting screen
Whitelisting lives in the PayBito merchant console, not in Squarespace. Sign in at portal.paybito.com, expand Developers in the left sidebar, and click Domain Whitelisting.
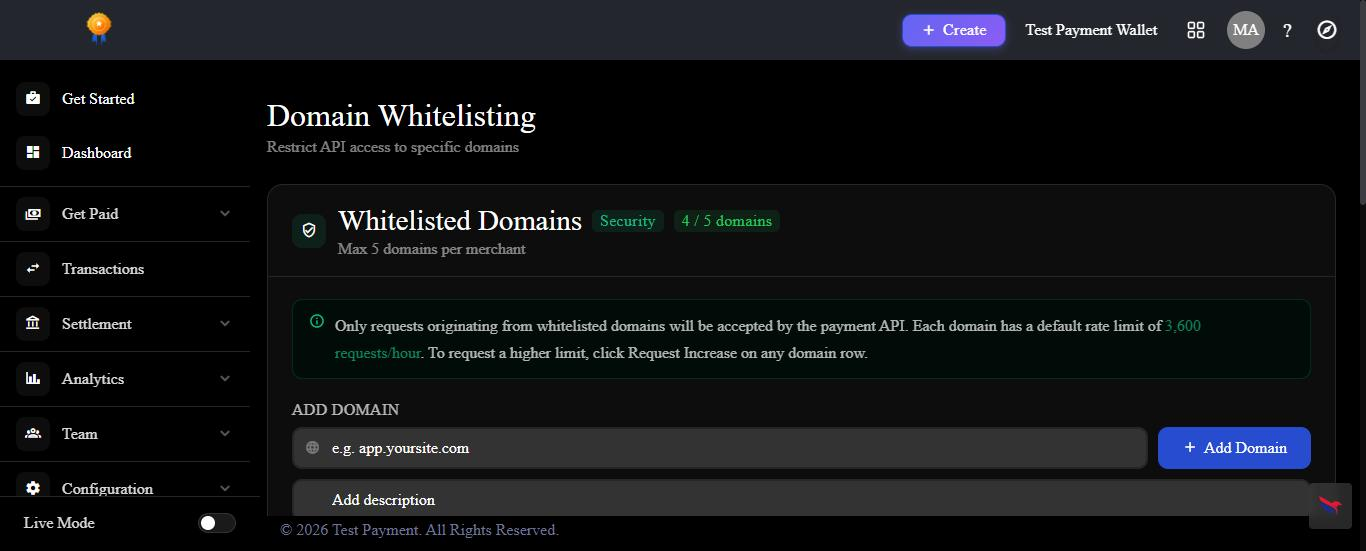 The Domain Whitelisting screen. Paste your store address into ADD DOMAIN, optionally add a description, then click Add Domain. Each merchant may whitelist up to five domains.
Once added, the domain appears in the Whitelisted Domains list marked APPROVED, with its own request-rate allowance:
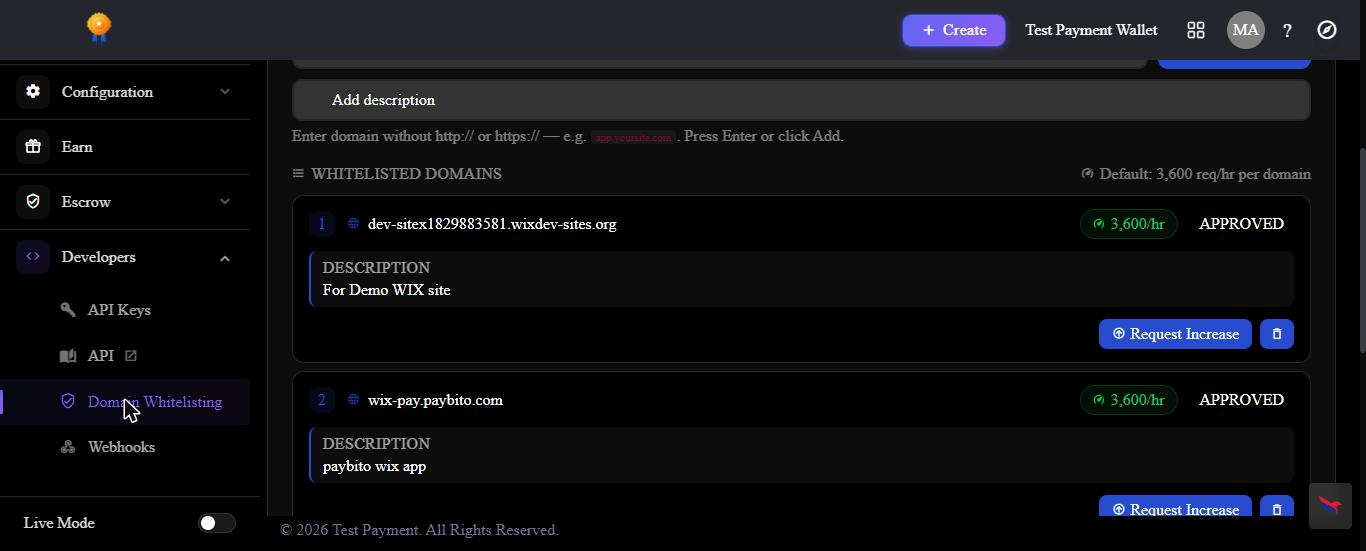 An approved domain in the Whitelisted Domains list. The stored value carries no https:// prefix.
Skip this and nothing looks broken - until someone tries to buy. Your store renders normally, because PayBito only rejects the cart request itself. The PayBito button also stays switched off until Check the connection passes, so always finish with that check.
Step 3: Style the Button and Check the Connection
Still in Your store, choose how the PayBito Add to Cart button looks, then let the dashboard check everything with PayBito.
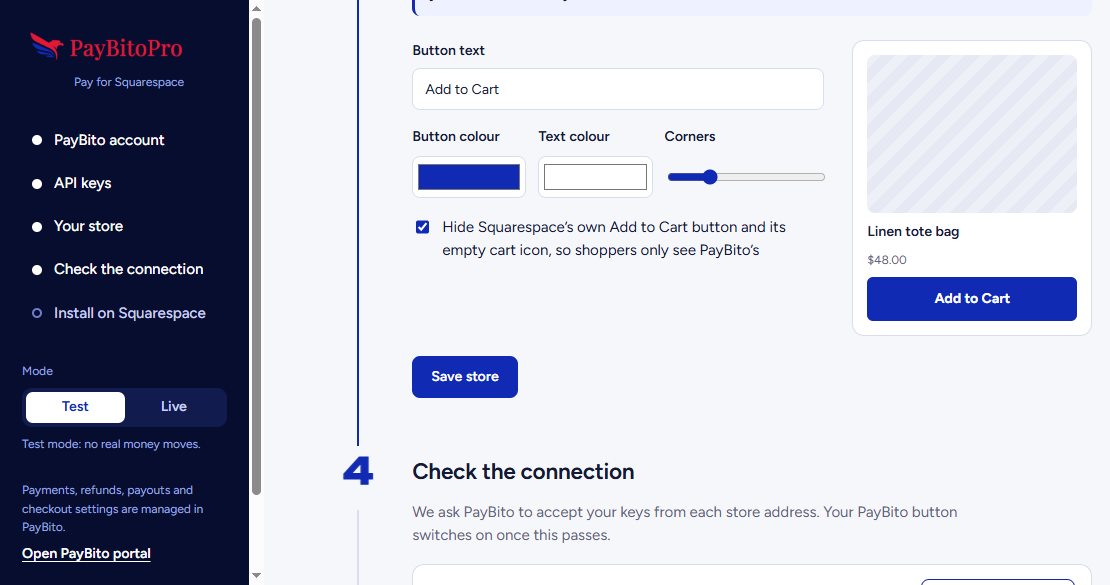 Button text, colours and corners, with a live preview. Click Save store when you're done.
Button settings
Button text and style
The label defaults to Add to Cart. Pick the button colour, text colour and corner rounding to match your theme; the preview updates as you go.
Hide Squarespace's own Add to Cart
On by default, so shoppers see a single Add to Cart button - PayBito's - and no empty Squarespace cart icon. Turn it off to keep both buttons.
Check the connection
In Check the connection, click Check connection for Test, and for Live once your live keys are saved. PayBito is asked to accept your keys from each store address; if something is missing, the result tells you what to fix.
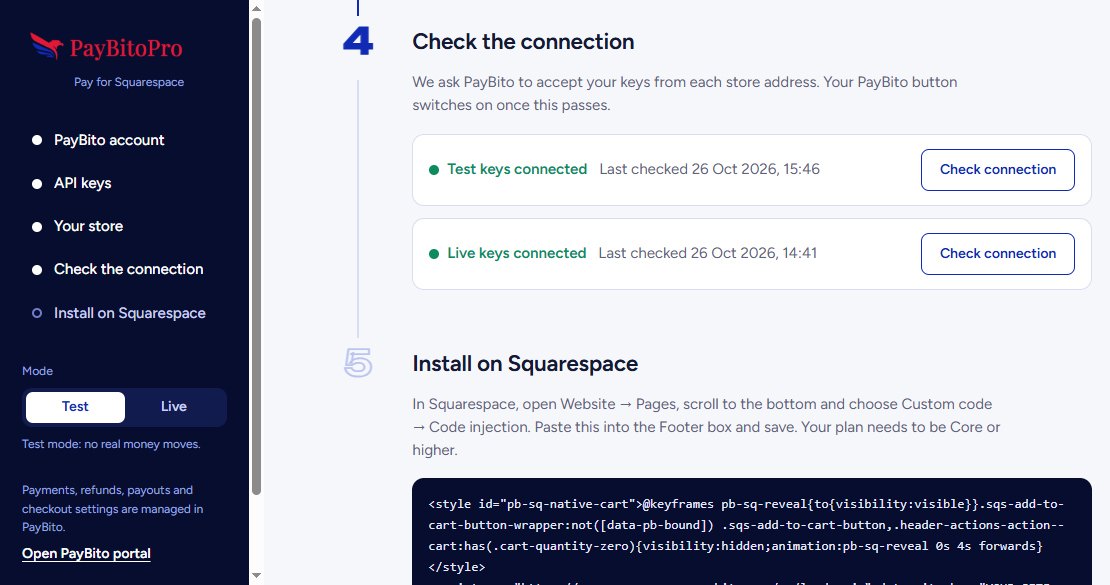 Both modes connected. Your PayBito button switches on once this passes.
The Test / Live switch in the dashboard's left panel decides which keys your store uses. Live can only be selected once the live keys pass the check.
Step 4: Install the Snippet on Squarespace
The last dashboard step, Install on Squarespace, shows your snippet. It is the only thing you add to your store.
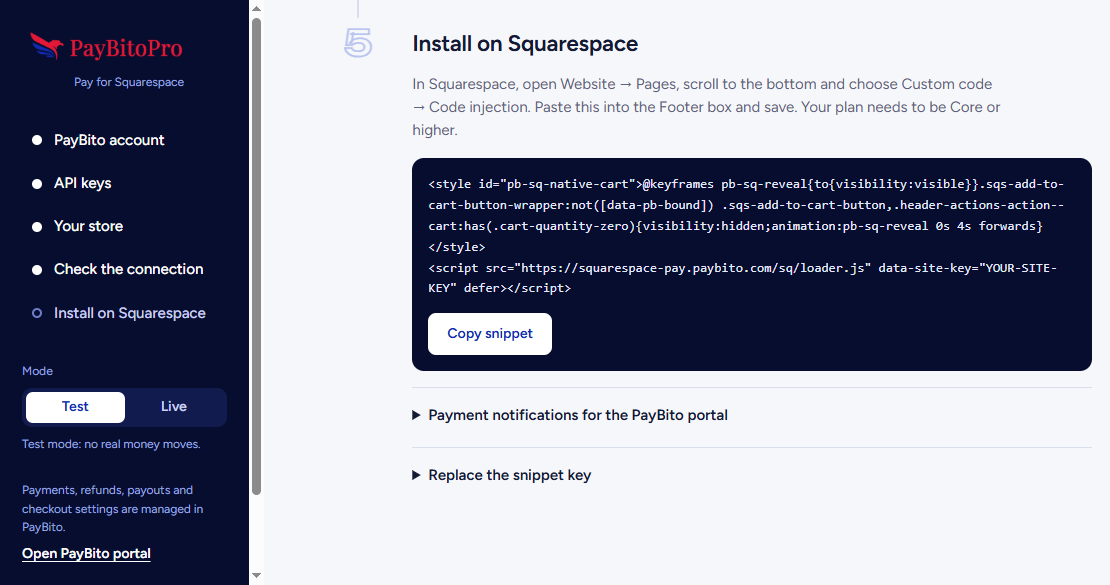 Your snippet, with your own site key already filled in. Click Copy snippet.
Adding the snippet
Copy the snippet
In the dashboard, click Copy snippet.
Open Code Injection in Squarespace
In Squarespace, open Website → Pages, scroll to the bottom of the panel and choose Custom Code → Code Injection.
Paste it into the Footer box and save
Paste the snippet into the Footer box - not the Header - and click Save.
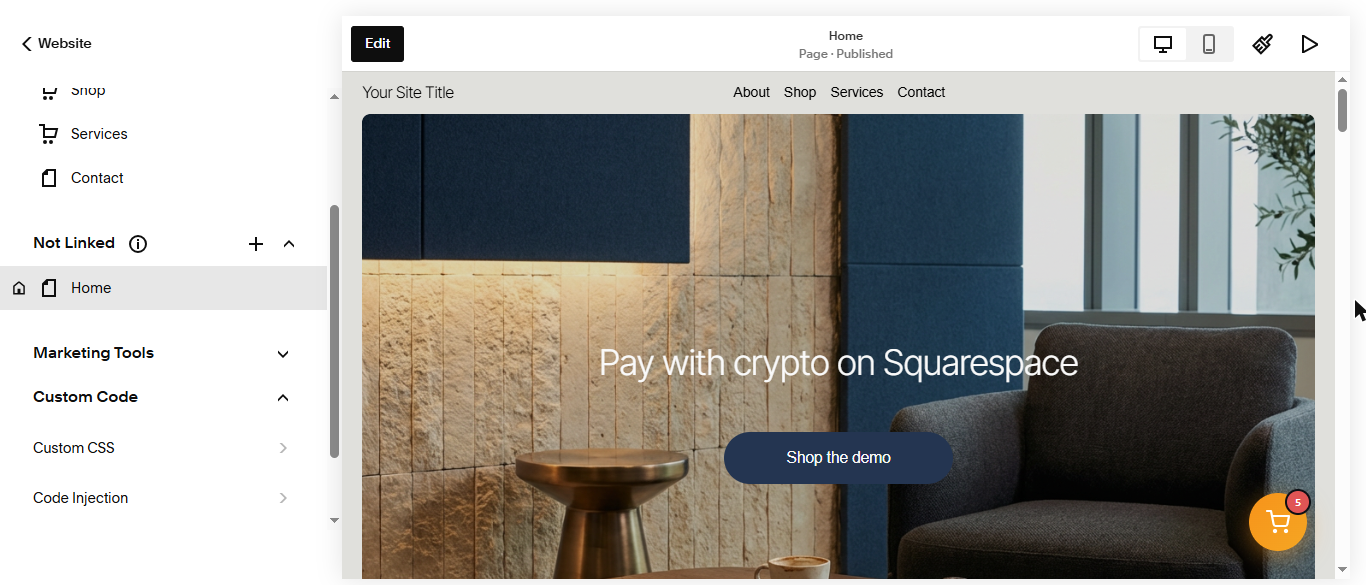 At the bottom of the Pages panel, expand Custom Code and choose Code Injection.
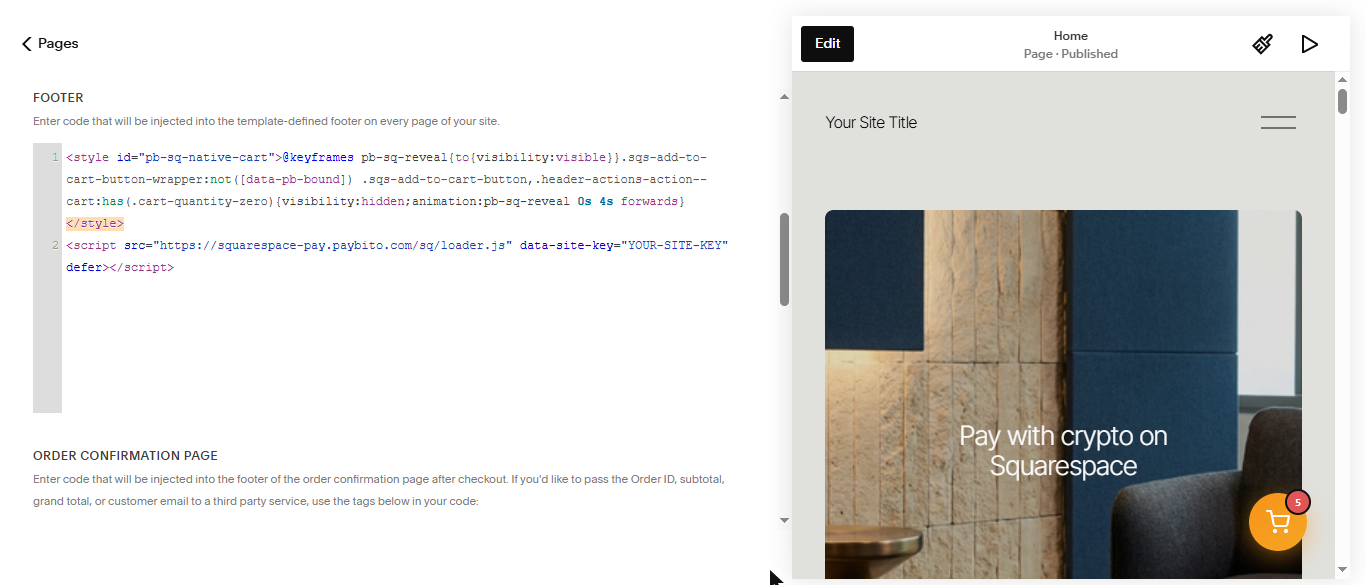 The snippet in the Footer box. The preview on the right already shows the floating PayBito cart.
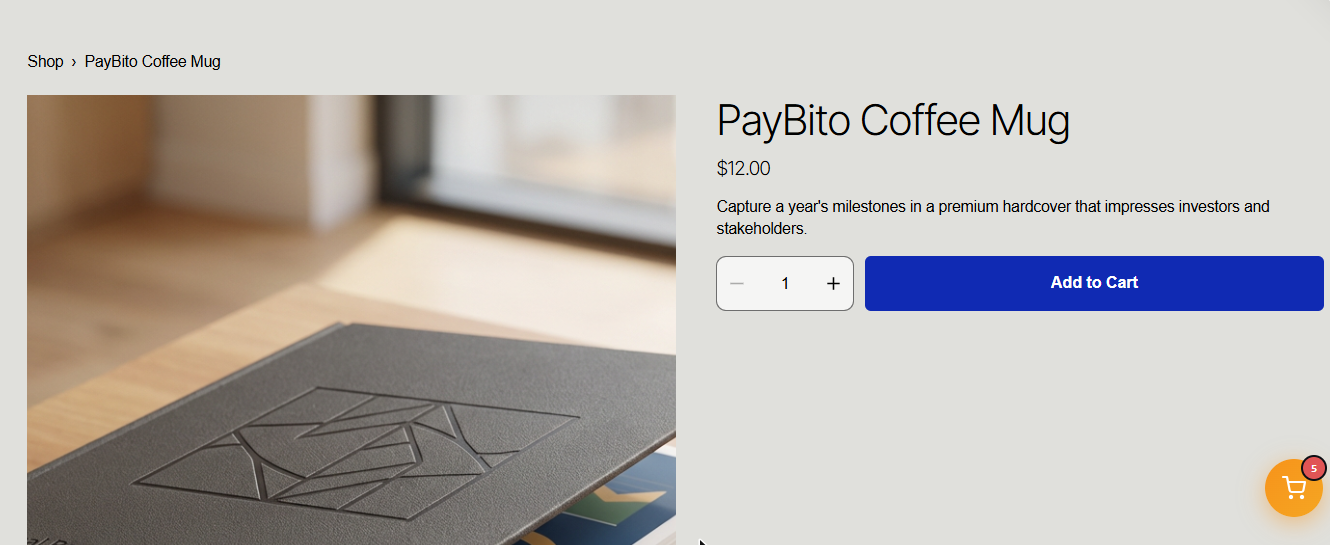
Open any product page on your store: the PayBito Add to Cart button sits next to the quantity selector, and a floating cart appears in the corner of every page - see Checkout below for what your customers then see.
Step 5: Register Payment Notifications
This is how payment results reach PayBito Pay, so an order is marked paid on its own. You add the webhook in the PayBito portal yourself - once for Test and once for Live.
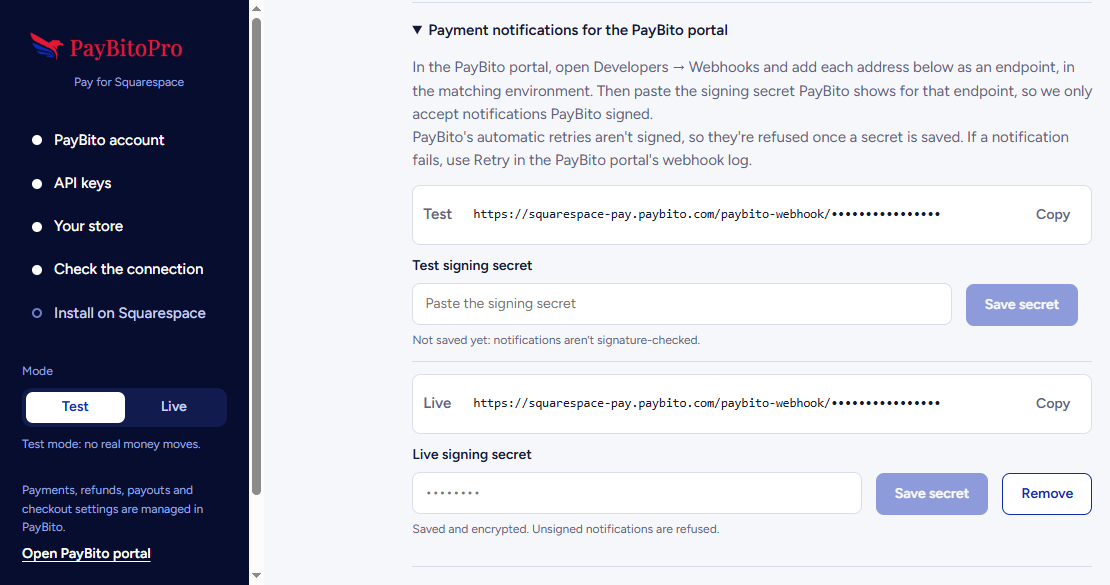 Under Install on Squarespace, open Payment notifications for the PayBito portal. Each mode has its own webhook URL and signing secret.
Registering the webhook
Copy your webhook URL
Open Payment notifications for the PayBito portal and click Copy next to the Test URL. It is unique to your store.
Add it in the PayBito portal
Go to Developers → Webhooks and add the URL as an endpoint, in the matching environment.
Paste the signing secret
PayBito shows a signing secret for the new endpoint. Paste it into Test signing secret in the dashboard and click Save secret. From then on, only notifications PayBito signed are accepted.
Repeat for Live
Do the same with the Live URL and the live signing secret before you take real payments.
PayBito's automatic retries aren't signed, so they're refused once a signing secret is saved. If a notification fails, use Retry in the PayBito portal's webhook log.
Treat the webhook URL and signing secret as secrets. Don't paste them into support tickets or share them outside the PayBito portal.
Checkout
Here is the complete path a customer takes, from your product page to a confirmed payment.
1. The customer opens a product
Product pages keep your Squarespace design. Customers choose their options and quantity, then use the PayBito Add to Cart button.
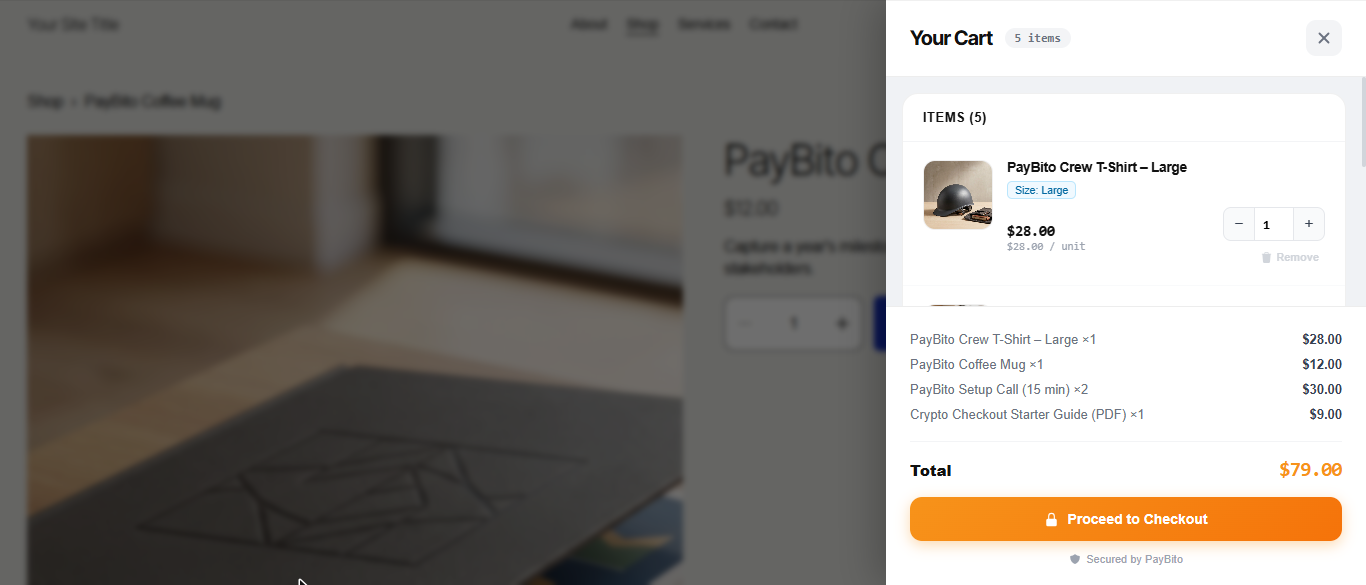
2. They review the cart
The cart panel lists every item with its selected options, quantities and the order total, and is marked Secured by PayBito. From here the customer clicks Proceed to Checkout.
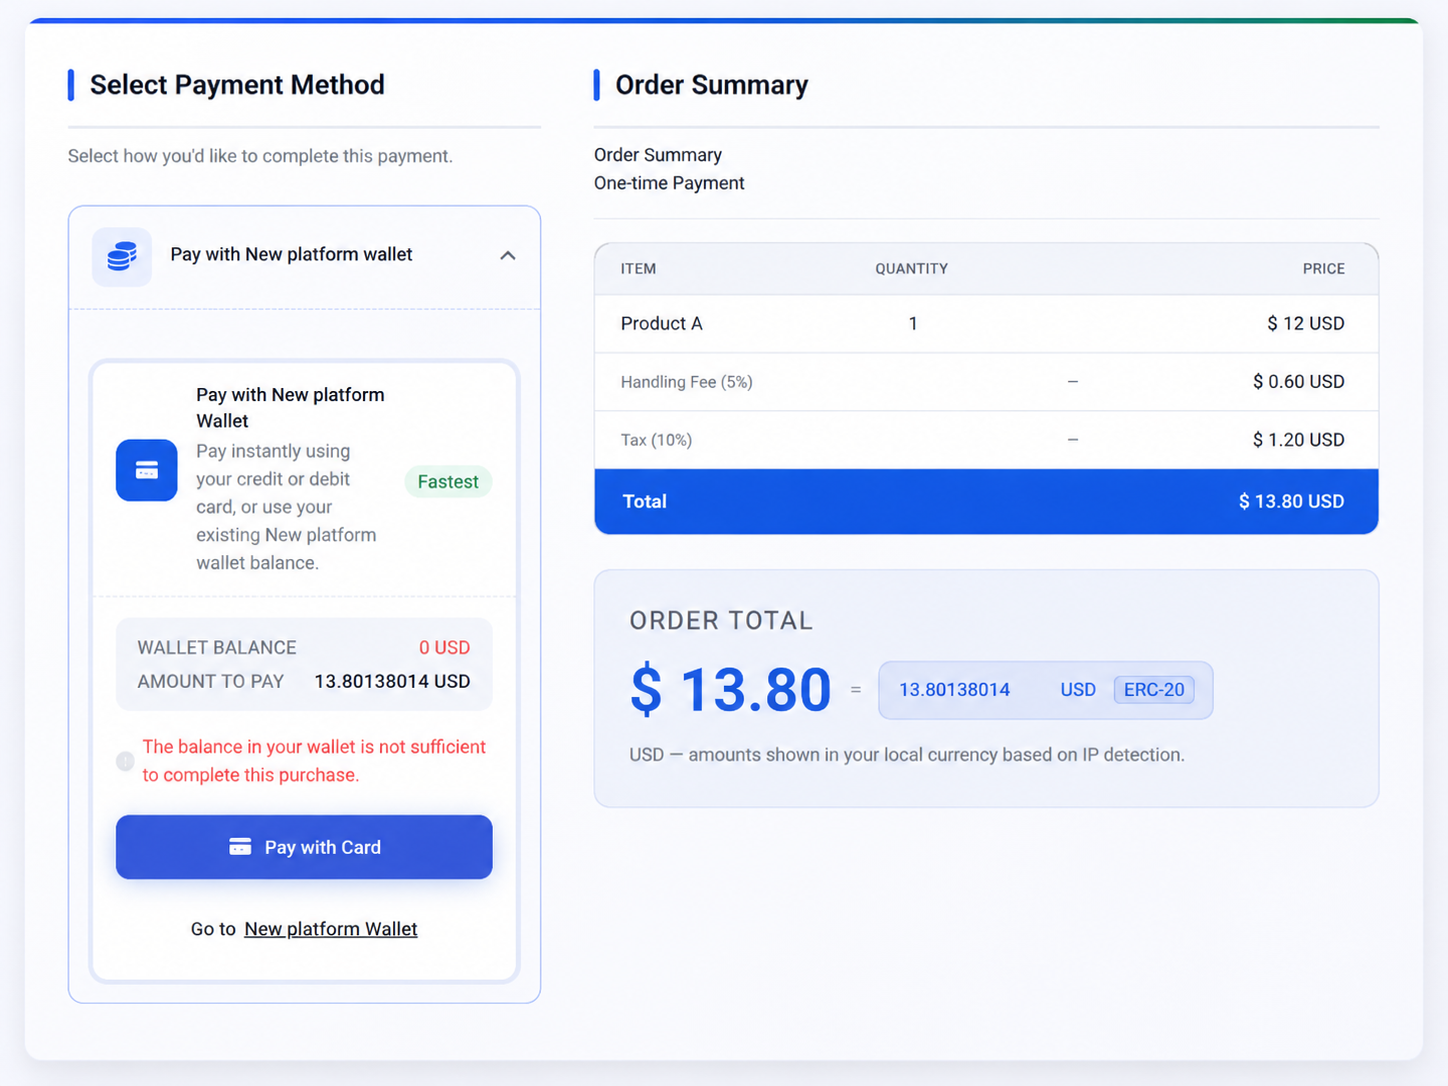
3. They choose how to pay
Before checkout opens, every price is checked again against your Squarespace store, so a cart can't be paid at a changed price. The customer then picks a payment method and reviews the full order summary before confirming the amount due.
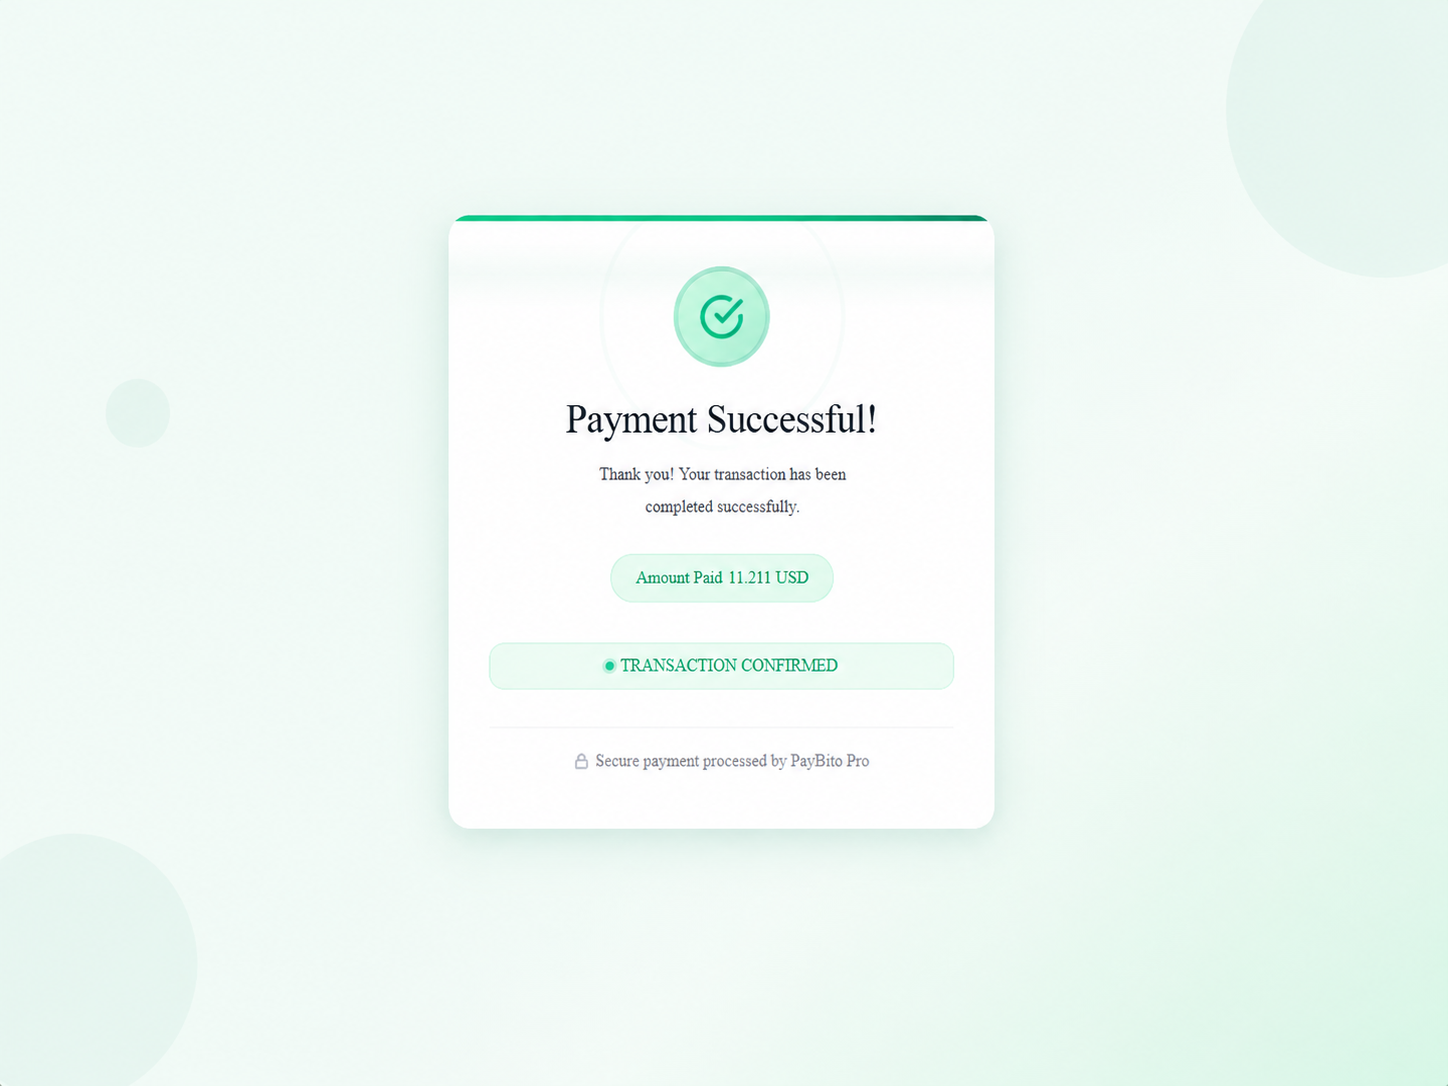
4. The payment is confirmed
Once the transaction completes, the customer sees a confirmation screen with the amount paid and a confirmed transaction status.
5. You track it from the PayBito dashboard
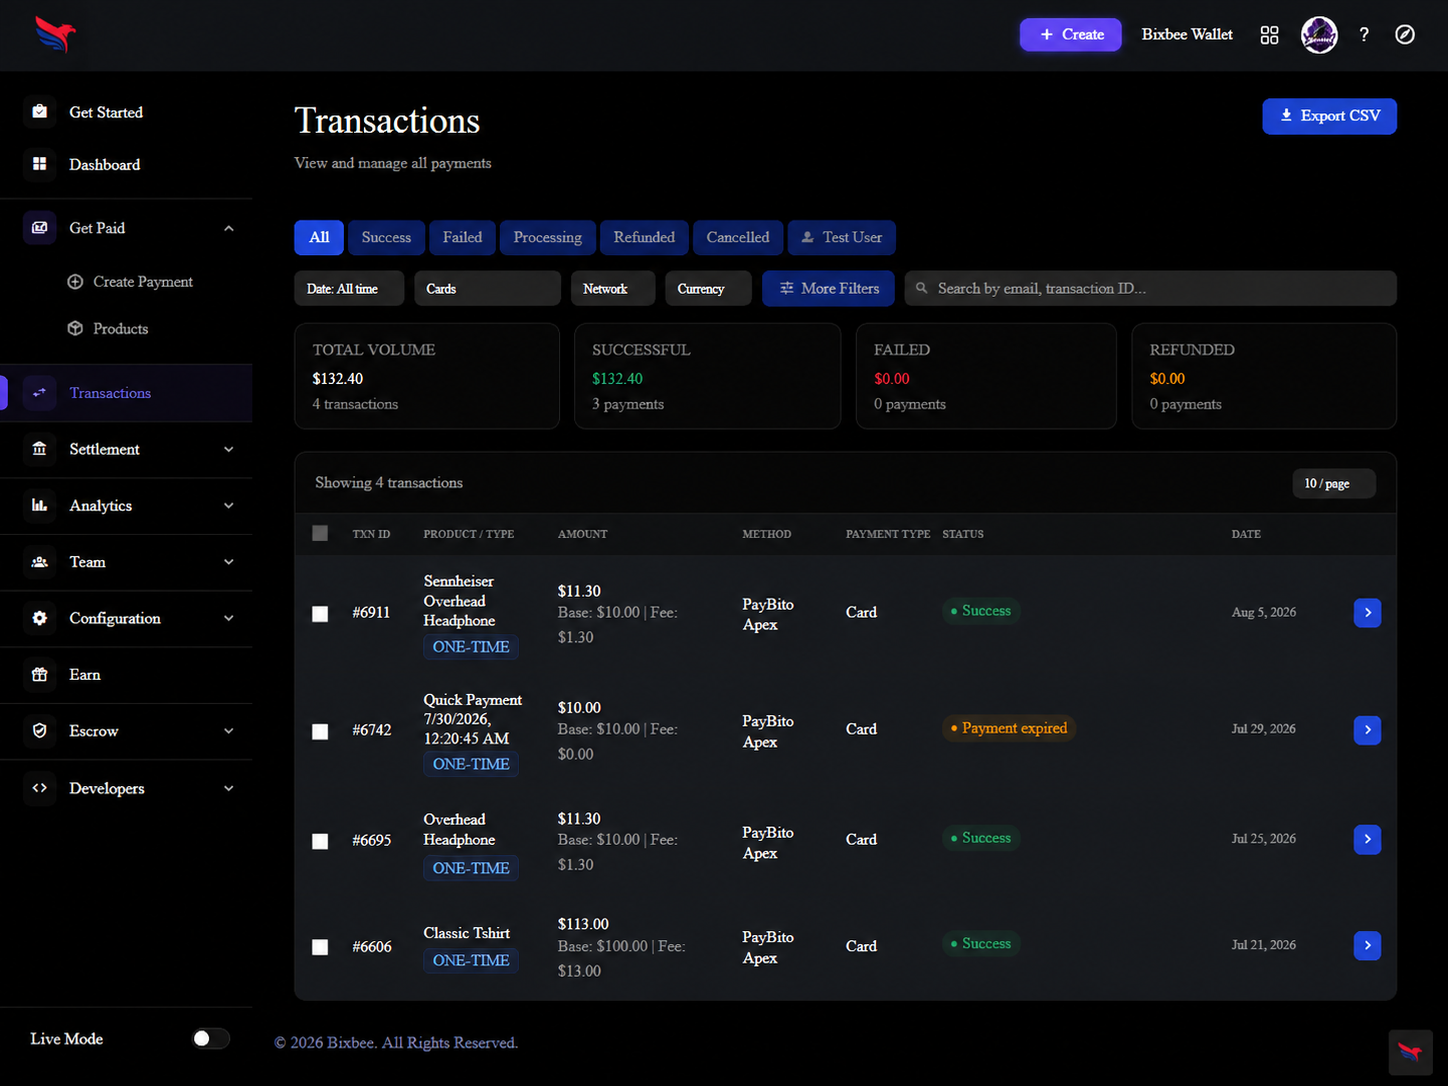
Every payment appears in the PayBito dashboard's Transactions view - totals, status, method and per-order detail, with CSV export.
Know how the PayBito cart behaves before you go live. Orders paid through PayBito are recorded in the PayBito portal, not in Squarespace's Orders panel. Squarespace inventory is not reduced, and Squarespace coupons, shipping rules and tax rules do not apply.
Stuck on any of this? Email support@paybito.com with your store address and your Merchant ID - but never your Secret Key, signing secret or webhook URL.