Overview
PayBito Pay for BigCommerce is a single-click app that bridges your BigCommerce store with PayBito's payment infrastructure, letting you accept Bitcoin, Ethereum, USDT and 100+ other digital assets alongside cards, Apple Pay and Google Pay — without writing code or editing your theme templates.
Installation runs over OAuth 2.0, the storefront script is registered for you through the BigCommerce Script Manager API, and confirmed payments are written back as real BigCommerce orders. Everything you configure lives in an embedded dashboard inside your BigCommerce control panel.
Key Features
Single-click OAuth 2.0 installation
Install the app in one click from the BigCommerce App Marketplace or Developer Portal. No manual key exchange, no theme file edits.
Automated script injection
The storefront script is registered across every customer-facing page using the BigCommerce Script Manager API, and cleanly removed again when you uninstall.
PayBito Cart SDK integration
Mounts the PayBito floating cart and slide-out checkout drawer directly on your storefront for a high-conversion checkout experience.
Server-side price floor validation
Before any payment session is created, the backend re-checks every item's unit price against the BigCommerce Catalog API v3 — eliminating client-side cart tampering and price manipulation.
Instant pay button, Page Builder ready
A native web component (<paybito-pay-button>) that can sit on Product Detail Pages or anywhere you can drop an HTML block in Page Builder.
Tokenized webhooks & automated order sync
Secured by per-merchant unguessable cryptographic tokens. When a payment confirms on-chain, PayBito fires the webhook and the app creates an official BigCommerce order through the Orders API v2, marked paid.
Embedded merchant dashboard
A responsive React interface embedded in your BigCommerce admin, where you manage credentials, test API connectivity in real time and monitor live transactions.
Architecture & Transaction Lifecycle
The app is a distributed, multi-tier system spanning the BigCommerce platform, the app backend, your control panel, the shopper's browser and the PayBito gateway.
| System Layer | Component | Technology | Role |
|---|---|---|---|
| Merchant Admin | Control Panel UI | React 18 + Vite | Embedded dashboard for API keys, Broker ID, connectivity testing and transaction history. |
| Backend Service | Express App Server | Node.js / Express | Handles OAuth exchanges, JWT sessions, catalog validation, PayBito V2 API calls and webhooks. |
| Persistence Layer | Database Pool | MySQL 8.0 / SQLite | Dual-engine storage for merchant configuration, encrypted secrets and payment sessions. |
| Storefront Layer | Storefront Loader | Vanilla JS / Web Components | Auto-injected by Script Manager. Loads PayBitoCart.js, intercepts checkout, mounts the PDP button. |
| Payment Gateway | PayBito V2 API & Hosted Checkout | REST / Webhook | Validates public keys, creates carts, generates the PCN (Payment Confirmation Number), processes the payment. |
| E-Commerce Core | BigCommerce API v2 / v3 | REST API | Validates the catalog price floor, provisions storefront scripts, creates paid orders on settlement. |
Merchant installation & authentication
Trigger
You click Install on PayBito Pay in the BigCommerce App Marketplace.
OAuth callback
BigCommerce redirects to /auth carrying code, context (stores/{store_hash}) and scope.
Token exchange
The backend swaps that authorization code for a permanent access token with login.bigcommerce.com/oauth2/token.
Secret encryption
The access token is encrypted with AES-256-CBC and stored in the merchants table.
Script provisioning
The app calls the BigCommerce Script Manager API to register paybito-storefront.js on your store.
Session launch
A 24-hour signed JWT session is issued and you land in the embedded React control panel.
Shopper checkout & payment
Page load
paybito-storefront.js loads and initialises the public configuration.
Checkout action
The shopper clicks PayBito Pay on a product page, or Checkout in the PayBito cart drawer.
Backend interception
The storefront intercepts checkout and posts the cartToken to POST /payment/create-from-cart.
Price verification
The backend fetches the authoritative cart from the PayBito V2 API, then calls the BigCommerce Catalog API v3 to confirm that unitPrice >= catalogMinPrice.
Session creation
PayBito product registration and payment creation are called, a unique PCN is returned, and a PENDING session is recorded.
Hosted checkout
The shopper is redirected to the PayBito hosted checkout — trade.paybito.com/payments/merchant/checkout/:pcn — to complete payment.
Webhook notification & order fulfilment
Blockchain confirmation
The shopper's transaction confirms on its network (Bitcoin, Ethereum, USDT and so on).
Webhook event
PayBito sends an asynchronous HTTP POST to /paybito-webhook/:token.
Security validation
The app validates the token, decrypts the stored BigCommerce credentials and checks the transaction state.
Order creation
The BigCommerce Orders API v2 is called to create a real store order with status_id = 11 (Awaiting Fulfillment / Paid).
Session settlement
The internal payment_sessions record moves to PAID with the created BigCommerce order_id.
Installation & Merchant Setup
Setup happens in two places: the embedded PayBito Pay screen in your BigCommerce control panel, and the PayBito merchant portal where your API keys and whitelisted domains live. Both are required — the cart will not work with only one of them done.
Step 1: Install the App on Your Store
Install PayBito Pay
In your BigCommerce control panel go to Apps → My Apps (or the App Marketplace) and click Install on PayBito Pay.
Authorize the permissions
BigCommerce shows the OAuth permissions screen. Click Confirm to grant the scopes the app needs — Script Manager, Checkout Content, Orders, Products and Store Information.
Open the control panel
You are redirected straight into the embedded PayBito Pay Settings screen. You can return to it any time from Apps → PayBito Pay.
There is nothing to unzip and no theme file to edit. Installing the app registers the storefront script through the BigCommerce Script Manager API, and uninstalling removes it again.
Step 2: Enter Your PayBito Credentials
Fill in the PayBito API Credentials card at the top of the settings screen. Every value comes from your PayBito merchant account under Developers → API Keys.
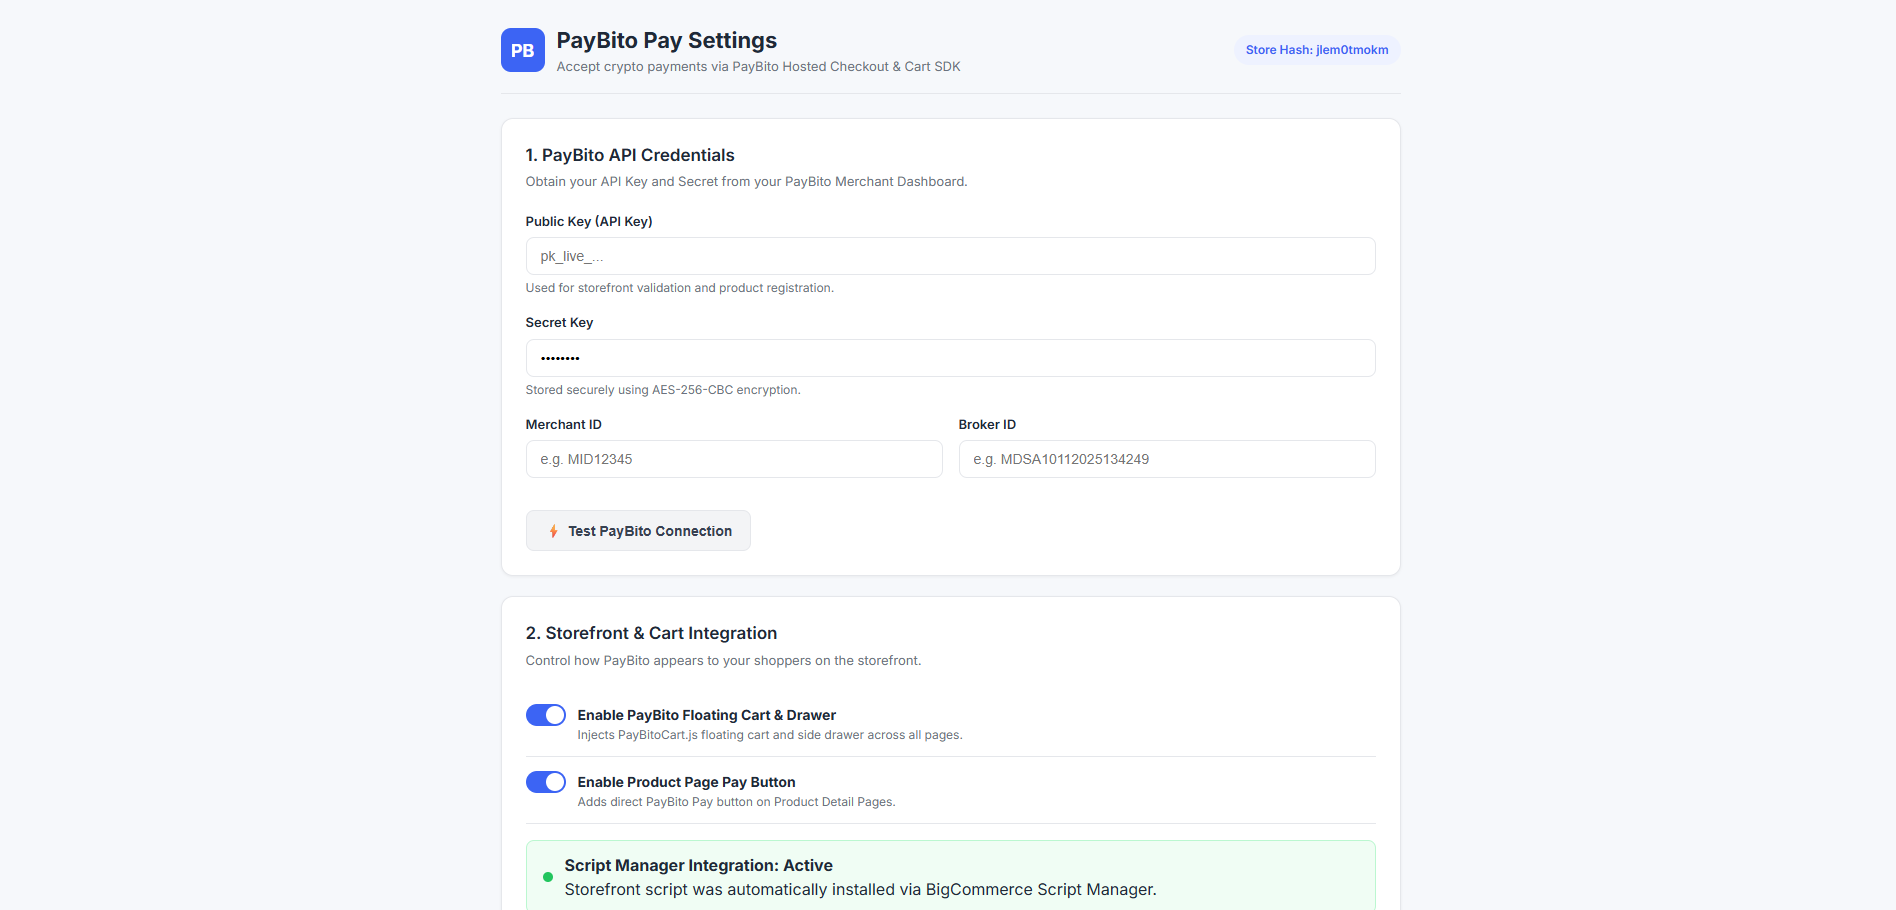 The embedded PayBito Pay Settings screen, reached from Apps → PayBito Pay. Your store hash is shown top right.
Where to find these values in the PayBito merchant console
Sign in at portal.paybito.com, expand Developers in the left sidebar and choose API Keys. Note the Domain Whitelisting entry in the same menu — you come back to it in the next section.
https://portal.paybito.com/payments/api-key
Enter a name that identifies this store — something like bigcommerce — and click Create. Your Merchant ID and Broker ID are displayed at the top right of the same card, each with a copy button.
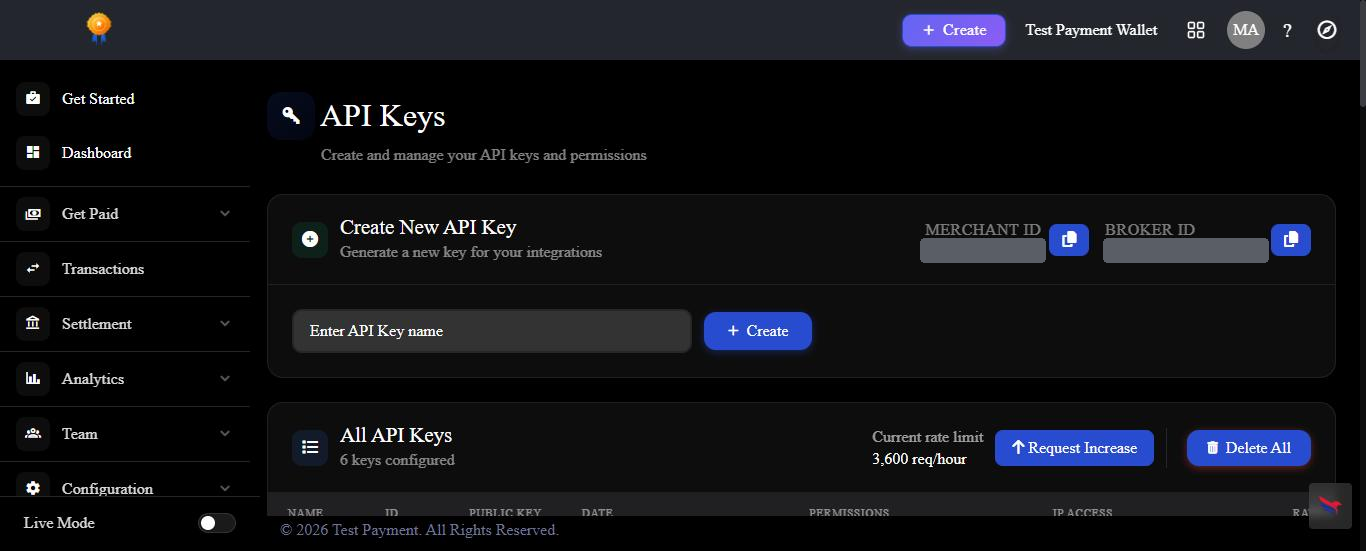 The API Keys screen. Create New API Key on the left; Merchant ID and Broker ID with copy buttons on the right.
| Field | What to Enter |
|---|---|
| Public Key (API Key) Required | Your public key, beginning pk_. Used for storefront validation and product registration. |
| Secret Key Required | Your secret key, beginning sk_. Stored encrypted with AES-256-CBC and never sent to a shopper's browser. |
| Merchant ID Required | The Merchant ID shown on your PayBito account, for example MID12345. |
| Broker ID Cart | Needed for the PayBito shopping cart, for example MDSA10112025134249. |
Click Test PayBito Connection. The server validates your credentials against the PayBito validate API and confirms connectivity before you save.
Live vs test keys. Test keys work only against the PayBito sandbox. Turn TEST MODE off in the portal and create a live key before you accept real payments.
Step 3: Choose Your Storefront Options
The Storefront & Cart Integration card controls how PayBito appears to your shoppers. Both toggles are independent — turn on either, both, or neither.
Storefront toggles
Enable PayBito Floating Cart & Drawer
Injects the PayBitoCart.js floating cart and side drawer across all storefront pages.
Enable Product Page Pay Button
Adds the direct PayBito Pay button to your Product Detail Pages, beneath the standard Add to Cart button.
Save PayBito Settings
Saving encrypts and stores your keys, registers the storefront script through Script Manager, and sets up your tokenized webhook endpoint.
No webhook to configure by hand. Saving your settings registers a per-merchant tokenized webhook endpoint automatically, so payment results flow back on their own. There is no endpoint URL to copy and no shared secret to paste anywhere. Once it is done, the settings screen reports Script Manager Integration: Active.
Domain Whitelisting
The PayBito V2 API enforces origin whitelisting: it only accepts cart requests from addresses you have explicitly approved. This step happens in the PayBito portal, not in BigCommerce.
Domains to whitelist
Your storefront domain
The address shoppers actually browse — mystore.mybigcommerce.com, or your custom domain such as store.example.com.
The app domain
The host the PayBito Pay app itself runs on, for example paybito-bc.yourdomain.com.
Verify it worked
Back in the BigCommerce settings screen, click Test PayBito Connection. A green result means PayBito is accepting requests.
Finding the Domain Whitelisting screen
Sign in at portal.paybito.com, expand Developers in the left sidebar, and click Domain Whitelisting — the third item in that menu, below API Keys and API. Paste each address into ADD DOMAIN and click Add Domain.
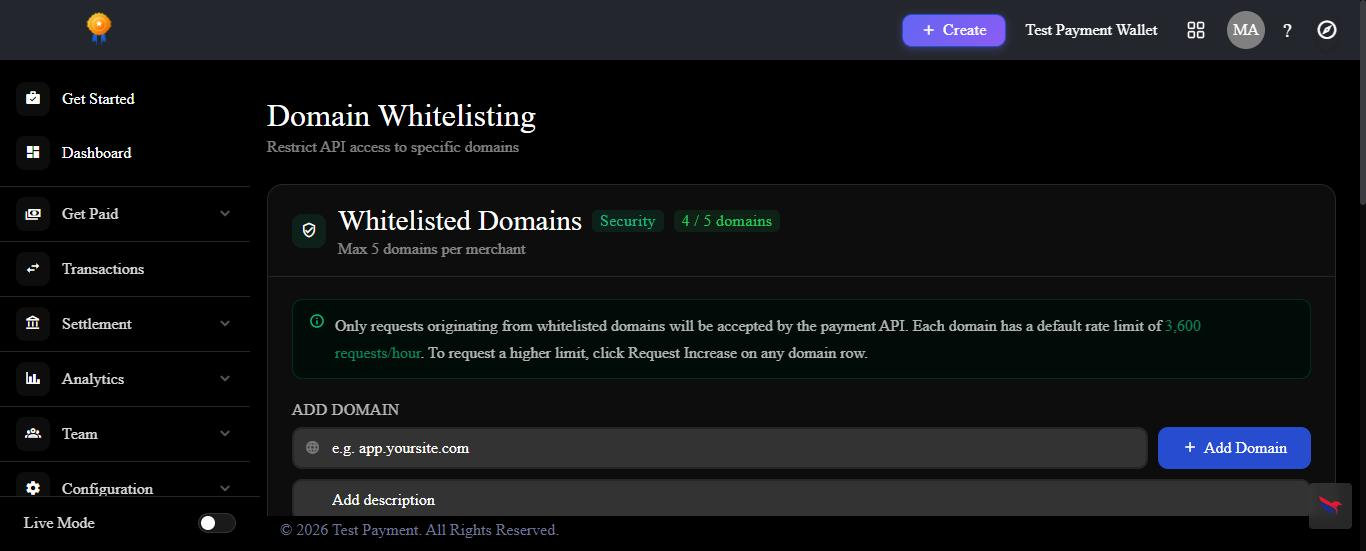 The Domain Whitelisting screen. Enter a bare domain — strip the https:// prefix — optionally add a description, then click Add Domain. Each merchant may whitelist up to five domains.
Once added, each domain appears in the Whitelisted Domains list marked APPROVED, with its own request-rate allowance:
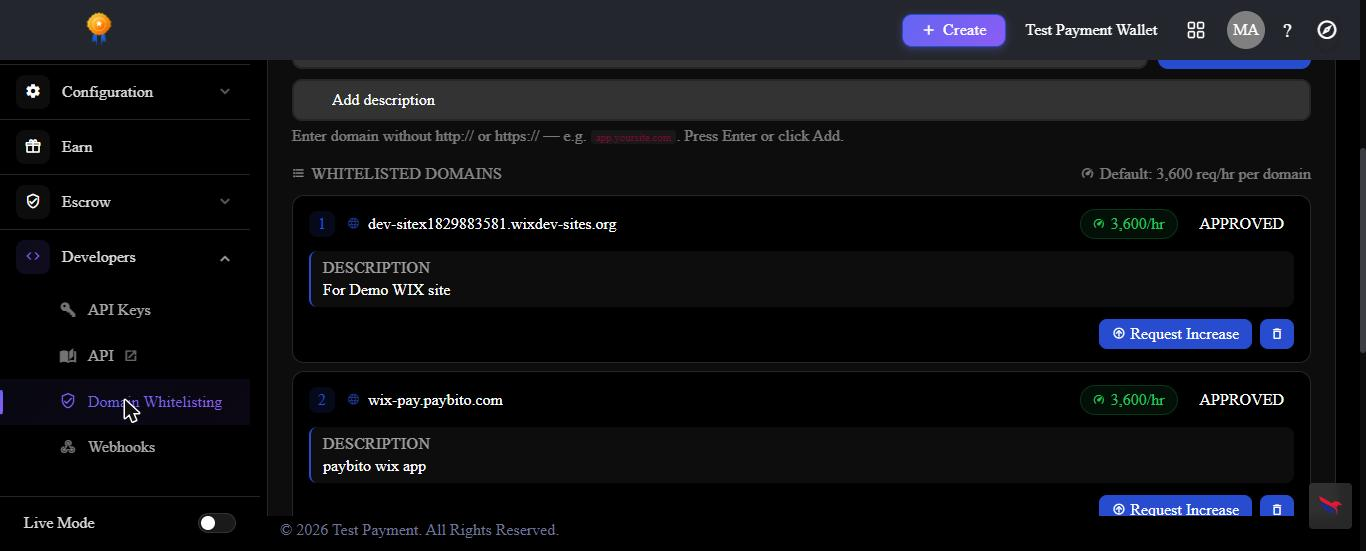 An approved store in the Whitelisted Domains list. Note the sidebar path — Developers → Domain Whitelisting — and that the stored value carries no https:// prefix.
Skip this and nothing looks broken — until someone tries to buy. Your storefront renders perfectly normally, because PayBito only rejects the cart request itself. The failure shows up the moment a customer clicks the pay button, as a 403 or 401 from the validate call. Always finish with Test PayBito Connection.
Storefront & Cart Integration
Automatic script injection
When you install the app and save your settings, it uses the BigCommerce Script Manager API to inject paybito-storefront.js into the <head> of every storefront page with load_method: "defer". No manual theme edits are required.
Product Detail Page button
With Enable Product Page Pay Button turned on, the storefront script finds your theme's add-to-cart form and injects a high-visibility PayBito Pay button directly below the standard Add to Cart button.
 A BigCommerce product page with the injected PayBito Pay button below Add to Cart. Your existing theme, quantity selector and Add to Wish List are untouched.
Custom web component
You and your theme developers can place PayBito buttons anywhere across the store — landing pages, promo banners, Page Builder HTML widgets — using the built-in web component:
<!-- Drop this into any BigCommerce Page Builder block or HTML widget -->
<paybito-pay-button
  amount="49.99"
  currency="USD"
  order-ref="promo-bundle-2026"
  product-id="125">
</paybito-pay-button>
| Attribute | Required | Description | Example |
|---|---|---|---|
| amount | Yes | The transaction amount in the specified fiat currency. | amount="49.99" |
| currency | No | Three-letter currency code. Defaults to USD. | currency="USD" |
| order-ref | No | Custom order reference. Auto-generated if omitted. | order-ref="promo-bundle-01" |
| product-id | No | BigCommerce product ID, used for catalog price verification. | product-id="125" |
| store-hash | No | BigCommerce store hash. Auto-detected from the environment. | store-hash="abc123xyz" |
Customer Checkout Flow
Here is the complete path a customer takes, from your product page to a confirmed payment.
1. The customer opens a product
Your catalog and product pages look exactly as they did before. The only visible additions are the PayBito Pay button and the floating cart.
2. They reach the PayBito hosted checkout
Clicking PayBito Pay — or Checkout in the PayBito cart drawer — hands the shopper to PayBito's secure hosted checkout, where they enter their email and review the order total before choosing how to pay.
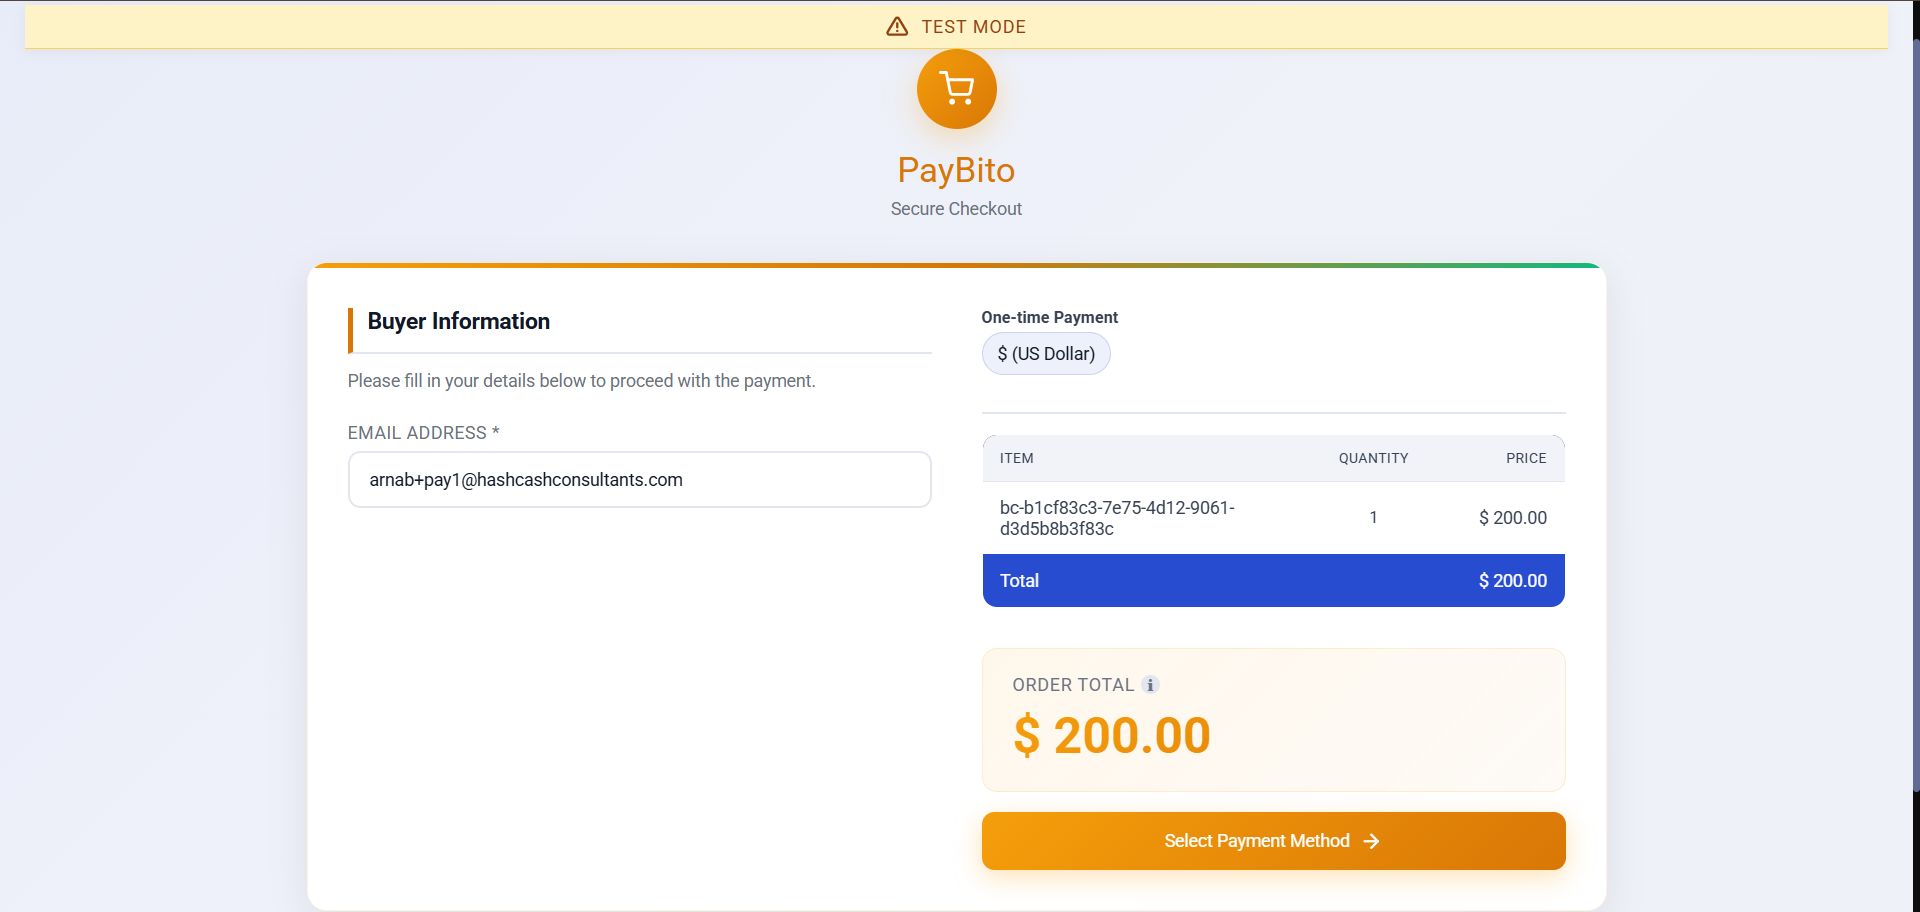 PayBito Secure Checkout. The TEST MODE banner appears only while you are using sandbox keys — it disappears once you switch to live keys.
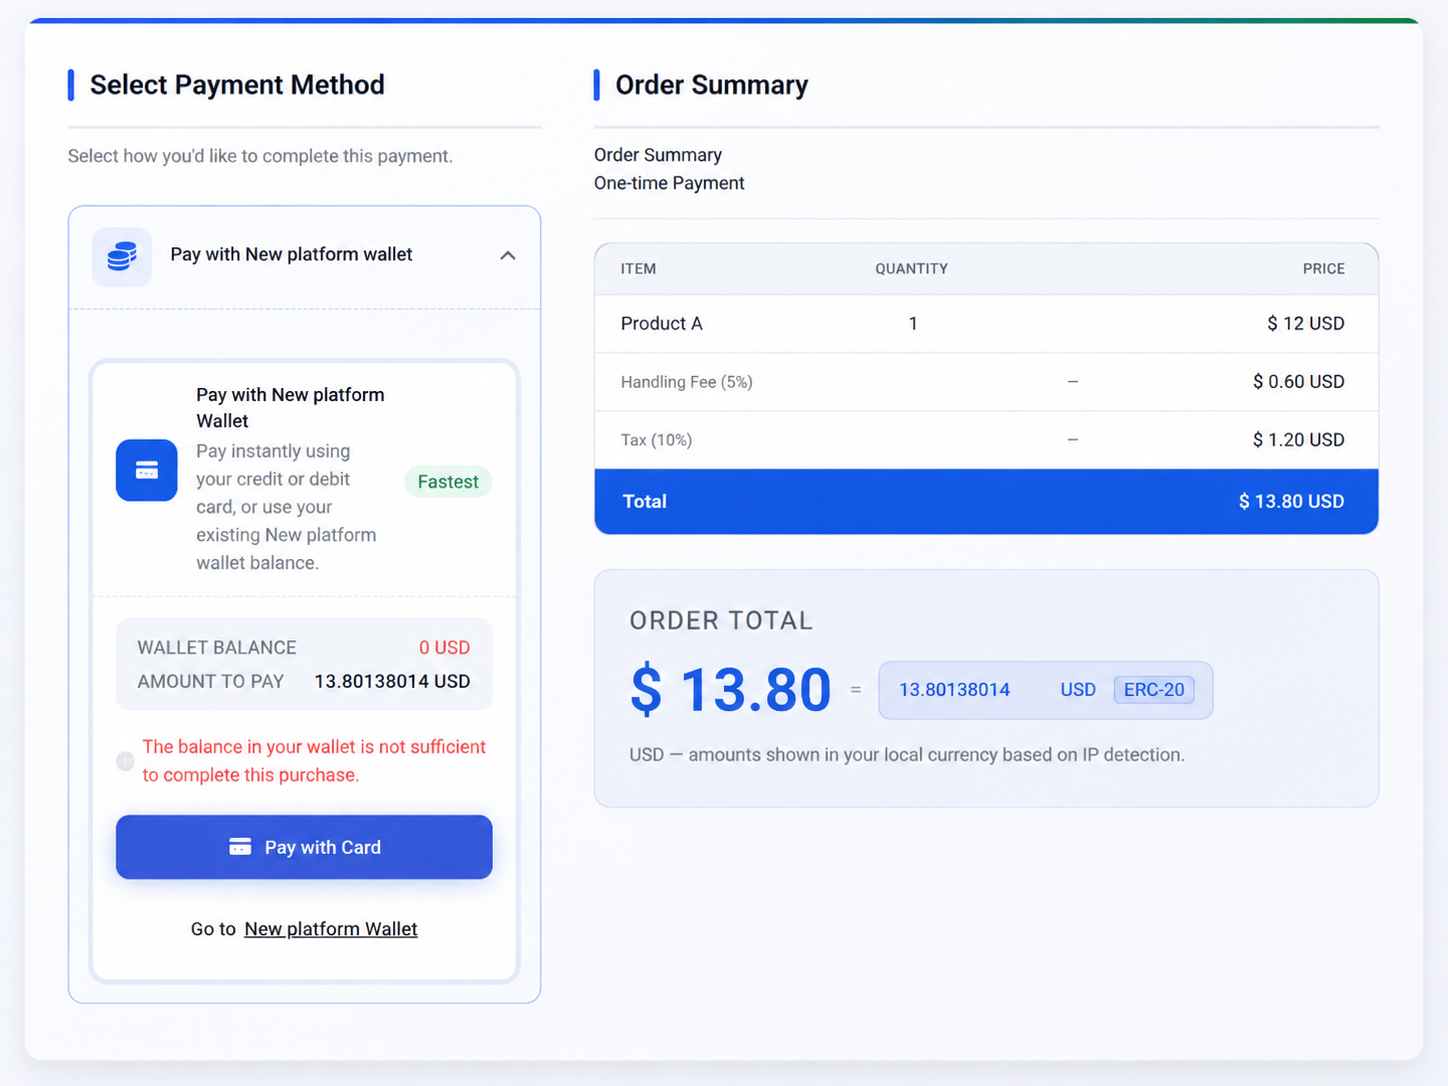
3. They choose how to pay
The customer picks a payment method and reviews the full order summary — including any handling fee and tax — before confirming the amount due.
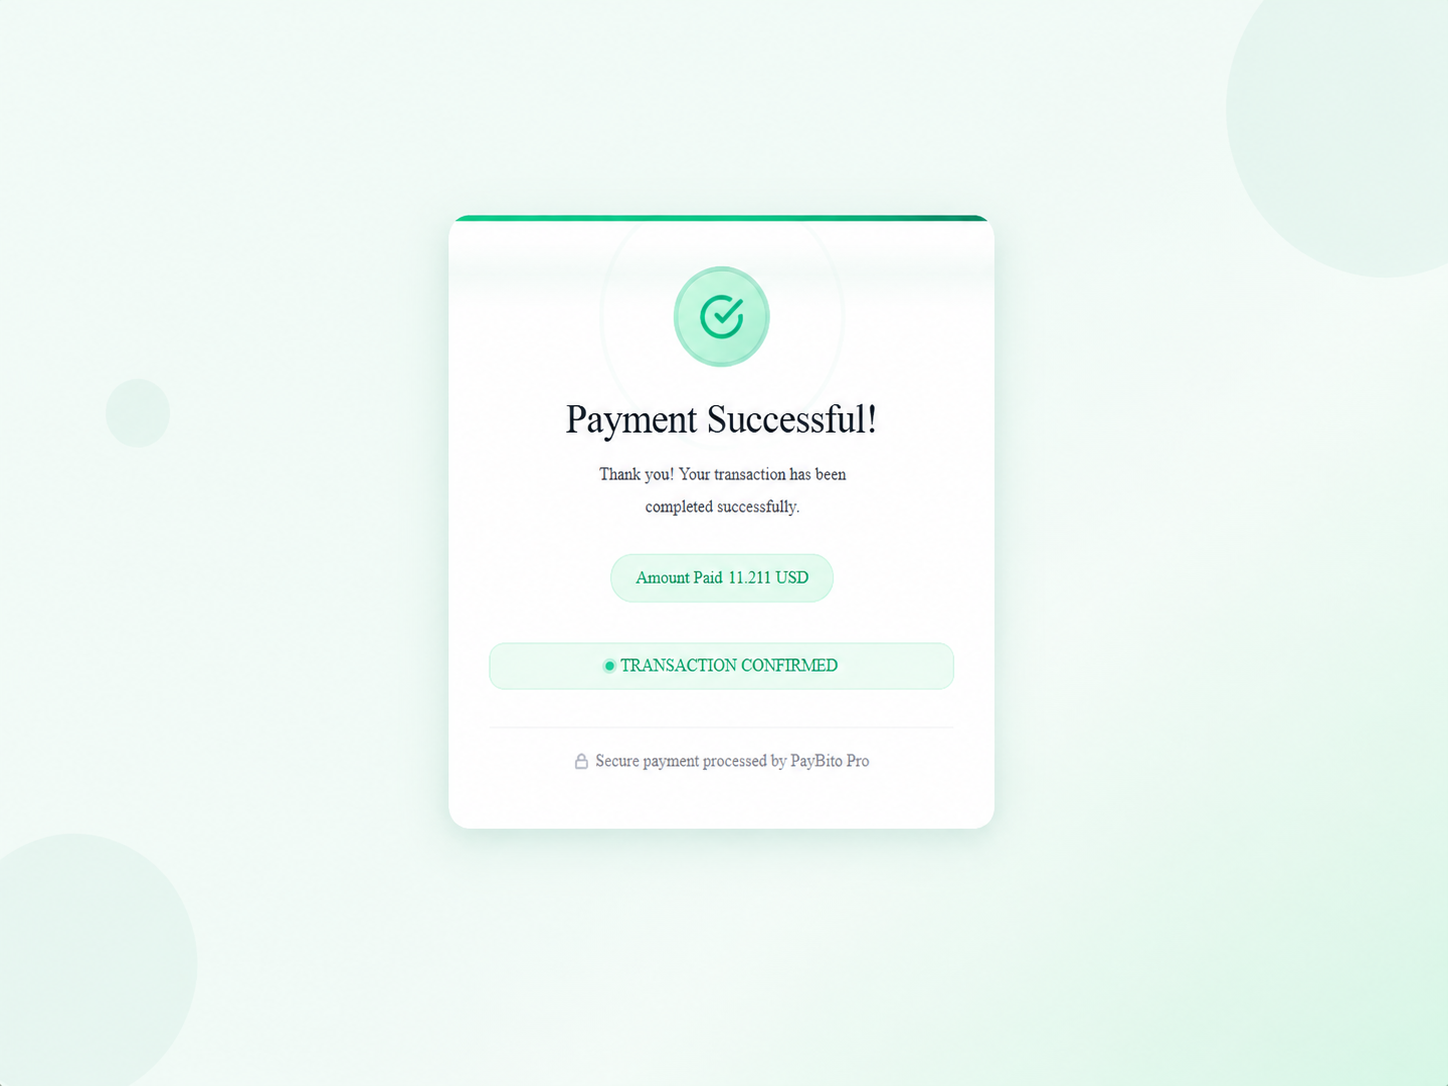
4. The payment is confirmed
Once the transaction completes, the customer sees a confirmation screen with the amount paid and a confirmed transaction status.
5. The order lands in BigCommerce — and in PayBito
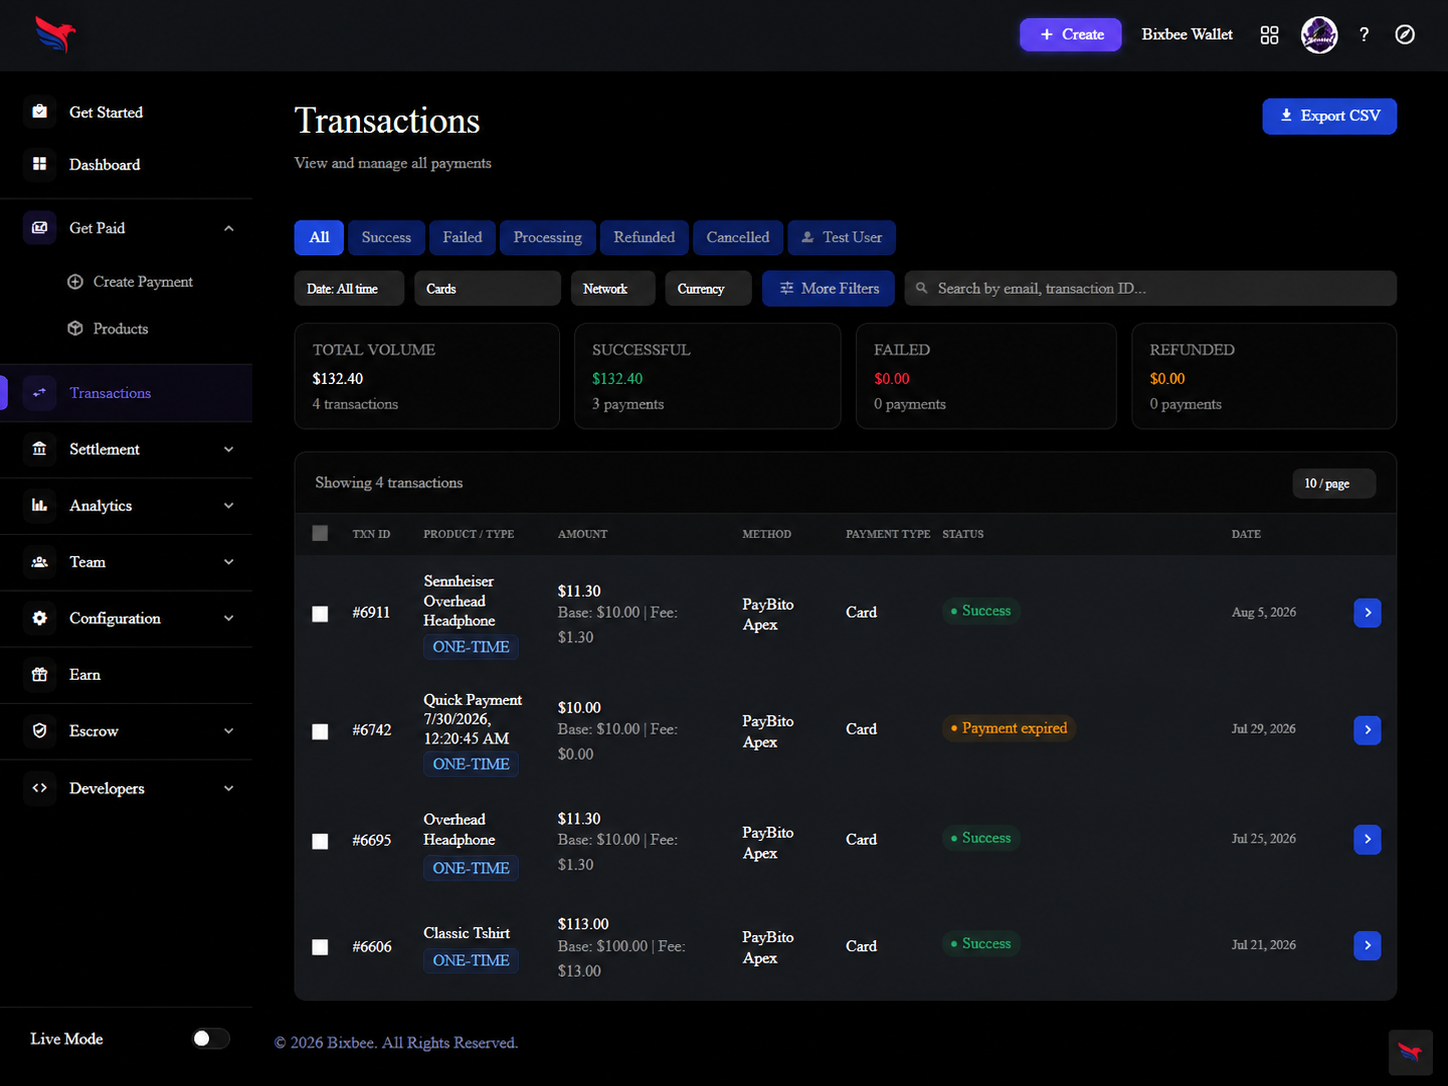
When the payment confirms on-chain, PayBito calls the app's webhook and the app creates a real BigCommerce order through the Orders API v2, set to Awaiting Fulfillment. You fulfil it from your BigCommerce dashboard exactly like any other order.
Every payment also appears in the PayBito dashboard's Transactions view — totals, status, method and per-order detail, with CSV export.
Server Deployment Guide
For developers self-hosting the app. If you are a merchant installing PayBito Pay from the App Marketplace, you can skip this section and the next one — the app server is already running for you. These pages document deploying your own instance on Ubuntu 22.04 LTS, Debian 12, AWS EC2, a DigitalOcean droplet or GCP Compute Engine.
Prerequisites
| Requirement | Minimum | Recommended | Notes |
|---|---|---|---|
| Operating system | Ubuntu 20.04 LTS | Ubuntu 22.04 / 24.04 LTS | A Linux environment is recommended for production. |
| Node.js runtime | Node.js v18.x LTS | Node.js v20.x or v22.x LTS | Includes npm v9+. |
| Database | MySQL 8.0 / MariaDB 10.6 | MySQL 8.0+ or AWS RDS MySQL | An embedded SQLite fallback is also built in. |
| Memory | 1 GB RAM | 2 GB – 4 GB RAM | Enough for the Node build and runtime. |
| Domain & SSL | Public domain name | FQDN with Let's Encrypt SSL | BigCommerce requires valid HTTPS/TLS endpoints. |
| Process manager | systemd | PM2 | Automatic restarts, clustering and log management. |
| Reverse proxy | Nginx 1.18+ | Nginx 1.24+ with HTTP/2 | Handles SSL termination and proxy buffering. |
Step 1: Initial server setup
Connect over SSH and update the base system repositories:
# 1. Update system packages
sudo apt update && sudo apt upgrade -y

# 2. Install build tools, Git, curl and Nginx
sudo apt install -y curl git ufw nginx certbot python3-certbot-nginx build-essential

# 3. Install Node.js 20.x LTS from the NodeSource repository
curl -fsSL https://deb.nodesource.com/setup_20.x | sudo -E bash -
sudo apt install -y nodejs

# 4. Verify the versions
node -v    # expected: v20.x.x
npm -v     # expected: 10.x.x

# 5. Install PM2 globally
sudo npm install -g pm2
Step 2: MySQL setup and hardening
# 1. Install MySQL Server
sudo apt install -y mysql-server

# 2. Secure the installation (set the root password, drop the test DB)
sudo mysql_secure_installation

# 3. Open the MySQL shell
sudo mysql -u root -p

-- 4. Create the database and a dedicated production user
CREATE DATABASE paybito_bigcommerce_app CHARACTER SET utf8mb4 COLLATE utf8mb4_unicode_ci;
CREATE USER 'paybito_bc_user'@'localhost' IDENTIFIED WITH mysql_native_password BY '<STRONG_DB_PASSWORD>';
GRANT ALL PRIVILEGES ON paybito_bigcommerce_app.* TO 'paybito_bc_user'@'localhost';
FLUSH PRIVILEGES;
EXIT;
Step 3: Clone the codebase and install dependencies
# 1. Create the application directory
sudo mkdir -p /var/www/paybito-bigcommerce
sudo chown -R $USER:$USER /var/www/paybito-bigcommerce

# 2. Clone the repository
cd /var/www/paybito-bigcommerce
git clone <YOUR_GIT_REPOSITORY_URL> .

# 3. Install production and build dependencies
npm install
Step 4: Production environment variables
Create /var/www/paybito-bigcommerce/.env and populate every required variable. Replace each placeholder with your own value.
# ================================================================
# PayBito BigCommerce production environment configuration
# ================================================================
PORT=3020
NODE_ENV=production
APP_URL=https://paybito-bc.yourdomain.com

# Database connection (MySQL 8.0)
DATABASE_URL=mysql://paybito_bc_user:<STRONG_DB_PASSWORD>@127.0.0.1:3306/paybito_bigcommerce_app

# Security and encryption (must be exactly 32 hexadecimal characters for AES-256-CBC)
ENCRYPTION_KEY=<32_HEX_CHARACTER_KEY>
JWT_SECRET=<YOUR_JWT_SECRET>

# BigCommerce developer app credentials (from the DevTools app portal)
BC_CLIENT_ID=<YOUR_BC_CLIENT_ID>
BC_CLIENT_SECRET=<YOUR_BC_CLIENT_SECRET>
BC_AUTH_CALLBACK=https://paybito-bc.yourdomain.com/auth

# PayBito global API endpoints
PAYBITO_BASE_URL=https://service.hashcashconsultants.com
PAYBITO_CHECKOUT_BASE=https://trade.paybito.com
Guard the ENCRYPTION_KEY. It encrypts merchant API secrets and BigCommerce access tokens in the database using AES-256-CBC, and it must be exactly 32 characters. Keep it confidential and back it up securely — if it is lost, previously encrypted merchant secrets cannot be decrypted.
Step 5: Run migrations and build the bundles
# 1. Create the merchants and payment_sessions tables
npm run db:migrate

# 2. Build the control panel (React SPA) and storefront JS bundles
npm run build

# 3. Verify the build artifacts exist
ls -la client/dist
ls -la storefront/dist
ls -la public/storefront
Step 6: Run the service under PM2
# 1. Start the application
pm2 start server/index.js --name "paybito-bigcommerce" --env production

# 2. Restart automatically on reboot
pm2 startup systemd    # then run the command PM2 prints
pm2 save

# 3. Check status and live logs
pm2 status
pm2 logs paybito-bigcommerce --lines 50
Step 7: Nginx reverse proxy with SSL
Route incoming HTTPS traffic to the Node service on port 3020:
# 1. Create the Nginx site configuration
sudo nano /etc/nginx/sites-available/paybito-bigcommerce

# Paste the following server block:
server {
    listen 80;
    server_name paybito-bc.yourdomain.com;

    # Security headers
    add_header X-Frame-Options "ALLOW-FROM https://*.mybigcommerce.com" always;
    add_header Content-Security-Policy "frame-ancestors https://*.mybigcommerce.com https://*.bigcommerce.com;" always;

    location / {
        proxy_pass http://127.0.0.1:3020;
        proxy_http_version 1.1;
        proxy_set_header Upgrade $http_upgrade;
        proxy_set_header Connection "upgrade";
        proxy_set_header Host $host;
        proxy_set_header X-Real-IP $remote_addr;
        proxy_set_header X-Forwarded-For $proxy_add_x_forwarded_for;
        proxy_set_header X-Forwarded-Proto $scheme;
        proxy_cache_bypass $http_upgrade;
    }
}

# 2. Enable the site and test the configuration
sudo ln -s /etc/nginx/sites-available/paybito-bigcommerce /etc/nginx/sites-enabled/
sudo nginx -t
sudo systemctl reload nginx

# 3. Obtain and install a Let's Encrypt certificate
sudo certbot --nginx -d paybito-bc.yourdomain.com

# 4. Open the firewall
sudo ufw allow "Nginx Full"
sudo ufw enable
Why those frame headers matter. BigCommerce embeds single-click apps in an iframe inside the merchant control panel on mybigcommerce.com. The headers above permit framing from BigCommerce origins while still blocking clickjacking from untrusted domains.
BigCommerce Developer Portal Configuration
To publish the app or install it into stores, register it in the BigCommerce Developer Portal (DevTools).
Sign in to the portal
Log in at devtools.bigcommerce.com.
Create the app
Go to My Apps and click Create an App.
Fill in the basics
Give it a name — for example PayBito Pay — and a short summary.
Callback URLs
| Callback | URL format | Purpose |
|---|---|---|
| Auth | https://paybito-bc.yourdomain.com/auth | Fired when a merchant clicks Install; exchanges the OAuth code for an access token. |
| Load | https://paybito-bc.yourdomain.com/load | Fired when a merchant opens the app in the control panel; validates the signed_payload_jwt. |
| Uninstall | https://paybito-bc.yourdomain.com/uninstall | Fired on removal; cleans up Script Manager tags and disables the store record. |
Required OAuth scopes
Configure these under the Technical tab:
| Scope area | Permission | Why it is needed |
|---|---|---|
| Content (Script Manager) | modify | Register and deregister the paybito-storefront.js script tag. |
| Checkout Content | modify | Mount the cart and the checkout redirection logic. |
| Orders | modify | Create and update BigCommerce orders when PayBito confirms a payment. |
| Products | read-only | Perform server-side price floor validation against the catalog. |
| Store Information | read-only | Retrieve the store domain, currency and storefront origin for PayBito validation. |
After saving the app configuration, copy the Client ID and Client Secret into your server's .env as BC_CLIENT_ID and BC_CLIENT_SECRET, then restart the PM2 process.
Maintenance & Troubleshooting
Monitoring logs
# Live application logs with timestamps
pm2 logs paybito-bigcommerce --lines 100

# CPU and memory usage across processes
pm2 monit

# Nginx access and error logs
sudo tail -f /var/log/nginx/error.log
sudo tail -f /var/log/nginx/access.log
Common issues
| Issue | Root cause | Resolution |
|---|---|---|
| OAuth 400: Missing code or context | The app was opened directly by URL instead of through BigCommerce. | Open it from inside the BigCommerce control panel: Apps → PayBito Pay. |
| Invalid signed payload signature | BC_CLIENT_SECRET does not match the secret in DevTools. | Correct it in .env and restart the PM2 process. |
| CartPricingError: Price tampering detected | The submitted unit price is below the BigCommerce catalog floor price. | Register promotional discounts in the BigCommerce catalog, or clear the browser cart cache. |
| PayBito validate failed (401 / 403) | The public key is invalid, or the storefront origin is not whitelisted. | Whitelist the domain in the PayBito portal and re-check the API key. See Domain Whitelisting. |
| Webhook not updating the BigCommerce order | Invalid webhook token, or the access token is missing the Orders: modify scope. | Re-save settings in the merchant dashboard to re-register the webhook, and verify the OAuth scopes in DevTools. |
Zero-downtime updates
To update a live instance without disrupting active shoppers:
cd /var/www/paybito-bigcommerce
git pull origin main
npm install
npm run build
npm run db:migrate
pm2 reload paybito-bigcommerce
Frequently Asked Questions
No. The app registers its storefront script through the BigCommerce Script Manager API and injects the Product Page button automatically. Uninstalling the app removes the script again.
Yes. When a payment confirms, the app creates a real BigCommerce order through the Orders API v2 with status Awaiting Fulfillment. The same payment also appears in the PayBito dashboard's Transactions view.
Yes. The two toggles in the Storefront & Cart Integration card are independent — enable either, both, or neither.
You are still using sandbox keys. Turn TEST MODE off in the PayBito portal, create a live API key, and replace the values in the settings screen. The banner disappears on live keys.
Your storefront looks completely normal until a customer tries to pay — then the PayBito validate call is rejected with a 401 or 403. Always finish setup with Test PayBito Connection.
It is encrypted with AES-256-CBC before it is stored and is never sent to a shopper's browser. Never share it by email or paste it into a support ticket.
Support
Stuck on any of this? Our integration team can help with installation, credentials, whitelisting and go-live checks.
Email support@paybito.com with your store address, your store hash and your Merchant ID — but never your Secret Key.